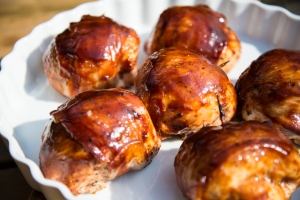
BBQ101 – Perfect, juicy smoked chicken breast filets (with bacon!)

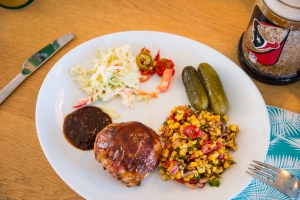
Tastes great with some grilled corn salsa, coleslaw and homemade bourbon-pickled jalapenos!

Tastes great with some grilled corn salsa, coleslaw and homemade bourbon-pickled jalapenos!

The last year I have had a personal focus on eating healthier and working out. Does that have to mean less BBQ? No, of course not. It means more BBQ. And one of the most protein-rich, low-fat foods you can put on your smoker is the chicken breast. However, due to the low fat content and the temperature levels you have to cook them to, they can easily end up being dry and bland. Some months ago I saw a (stupid) comment from someone about how you “had to” employ sous vide techniques to make a good chicken breast. Of course you don’t, as we all know EVERYTHING tastes better smoked or grilled (don’t get me started on the whole sous vide first and then smoke it debacle, it doesn’t even come close to real BBQ, and you know it). So I have experimented for a while, and believe now that I have found a very good (perfect?) way to make chicken breast! We will combine low and slow BBQ with the method known as the reverse sear, and some glazing in the end to achieve perfection while cooking outdoors. Let’s go!


What you will need for 6 filets:

  • 6 large chicken breast filets
  • 6 strips of quality dry smoked bacon
  • Some BBQ sauce for glazing (I like to use this one, but you can buy a good one too of course)

Serving suggestions:

  • I like to serve with some good coleslaw, maybe some grilled corn salsa (recipe to come later…) and some good homemade bourbon-pickled jalapenos. Some bratwurst is never a bad idea either!

Preparations (15 min):

  • Set up your grill or smoker for indirect cooking and try to stabilize grate temp at Chicken filets on the Primo Oval XL. Yum!around 100C/212F
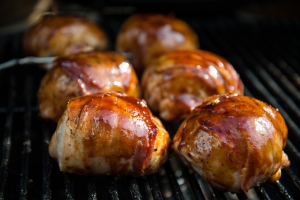
  • I like to rinse the filets under cold water and then pat them dry with kitchen towel. You can brine them too if you like that, but I don’t find it necessary using the method we will use
  • Season the filets. I use salt and pepper only for this, but you can use your favorite rub for more spiciness too if you like.
  • Once rinsed and dry, roll/fold the filets lengthwise into a ball that is uniform as possible. This together with low temperature smoking will aid in even cooking throughout, plus it looks cool. Wrap a strip of bacon (or two, cross-wise if you’re feeling like partying) around the filet, and use a small wood skewer to hold it all in place.
  • Chicken is now ready to go!

How to cook it (120-150 min):

  • Place your chicken balls safely on the cold side of your grill smoker. Throw some (cherry/apple) wood chips on if you like, I don’t find it necessary on my lovely Primo Oval XL, I get enough smokiness just from the lump charcoal I use. Either way go easy on the smoke, poultry is easily oversmoked.
  • Stick a thermometer probe in the largest one and keep an eye on the temperature throughout cooking. On around 100C/212F grate temp it usually takes a bout 90 minutes to get to the desires temp, which should be about 65C/149F (not safe for eating, but we are not done yet!)
  • Once the chicken has reached 65C/149F, take them off the grill, and get the temp up a bit. Heat up a grate over the coal side of the grill, because we will do some searing next
  • When the grate is nice and hot, get the chicken balls nicely seared on all sides. ThisChicken safe temp reached and resting commencing should bring them up to around 70C/158F.
  • Once searing is done move them over to the cold side of the grill again, and brush them with the BBQ sauce selected earlier. I normally have a grate temp of around 150C/300F at this point, try and keep it at that or lower, or the sugar in your BBQ sauce will burn and create bad flavors
  • Let the filets glaze for 5-10 minutes. At this point I check each one with my ThermaPen, to see if I have reached the safe temp for chicken (USDA says 165F/74C, and I agree)
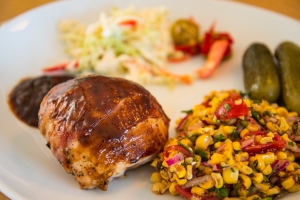
  • Winner winner. Chicken dinner.Once they reach the correct temp, take them off the grill and let them rest 5-10 minutes. Serve it up and enjoy the juiciest, most delicious smoky chicken filets you have ever eaten. Perfection!

Grilled duck breast with winter vegetables

Grilled duck breast with winter vegetablesDuck breast is my wife’s favorite dinner. I can only agree, it’s got that light gamy flavor, and the duck fat is widely known to be bacon’s only challenger in the world of fats. All the fat on a duck breast also makes it perfect for grilling – because fat takes up a lot of smoky flavors. This is a nice and quick weeknight or weekend dinner, nothing fancy – but man it tastes good!

Serving suggestion:
This time I served it straight up like this, just the duck and the vegetables, but adding a little red onion compote probably won’t get you a lot of complaints either – it goes perfect with duck meat. If you want a sauce a simple balsamic reduction works really well too.

Total time: 60 minutes
Skill level: Beginner/Intermediate
Grilling method/setup: 50/50
Grill temperature: About 170-200 degrees centigrade (340-400F)

You’re going to need:

  • Duck breast – one per person might be a bit too much, usually two filets is enough for 3 people
  • Some sweet potatoes and some parsnips
  • Lemon infused olive oil (or just mix up some lemon juice and olive oil)
  • Some lump charcoal or charcoal briquettes (make sure you get good ones with no chemicals and food starch as a binder)
  • 1 cup of wood smoking chips (I used cherry wood and it worked well. Pretty sure apple or hickory would work too, go read more about smoke wood here.)
  • An instant-read thermometer like a Thermapen, or a leave-in probe style thermometer

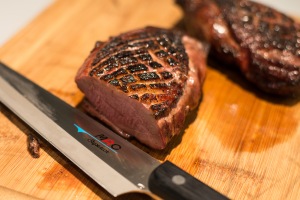
Perfect medium rare duck breast and crispy fat. Mmmm...How you do it:

  • Fire up your chimney starter full of briquettes or lumps of charcoal (this is basedon my 22.5″ Weber kettle, and your mileage and/or method may vary on other grills and smokers)
  • While the charcoal gets ready, score the fatty side of the duck breasts with a sharp knife. The goal is to increase the surface area of the fat to ensure crispy fat and ease rendering, so a fairly tight diamond/cube pattern is best. Make sure you don’t cut all the way through the fat and into the meat.
  • Peel and dice parsnips and sweet potatoes, and put them in a perforated grill pan (like this one for instance),on a griddle or even some foil. I highly recommend getting a perforated grill pan of sorts, it is a useful tool.
  • Once the charcoal is ready, fill up one half of the grill with the charcoal, and leave the other half to be the “cold/indirect” zone. Throw some cherry wood chips on the coals at once, because you want smoke going for real when you put the cold duck breasts on for the first time.
  • Here is a neat trick: Put the duck breasts on instantly when the coal is in place, on a cold grate. Starting the duck breasts carefully/slowly, renders a lot more of the fat off than going direct to high heat, and rendering is necessary for that crisp finish you want on the fat side. It also means fewer flame-ups later on. I usually leave them like this for 7-8 minutes, to let a bit of the fat melt off. If you put a drip pan underneath, you might even be able to catch some fat for use on the vegetables.
  • After rendering some fat off, put the duck on a plate off the grill while you grill vegetables, let it rest a while.
  • Using the vegetable grill pan, fry up the vegetables directly over the coalswith duck fat and/or olive oil, turning over often with a spatula so nothing gets burnt. Gloves are nice to have.Once the vegetable are nicely browned, move them to the indirect side and cook with lid on for 20-30 minutes, turning them over every 5-6 minutes to get even cooking. When they’re done I usually stash them in the kitchen oven on low to keep warm while I focus on the meat.
  • Winter vegetables waiting for the star of the showNow it’s time for the fun part, sear the duck breast properly on both sides over direct heat. Be aware, there will be flame-ups, especially when searing fat side down. Just move them around, burnt food is never tasty.
  • Once seared check the internal temp using a Thermapen or other instant read thermometer. I like my duck at 55C (131F) which is sort of medium rare. If you want medium go to 60C (140F). If the duck isn’t finished after searing, put it on the cold side, lid on, and let it have another short round before checking again.
  • Let the duck breasts rest for at least 7-@8 minutes before cutting them in thin slices and serving.
  • Enjoy!

Butterflied Chicken

Whole chickens are one of my favorite things to grill. They’re tasty, juicy, and here in Norway, cheap. A lot of people grill chicken breasts only, which I think is REAL boring. They don’t taste much unless you do a lot to them, and they dry out easily unless you brine them and do other secret tricks. A whole chicken is much more forgiving in terms of temperature, and much tastier too. Also, I am a leg man (I prefer the thighs with their juicy, darker meat). This recipe makes use of the butterflying technique which essentially lets you flatten the whole bird, making it easier to cook it evenly and shortening cooking time for those weeknight BBQs. I get my chicken thighs and legs, and there’s two nice chicken breasts for my wife and the kids. Everybody wins with whole chicken!

Time: 60-90 minutes total

Skill level: Easy
Grilling method: Direct/indirect
Grill temperature: About 200-250 degrees centigrade  (390-480F)
Equipment: Fish basket (optional), mesquite wood chips or chunks for smoke

You’ll need to get hold of:
A whole, raw chicken
Your favorite home-made BBQ rub (or a store-bought one)
Some hot chili sauce

How you do it:

  • Have a hot grill waiting (don’t you always?)
  • Prep the chicken; trim off unneccesary fat, cut out the backbone and remove wishbone (Great TVWB instruction video here). Finally rinse under cold water and dry with paper towels. I tend to use disposable vinyl gloves for this whole process. Always take extra care with hygiene and cleanliness when working with raw poultry!
  • Make yourself a simple wet rub/sauce mixture. I mix up my home-made rub-a-dub with some rapeseed oil and some hot asian chili sauce I buy from the local Turkish convenience store. Use what you have access to, but the goal is to end up with a nice sticky sauce that can be brushed on the chicken, and has the heat level you prefer
  • Once the sauce is ready, brush the chicken with it, make sure to get good coverage everywhere
  • (Optional) If you have time, cover the chicken in clingfilm and let it marinate in the fridge for some hours or even overnight
  • (Optional) When the grill is nice and hot and ready, you can put the chicken in a fish basket like on the above pic. It’s not necessary by any means, but it’s kind of a neat look, and i makes it a lot easier to flip the chicken during grilling. It also makes it stay nice and flat throughout the process, easing even cooking.
  • Grill it! I like to have a lot of mesquite smoke flavor on my chicken, so before I put it on the grill, I like to throw in some soaked mesquite chips on the coals. Once the smoke gets started, I grill the chicken over direct heat, 3-4 minutes on each side, to get a nice brown, crispy texture on it. If you get flame-ups (you will), then keep the lid on and it should be fine
  • Once the chicken is nicely browned, move it over to the indirect side of the grill and leave it there until it’s done, flipping and basting it with your wet rub every ten minutes.
  • How do you know when it’s done? There are tons of methods for this. Wiggling the thigh joint is one, you’ll find many others. I use a Thermapen (www.thermapen.com) and I recommend you also use that or some other thermometer. The good thing about a Thermapen style thermometer is that it’s fast and has a thinner probe. This means I can check the temperature in several places. It’s the only real way for an amateur chef to know when the temperature is just right.
  • I usually cook my chicken to 75 degrees centigrade (167F). Salmonella is not a big problem here in Norway, but I know it is in many countries, so follow your local recommendations here for safety
  • Always let the chicken rest, at least 10-15 minutes before cutting into it. It will be worth the wait.