Grilled pears and ice cream!

Grilled up pears are tasty!
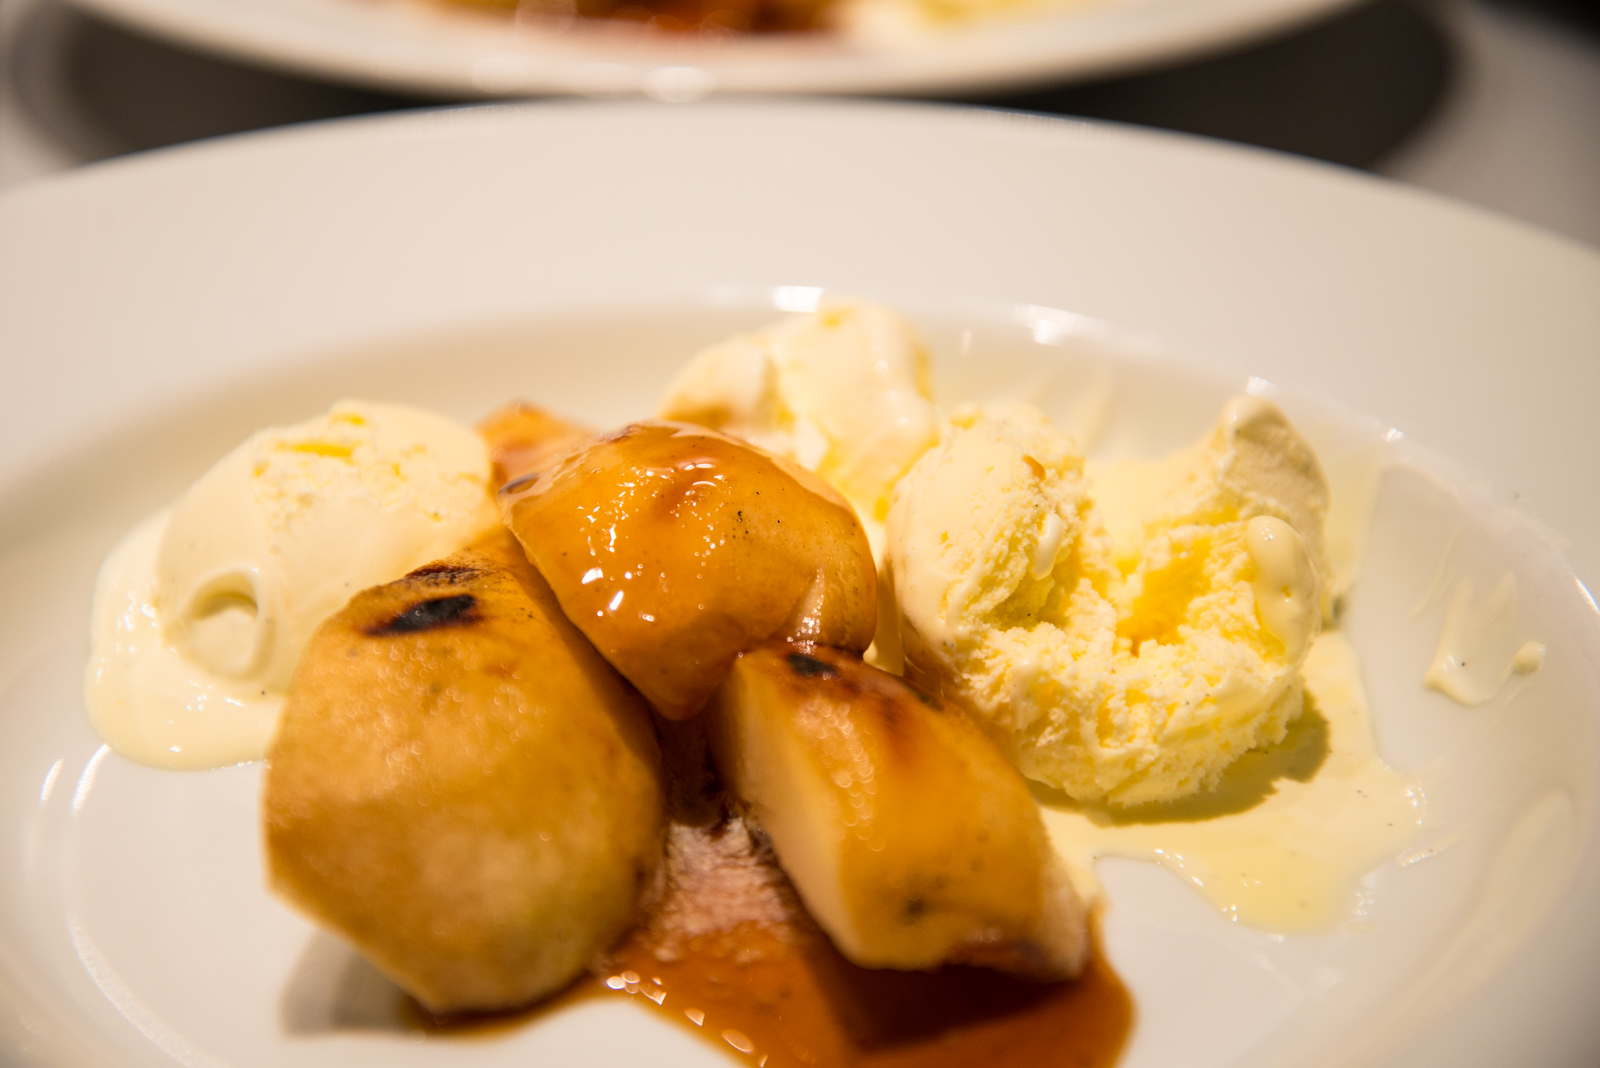
When it comes to dessert, I am usually not a fan. I just like dinner too much, so when that’s over all I am so full all I really want is some some quiet and a glass of good bourbon on the deck… Which I guess is why I go for dessert that are easy to make. This one was super easy, but the feedback from my dinner guests was awesome, so here – you can have it too. This dessert is very little work if you prep the glaze beforehand, which is perfect, because spending your time by the grill while everyone else is chilling after dinner is never fun!

What you need for 4 people:
4-6 pears, nice and ripe, but still firm
A box of quality vanilla ice cream
0.5 cup of good bourbon (I used Maker’s Mark)
A couple cinnamon sticks
1 tsp hot chili flakes, or more, depending
0.5 cup of 100% natural maple syrup
The juice from half a lemon
3-4 tbsp of brown sugar to taste

How to make the glaze (can be made ahead):

  • Put everything except the pears in a saucepan
  • Heat it slowly and let it simmer 10-15 minutes to reduce it
  • Optional but tasty: Caramelize the sugar. This can be hard without a candy thermometer, so you might need one. Just make sure you don’t burn the sugar, because that’s not tasty.
  • Remember, this stuff will thicken when cold. Try and get a thick syrupy consistency at room temp, that will make it easier when glazing time comes

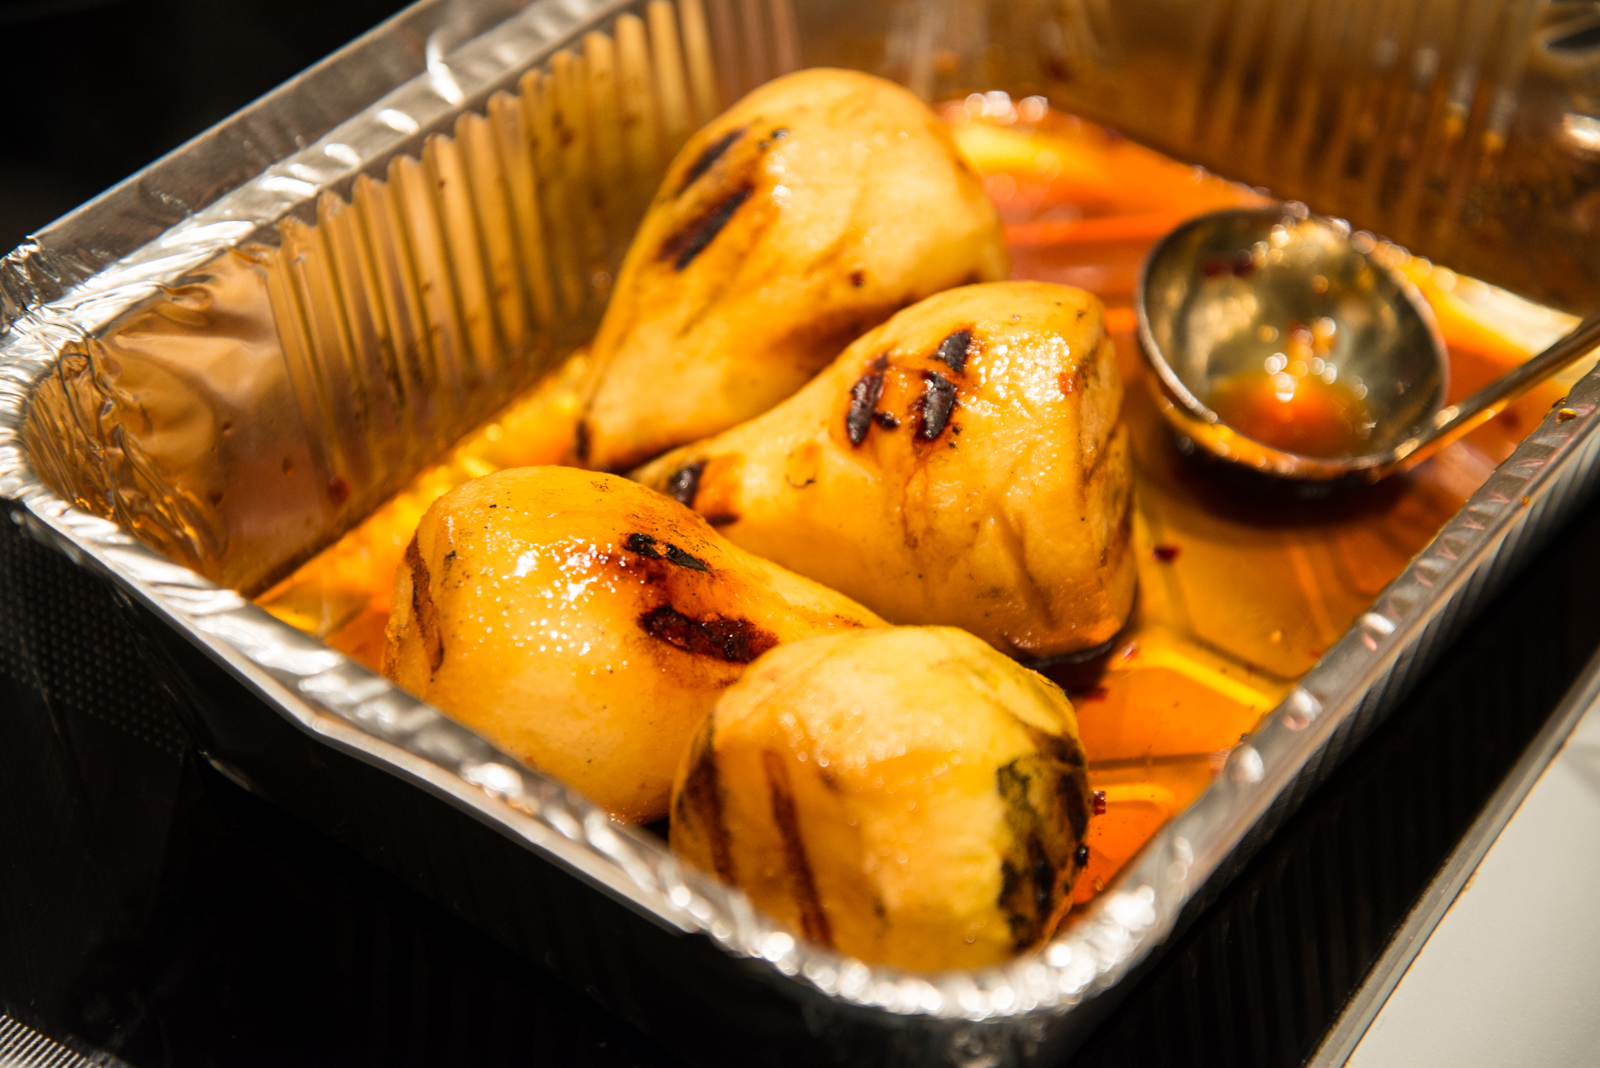
How to grill the pears:


  • I grilled my pears whole. That was not the best idea. What you should do and I willDSC_2047 next time; peel the pears and cut off the stem, quarter them so you can easily slice out the core
  • Grill them over direct heat first to get some beautiful sear marks
  • Place in a grill pan over indirect, pour/brush the glaze on. Turn and scoop some glaze over them every 10 minutes. I had a dome temp of about 150-160C (300-320F)
  • Mine were done after about half an hour. You want them to be soft but not mushy
  • Serve with some quality vanilla ice cream and pour the glaze over as a sauce. Tasty!
Advertisement

Grilled duck breast with winter vegetables

Grilled duck breast with winter vegetablesDuck breast is my wife’s favorite dinner. I can only agree, it’s got that light gamy flavor, and the duck fat is widely known to be bacon’s only challenger in the world of fats. All the fat on a duck breast also makes it perfect for grilling – because fat takes up a lot of smoky flavors. This is a nice and quick weeknight or weekend dinner, nothing fancy – but man it tastes good!

Serving suggestion:
This time I served it straight up like this, just the duck and the vegetables, but adding a little red onion compote probably won’t get you a lot of complaints either – it goes perfect with duck meat. If you want a sauce a simple balsamic reduction works really well too.

Total time: 60 minutes
Skill level: Beginner/Intermediate
Grilling method/setup: 50/50
Grill temperature: About 170-200 degrees centigrade (340-400F)

You’re going to need:

  • Duck breast – one per person might be a bit too much, usually two filets is enough for 3 people
  • Some sweet potatoes and some parsnips
  • Lemon infused olive oil (or just mix up some lemon juice and olive oil)
  • Some lump charcoal or charcoal briquettes (make sure you get good ones with no chemicals and food starch as a binder)
  • 1 cup of wood smoking chips (I used cherry wood and it worked well. Pretty sure apple or hickory would work too, go read more about smoke wood here.)
  • An instant-read thermometer like a Thermapen, or a leave-in probe style thermometer

Perfect medium rare duck breast and crispy fat. Mmmm...How you do it:

  • Fire up your chimney starter full of briquettes or lumps of charcoal (this is basedon my 22.5″ Weber kettle, and your mileage and/or method may vary on other grills and smokers)
  • While the charcoal gets ready, score the fatty side of the duck breasts with a sharp knife. The goal is to increase the surface area of the fat to ensure crispy fat and ease rendering, so a fairly tight diamond/cube pattern is best. Make sure you don’t cut all the way through the fat and into the meat.
  • Peel and dice parsnips and sweet potatoes, and put them in a perforated grill pan (like this one for instance),on a griddle or even some foil. I highly recommend getting a perforated grill pan of sorts, it is a useful tool.
  • Once the charcoal is ready, fill up one half of the grill with the charcoal, and leave the other half to be the “cold/indirect” zone. Throw some cherry wood chips on the coals at once, because you want smoke going for real when you put the cold duck breasts on for the first time.
  • Here is a neat trick: Put the duck breasts on instantly when the coal is in place, on a cold grate. Starting the duck breasts carefully/slowly, renders a lot more of the fat off than going direct to high heat, and rendering is necessary for that crisp finish you want on the fat side. It also means fewer flame-ups later on. I usually leave them like this for 7-8 minutes, to let a bit of the fat melt off. If you put a drip pan underneath, you might even be able to catch some fat for use on the vegetables.
  • After rendering some fat off, put the duck on a plate off the grill while you grill vegetables, let it rest a while.
  • Using the vegetable grill pan, fry up the vegetables directly over the coalswith duck fat and/or olive oil, turning over often with a spatula so nothing gets burnt. Gloves are nice to have.Once the vegetable are nicely browned, move them to the indirect side and cook with lid on for 20-30 minutes, turning them over every 5-6 minutes to get even cooking. When they’re done I usually stash them in the kitchen oven on low to keep warm while I focus on the meat.
  • Winter vegetables waiting for the star of the showNow it’s time for the fun part, sear the duck breast properly on both sides over direct heat. Be aware, there will be flame-ups, especially when searing fat side down. Just move them around, burnt food is never tasty.
  • Once seared check the internal temp using a Thermapen or other instant read thermometer. I like my duck at 55C (131F) which is sort of medium rare. If you want medium go to 60C (140F). If the duck isn’t finished after searing, put it on the cold side, lid on, and let it have another short round before checking again.
  • Let the duck breasts rest for at least 7-@8 minutes before cutting them in thin slices and serving.
  • Enjoy!

Quick and easy summer food- Mussels on the grill!

Delicious fruits of the sea taste even better straight from the grill.

Delicious fruits of the sea taste even better straight from the grill.

Don’t have a lot of time, so thinking about skipping the appetizer? Don’t do that, just get yourself a net of fresh mussels and grill’em up. Here’s how:

This is so easy, and it’s perfect for those times when you’ve set up for direct cooking the main course. How about some mussel and tenderloin surf and turf? Or, you could serve the mussels as a starter with some homemade buns and chipotle mayo. Me and my wife made them for dinner, with a side salad with some fresh spinach and chickpeas. Delicious.

Total time: 10 minutes

Skill level: Beginner
Grilling method: Direct
Grill temperature: High!

You’re going to need:

  • Fresh, live mussels
  • Whatever you want on the side

How you do it:

  • Set up your grill for direct cooking, and wait until it’s all nice and evenly hot
  • Throw the mussels on the direct heat! No prep, no seasonings, no smoke chips. They make their own smoky, salty flavor, and to me it’s just perfect.
  • As the mussels open up, take them off the grill and put them in a bowl. The ones that don’t open up a lot, or at all, need to be discarded, or you could get sick
  • Enjoy!

Lamb Chops grilled with Hickory and Rosemary smoke

Grilling and smoking lamb chops with rosemary and hickory smoke

Grilling and smoking lamb chops with rosemary and hickory smoke

There’s not much that can top some fresh young lamb for the grill. In this recipe we’ll pair it with some hickory and rosemary smoke, raw spring onions finely chopped and a delicious mint oil to go with your preferred side. Let’s roll!

What you need (to serve 4):

  • 2 racks of young lamb (3 if they’re small, and small is good here)
  • A fistful of fresh rosemary
  • A fistful of hickory wood chips
  • 6-8 spring onions
  • A cup of good olive oil of the extra virgin variety
  • A fistful of fresh mint
  • A Thermapen or similar instant-read thermometer is very useful for this one

How to make the mint oil (can be made a few days ahead, and should at least be made the night before for max flavor):

  • Finely chop the fresh mint
  • Combine with a pinch of good sea salt and about a cup of quality olive oil in a mortar, and crush away
  • Pour into a jar and leave it in the fridge overnight or for a couple days to let the oil take the flavor

How to grill the lamb:

  • Get your firestarter going, fill it up to the top with coals. For this you want the 50/50 setup so you can sear the chops on one side of the grill, and then move them over to the other side for finishing
  • Once your grill is nice and hot, might be a good time to dump some yams on there for a side dish, my recipe for ember-roasted yams is great with the mint oil.
  • Slice a nice little diamond pattern in the fatty parts of the rack, making sure not to Lil' lamb chops - all ready to go go goslice into the meat. This is to help the fat render, and to help with the crispiness of the skin. Important!
  • Cut your lamb racks into “chops” in the order of two bones on each. Doing one boned chops is possible, but you’re going to need your grill to get REALLY hot to pull that off – so let’s go with two. It’s a handy compromise
  • Season the chops with salt & pepper
  • Once your yams (if youre doing those) are done and out of the way, get the grill real hot (you want the grate to be so hot it whitens for this one), and chuck in the rosemary and hickory chips right on the coals.
  • The smoke will start fairly instantly, so get your chops on there (I usually do fatty side down first), and put the lid on for about a minute. Repeat for all sides so you get a good sear all round.
  • When you’re done searing, move the chops to the “cold side” of the grill, and take their temp. Continue to do so until they’re all done (I usually go with 56C/132F, nice and pink in the middle, tastes great!)
  • Give the chops a five minute rest while you finely chop some spring onion
  • Serve on warm plates, with abovementioned yams sprinkled with mint oil and spring onion
  • Enjoy!

BBQ Viking Sliders with caramelized onions

Sliders, homemade chipotle mayo, shakey taters and caramelized onions

These sliders are tasty, juicy (even when you have to cook them through), and are real popular with the kids. They’re easy to make too, and require only a quick sear on the grill. You could always buy some slider buns, but I really suggets making your own, see my recipe for buns here. I realize some of you are going to find it extremely controversial that I put bread in my sliders. Don’t knock it till you’ve tried it. I mean it. If you grind your own beef, and have a hot enough grill to get a sear on these while they’re still pink in the middle, you can skip the bread. But I often have to use storebought ground beef, and that means it has to be cooked all the way through. That’s where the bread comes in, by soaking up the juices and fat, it makes these sliders a real, juicy treat.

Time: 60 minutes total
Skill level: Easy
Grilling method: Direct
Grill temperature: About 250 degrees centigrade  (480F)
Equipment: Hickory wood chips for smoke

Serve with:
Homemade chipotle mayo
Homemade slider buns
Shakey potatoes (recipe to come)

Sliders and Texas style BBQ sauce

You’ll need to get hold of:
Ground beef, about 500 grams makes about 15 sliders
2 slices of bread
4 tbsp of your favorite, preferrable homemade, BBQ sauce. I used Rocket Fuelled Bull BBQ Sauce
Some meltable cheese (I prefer orange cheddar)
2 large yellow onions
2 tbsp butter

How you do it:

  • Have a hot grill waiting, for this I just cover the whole grill grate in white hot coals
  • Slice your onions the way you want them, and caramelize them in a frying pan with the butter, some salt and pepper, and about a tbsp of sugar, on low heat for 30-45 minutes. You can do this the night before, store in the fridge and just reheat.
  • Cut away the crust from your two slices of bread, and let it soak in cold water for ten minutes. After soaking, squeeze all the water out of it
  • Mix the ground beef carefully with the BBQ sauce, the bread and liberal amounts of salt and pepper
  • Form the slider patties. Remember to make them flatter and larger-diameter than you want to be finished product to be, because they will change size when they’re being grilled. Each patty should be about 33 grams
  • Get a good hickory smoke going on the grill before starting grilling, I use water-soaked chips for this to maximize smoke, since they’re only on there a couple of minutes.
  • Put them on the grill. About 2-3 minutes should be enough, flip them, put the cheese on the finished side, and give them another 2-3 minutes. Serve!