BBQ 101 – Smoked leg of lamb

DSC_1977
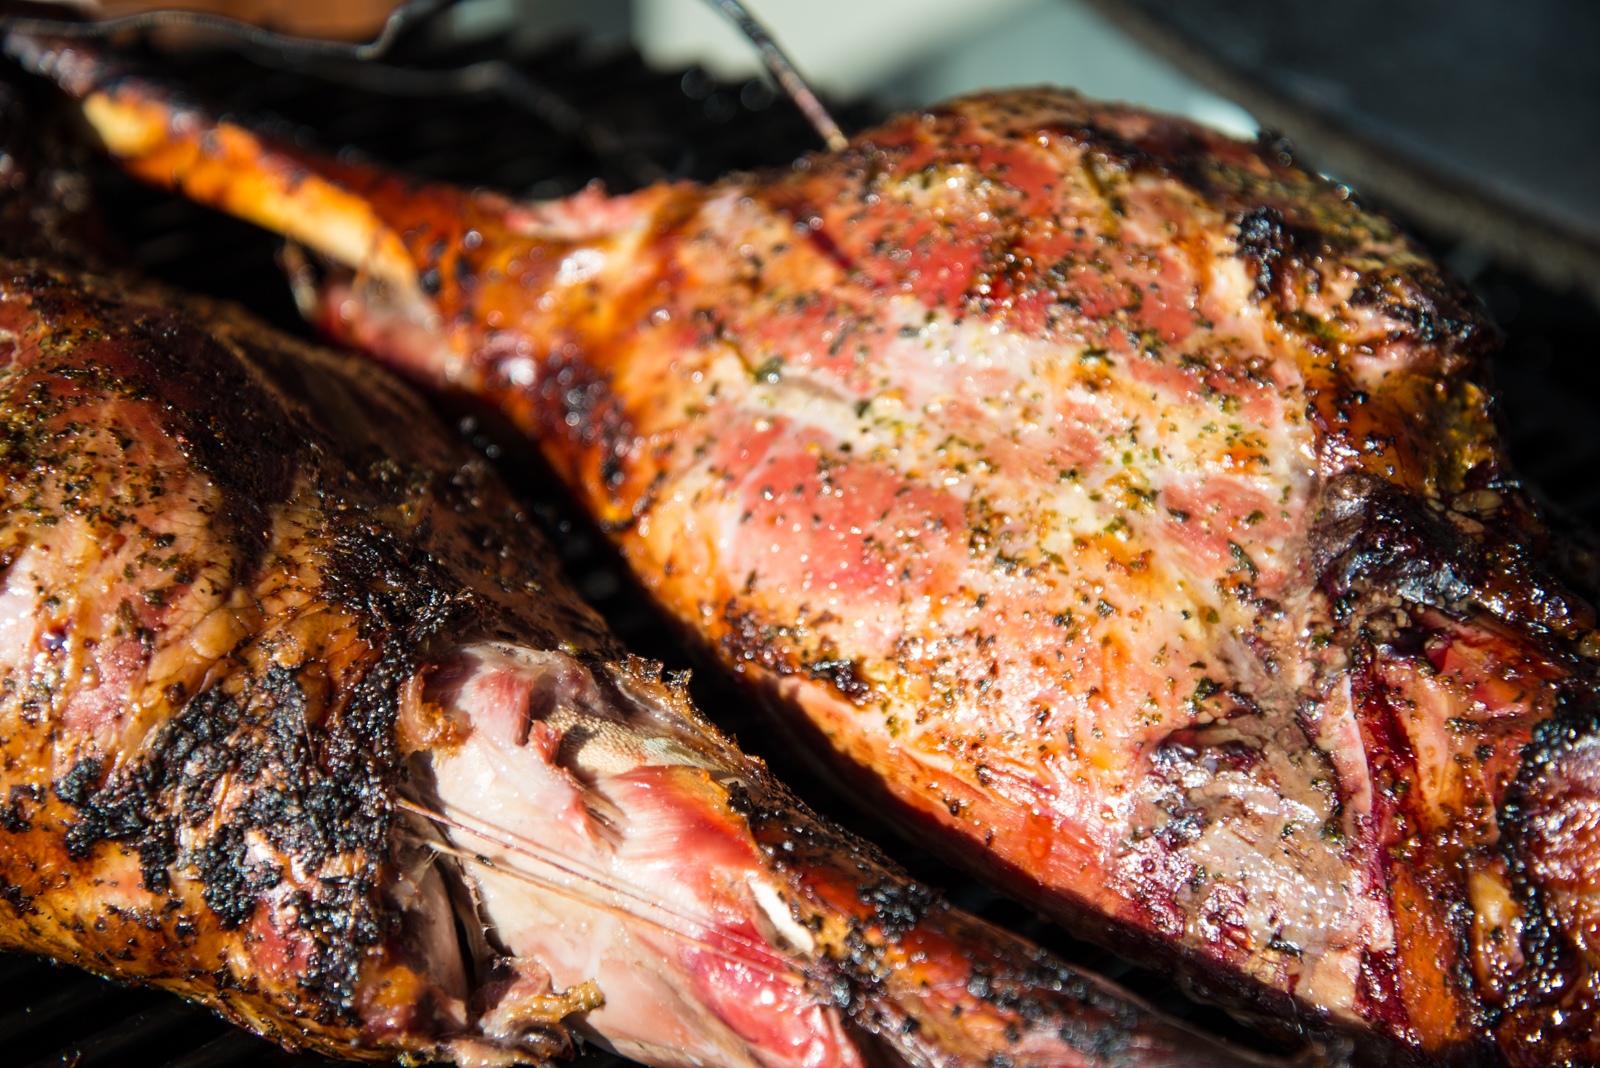
Lamb season is fast approaching here in Norway, and bone-in leg of lamb is my favorite. I know boneless is just as good, and butterflied is much quicker, but nothing beats the visual impact of a big chunk of meat with the bone still in it for me. Maybe it’s my Nordic genes, or maybe it’s the caveman or woman in all of us wanting some satisfaction? Anyhow, I will use bone-in for this recipe, it’s just more fun that way, plus the bone-in version has to great other features: Firstly, a nice handle for turning the meat in the form of a bone, secondly a litttle chef’s snack muscle towards to thin end of the bone. So there, bone-in wins for me, every time. Note: I have to excuse the lack of a photo of the plated food in this post, but sometimes the food is so good and I am so hungry that I forget. So enjoy a ton of pics of the lamb on the grill instead…. 😀
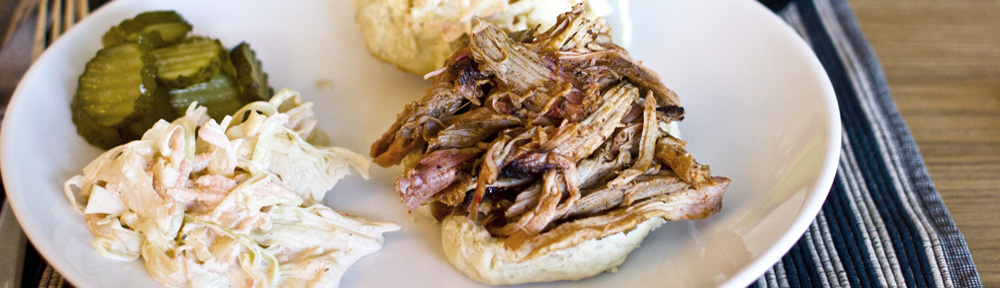
Serving suggestion:
I like to serve leg of lamb spiced in the mediterranean way, with an aubergine purée, some red onion compote and some freshly grilled greens. You can make a sauce too from the drippings.

2014-03-28 19.53.49-1Total time: 5-8 hours, marinating the day before if you want to
Skill level: Beginner/Intermediate
Grilling method: Indirect, one-zone
Grill temperature: About 110-120 degrees centigrade (230-250F), or even lowe if you can manage

You’re going to need:

  • A leg of lamb per four people should be about right, depending on how big they are
  • Rosemary, lots of rosemary
  • Garlic, lots of garlic
  • A lemon
  • Honey
  • Mustard, a homemade one is of course best
  • Good olive oil
  • Cayenne pepper

How you do it the day before:

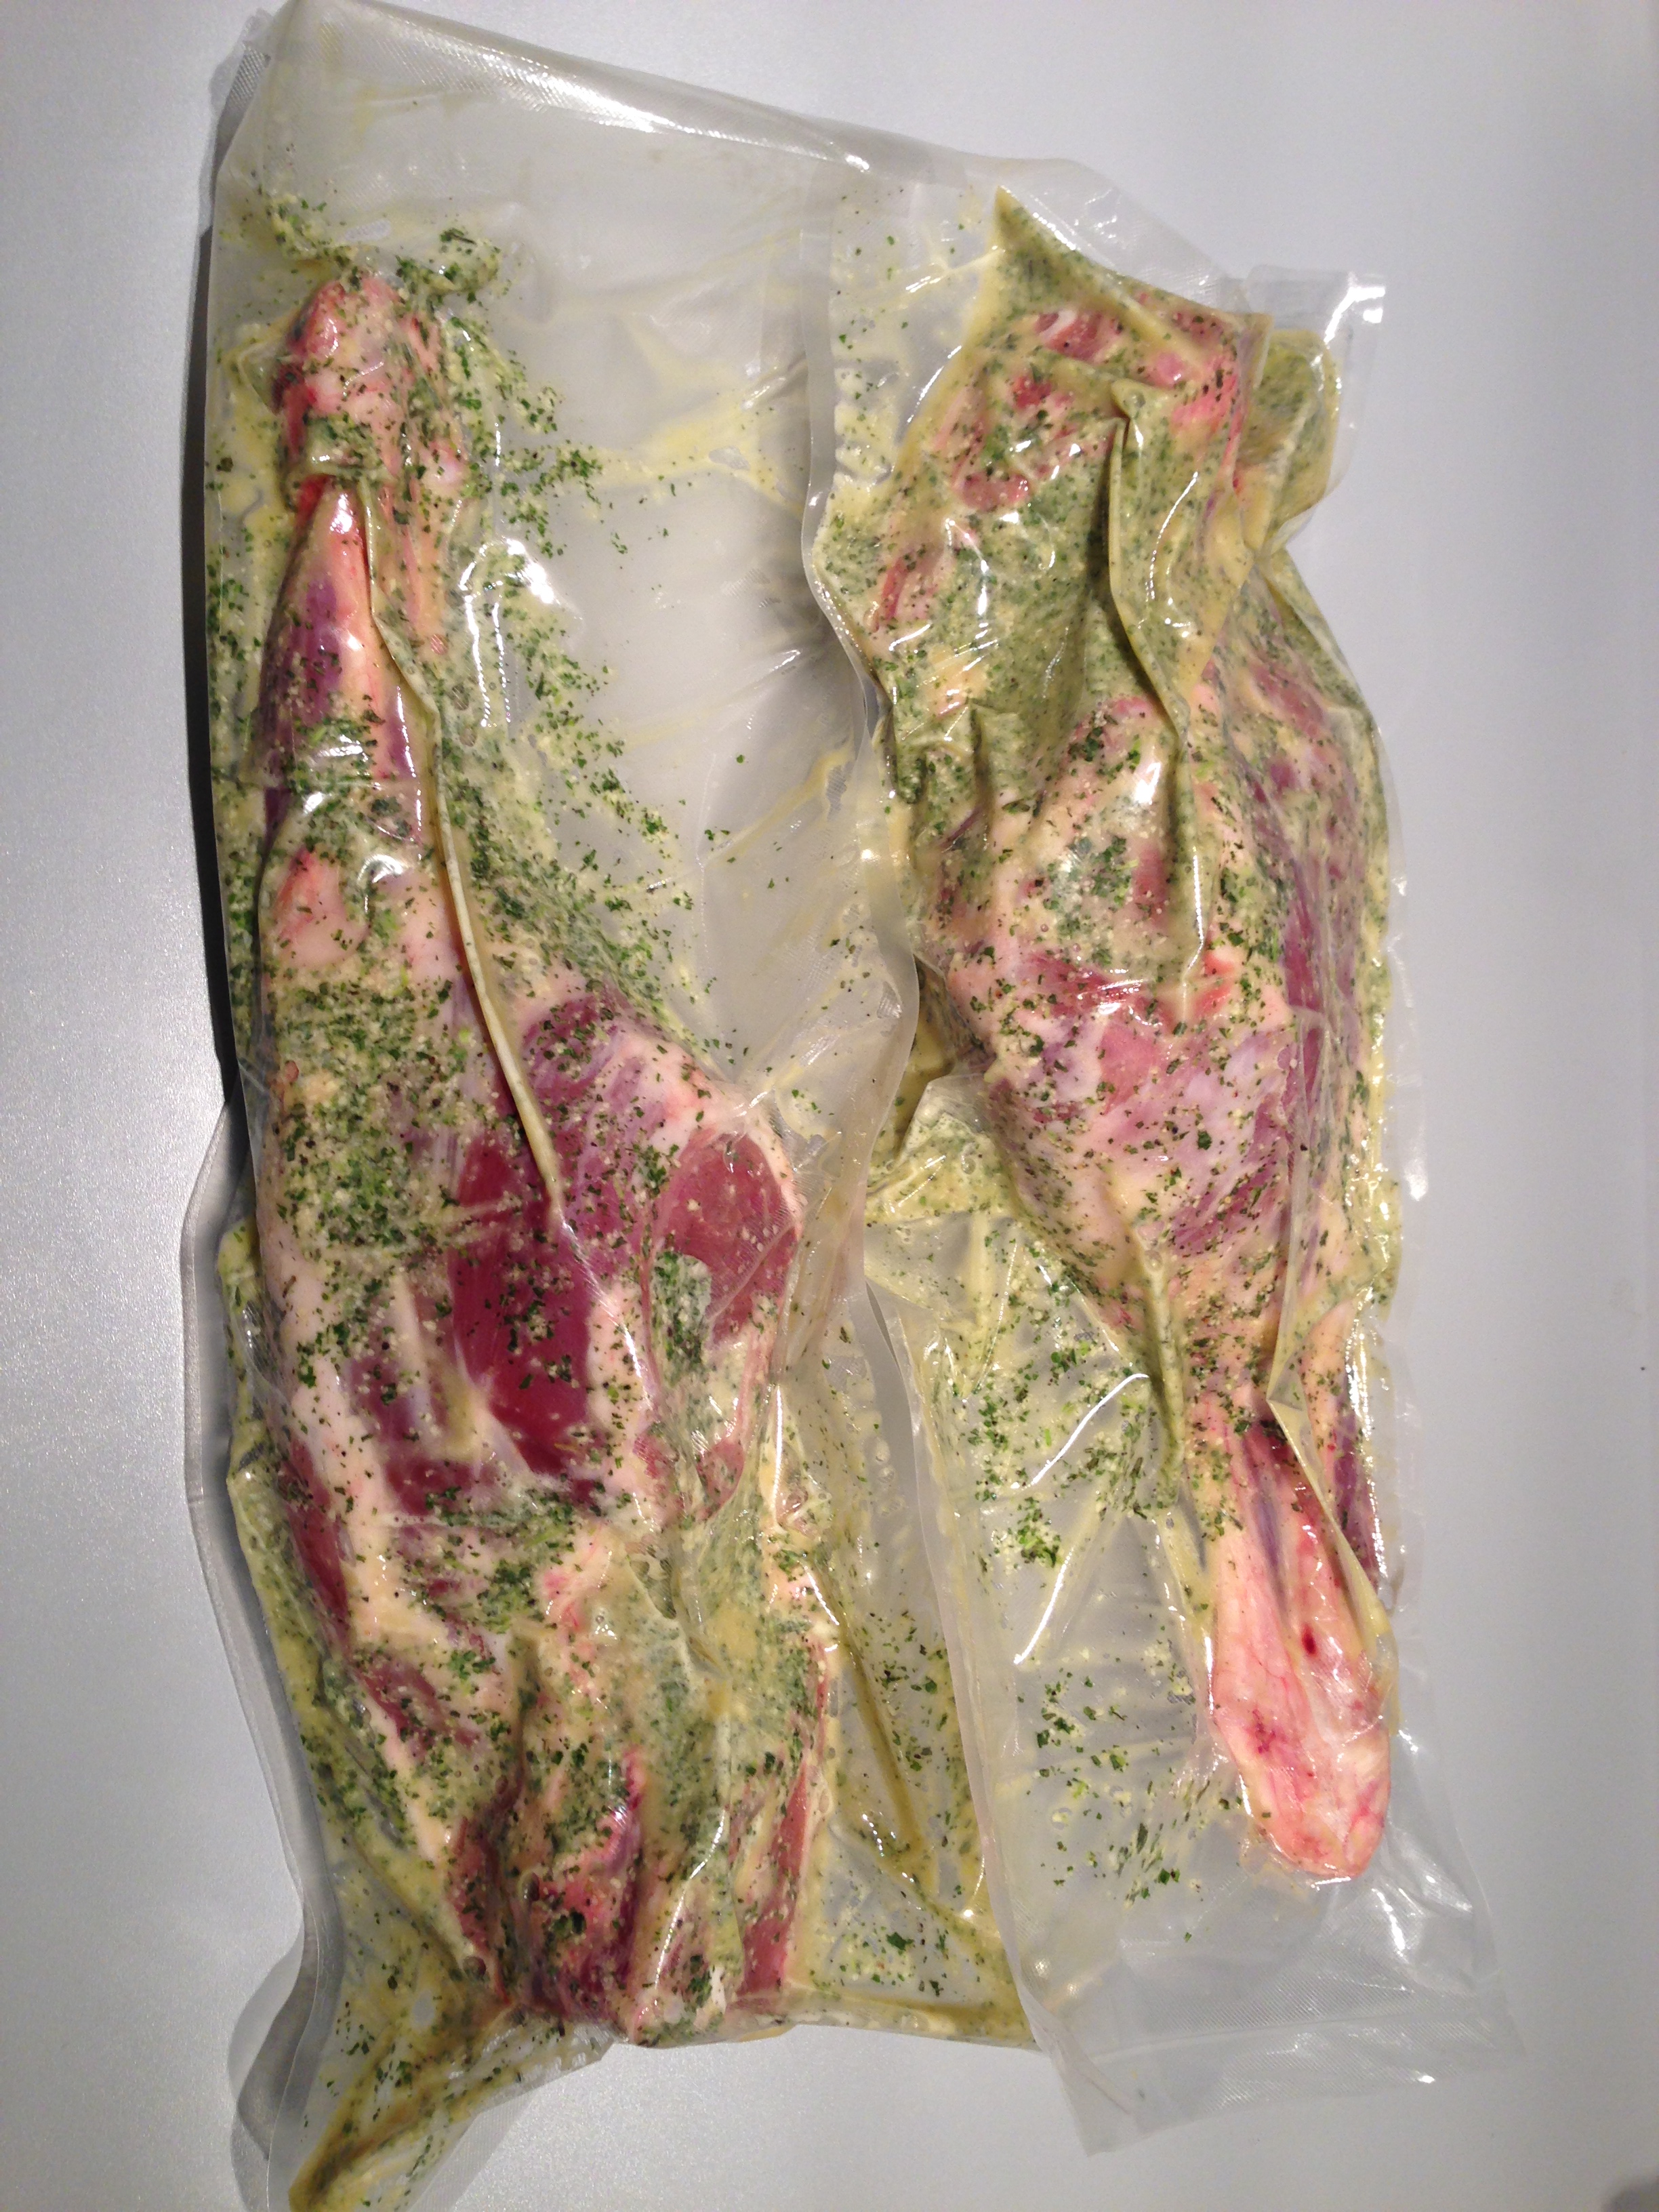
  • If you want to marinate the meat, you should start the day before. Mix up lemon, rosemary, honey, lots of crushed garlic, some mustard and a good olive oil in a blender. Add salt and pepper to taste, and some cayenne pepper if you want some heat (I always do)
  • If you’re lucky enough to have one of those fancy vacuum machines like I do, throw the leg in a bag with the marinade and vacuum it up, leaving it in the fridge overnight. If not, use a plastic bag, and try to cover it well in the marinade before wrapping it up and putting in the fridge.

DSC_1981How you do it on BBQ day:

  • Fire up your grill, and set it up for
  •  indirect, low and slow cooking with some coals on one side, and place for the met on the other. If you want to make sauce, you’re going to need a drip pan to put under the meat to catch drippings
  • If you didn’t marinate the night before, go up a couple steps, make the marinade mix and get the meat slathered in that stuff before you put the meat on the grill. If you did, take the meat out of the bag, but save up the marinade leftovers for later.
  • Remember to get the smoke going before putting the meat on. I like to mix rosemary branches with hickory for lamb smoking.
  • Add some water to your drip pan. Not a lot, this is just to keep the drippings from burning, remember you will make that into a sauce later.
  • Add a temperature probe to the meatiest part of the leg, and add another one to the grill grate to monitor grill temperature. You don’t have a two-probe style wireless thermometer yet you say? Go and get yourself one. I have been using the Maverick ET-732 for a couple years, and it works quite well.
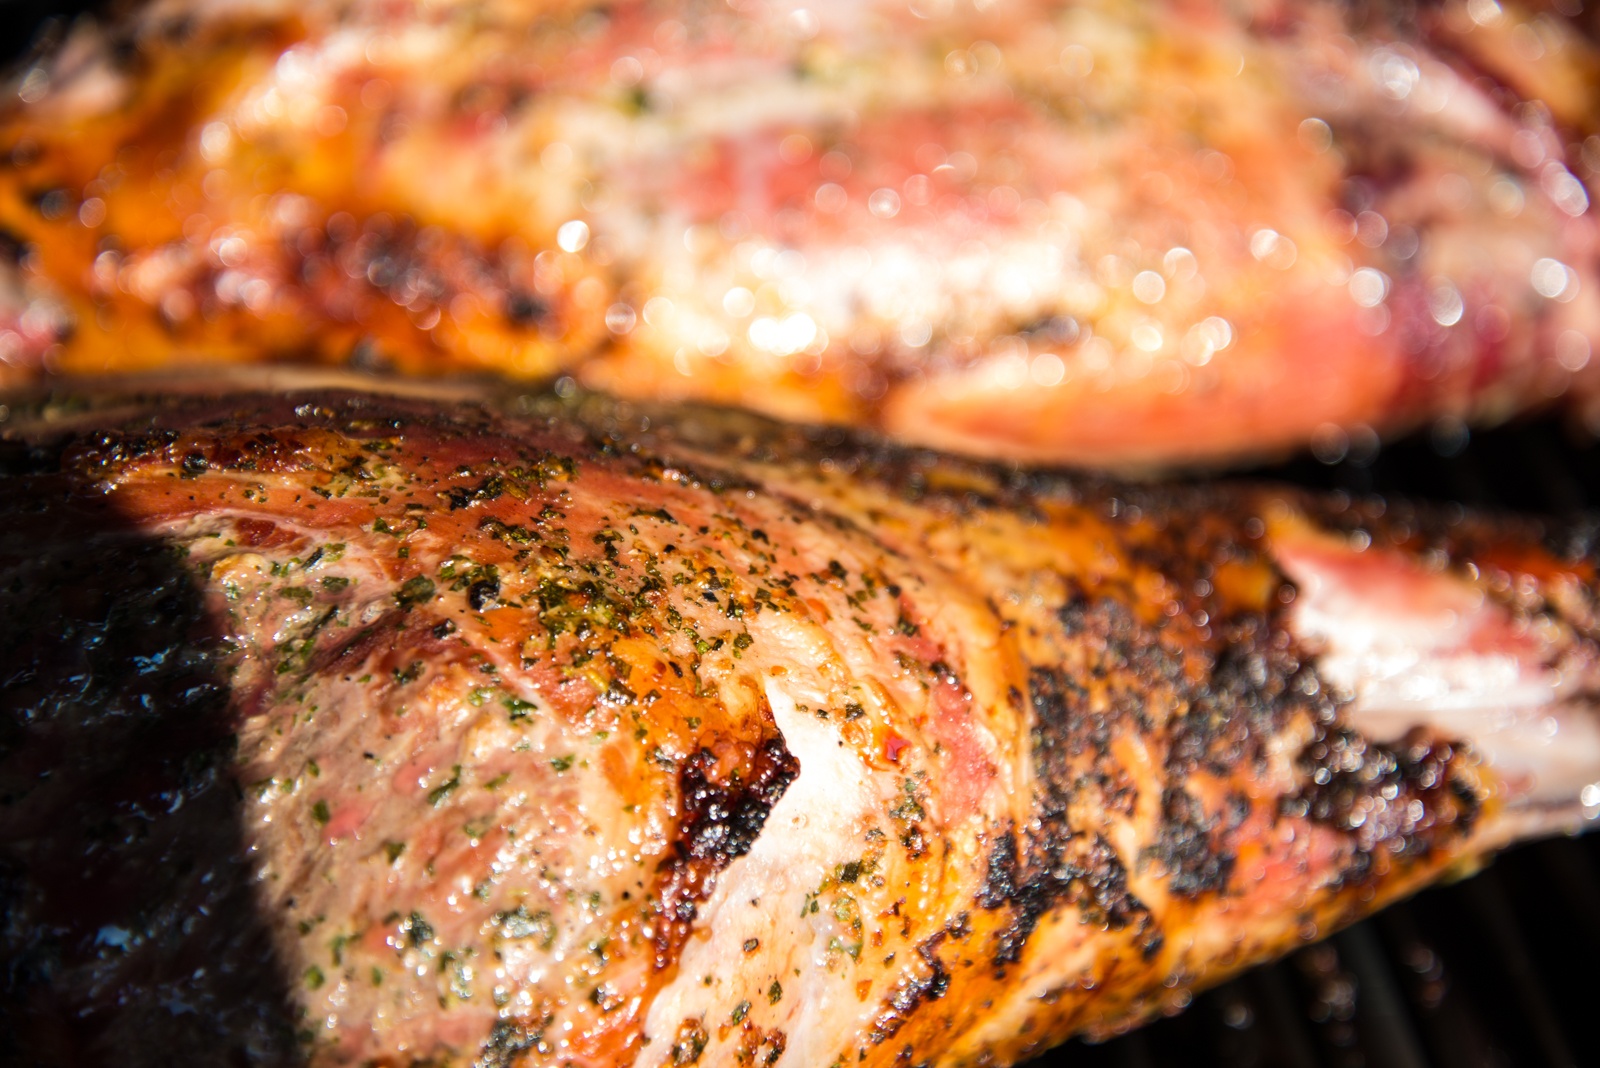
  • Keep the grill low and slow for hours, keeping an eye on meat and grill temp. Add aRoasted aubergine. Not quite done yet. cup of water to the drip pan if it runs out, and add coals if you need to (I don’t anymore thanks to my lovely new Primo Oval XL)
  • Once the meat reaches an internal temperature of exactly 68C (155F), take it off the grill, wrap it in a double layer of aluminium foil, and wrap that in a plastic bag, then a couple towels. Ideally you want to rest the leg for at least one hour, but if you’re done well ahead of dinner, resting it for 2-3 or even 4 hours is not a problem at all.
  • Take out the drip pan, put the sauce in a pot, and make a delicious sauce. Adding some red wine, salt and pepper to taste and reducing until you have the desired consistency is a good idea. If the sauce is too sharp, some honey might be able to help you out.
  • While you wait for the guest to arrive, you can make the sides, like aubergine purée and some red onion compote
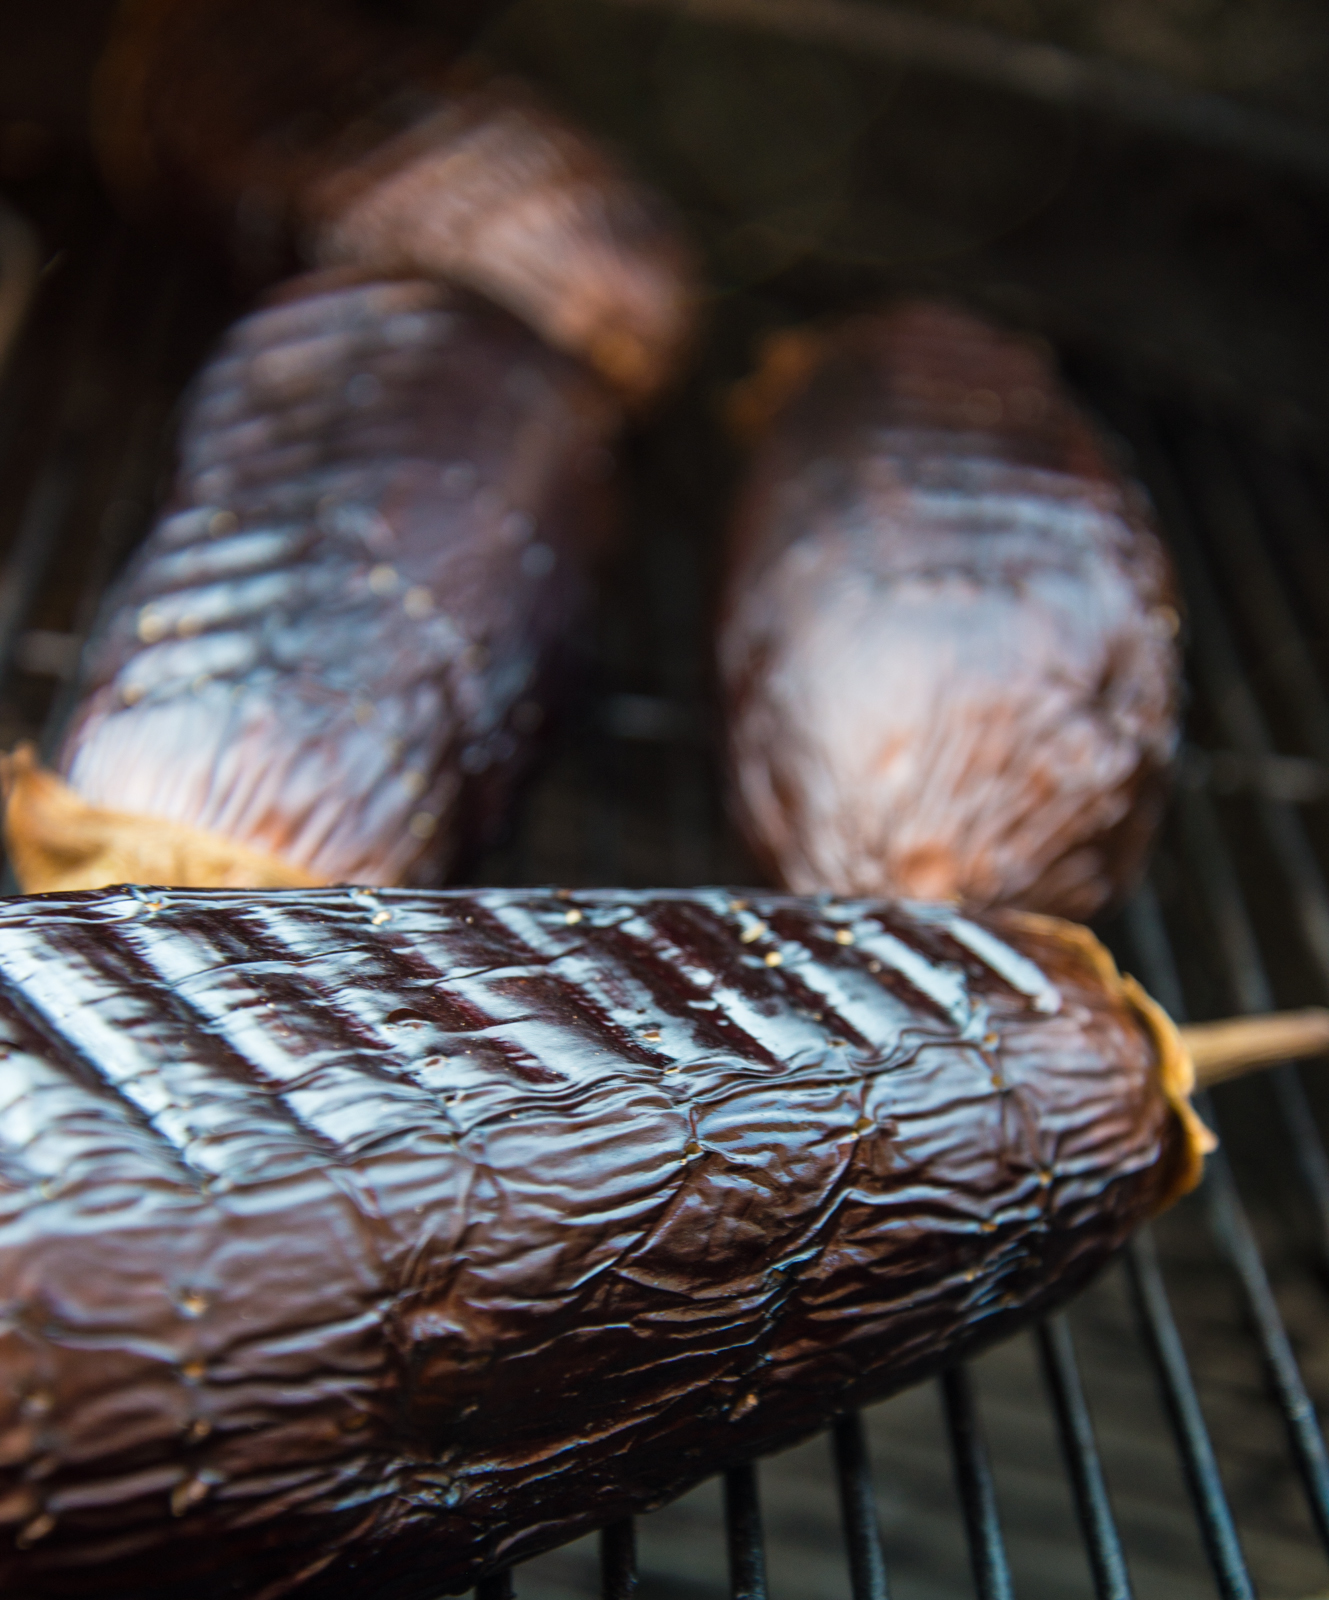
  • When you are about ready to serve, fire the grill up for direct cooking at a temp of about 150-160C (300-320F), brush the leg with any marinade leftovers, and finish the leg off over direct heat. The goal here is to get a nice sear before serving, and crisping up the outside.
  • Let the lamb rest for 5-10 minutes again, while you grill up some fresh spring oninon and/or asparagus. Serve and enjoy!DSC_1988

Quick tip: Build a two storey Weber kettle

20130531_140135
Quick technique tip this time. I had a challenge couple weeks ago, was doing a bunch of low & slow stuff for my wife’s birthday. For about 40+ guests. Now, I only have one standard sized Weber kettle (and a Go-Anywhere, which isn’t really great for low & slow), so I figured I’d try and improvise. This is what I came up with, using the heightener ring from the rotisserie kit, an extra grate I always keep handy, some steel string, and an upside down beer can chicken holder.

20130531_140039
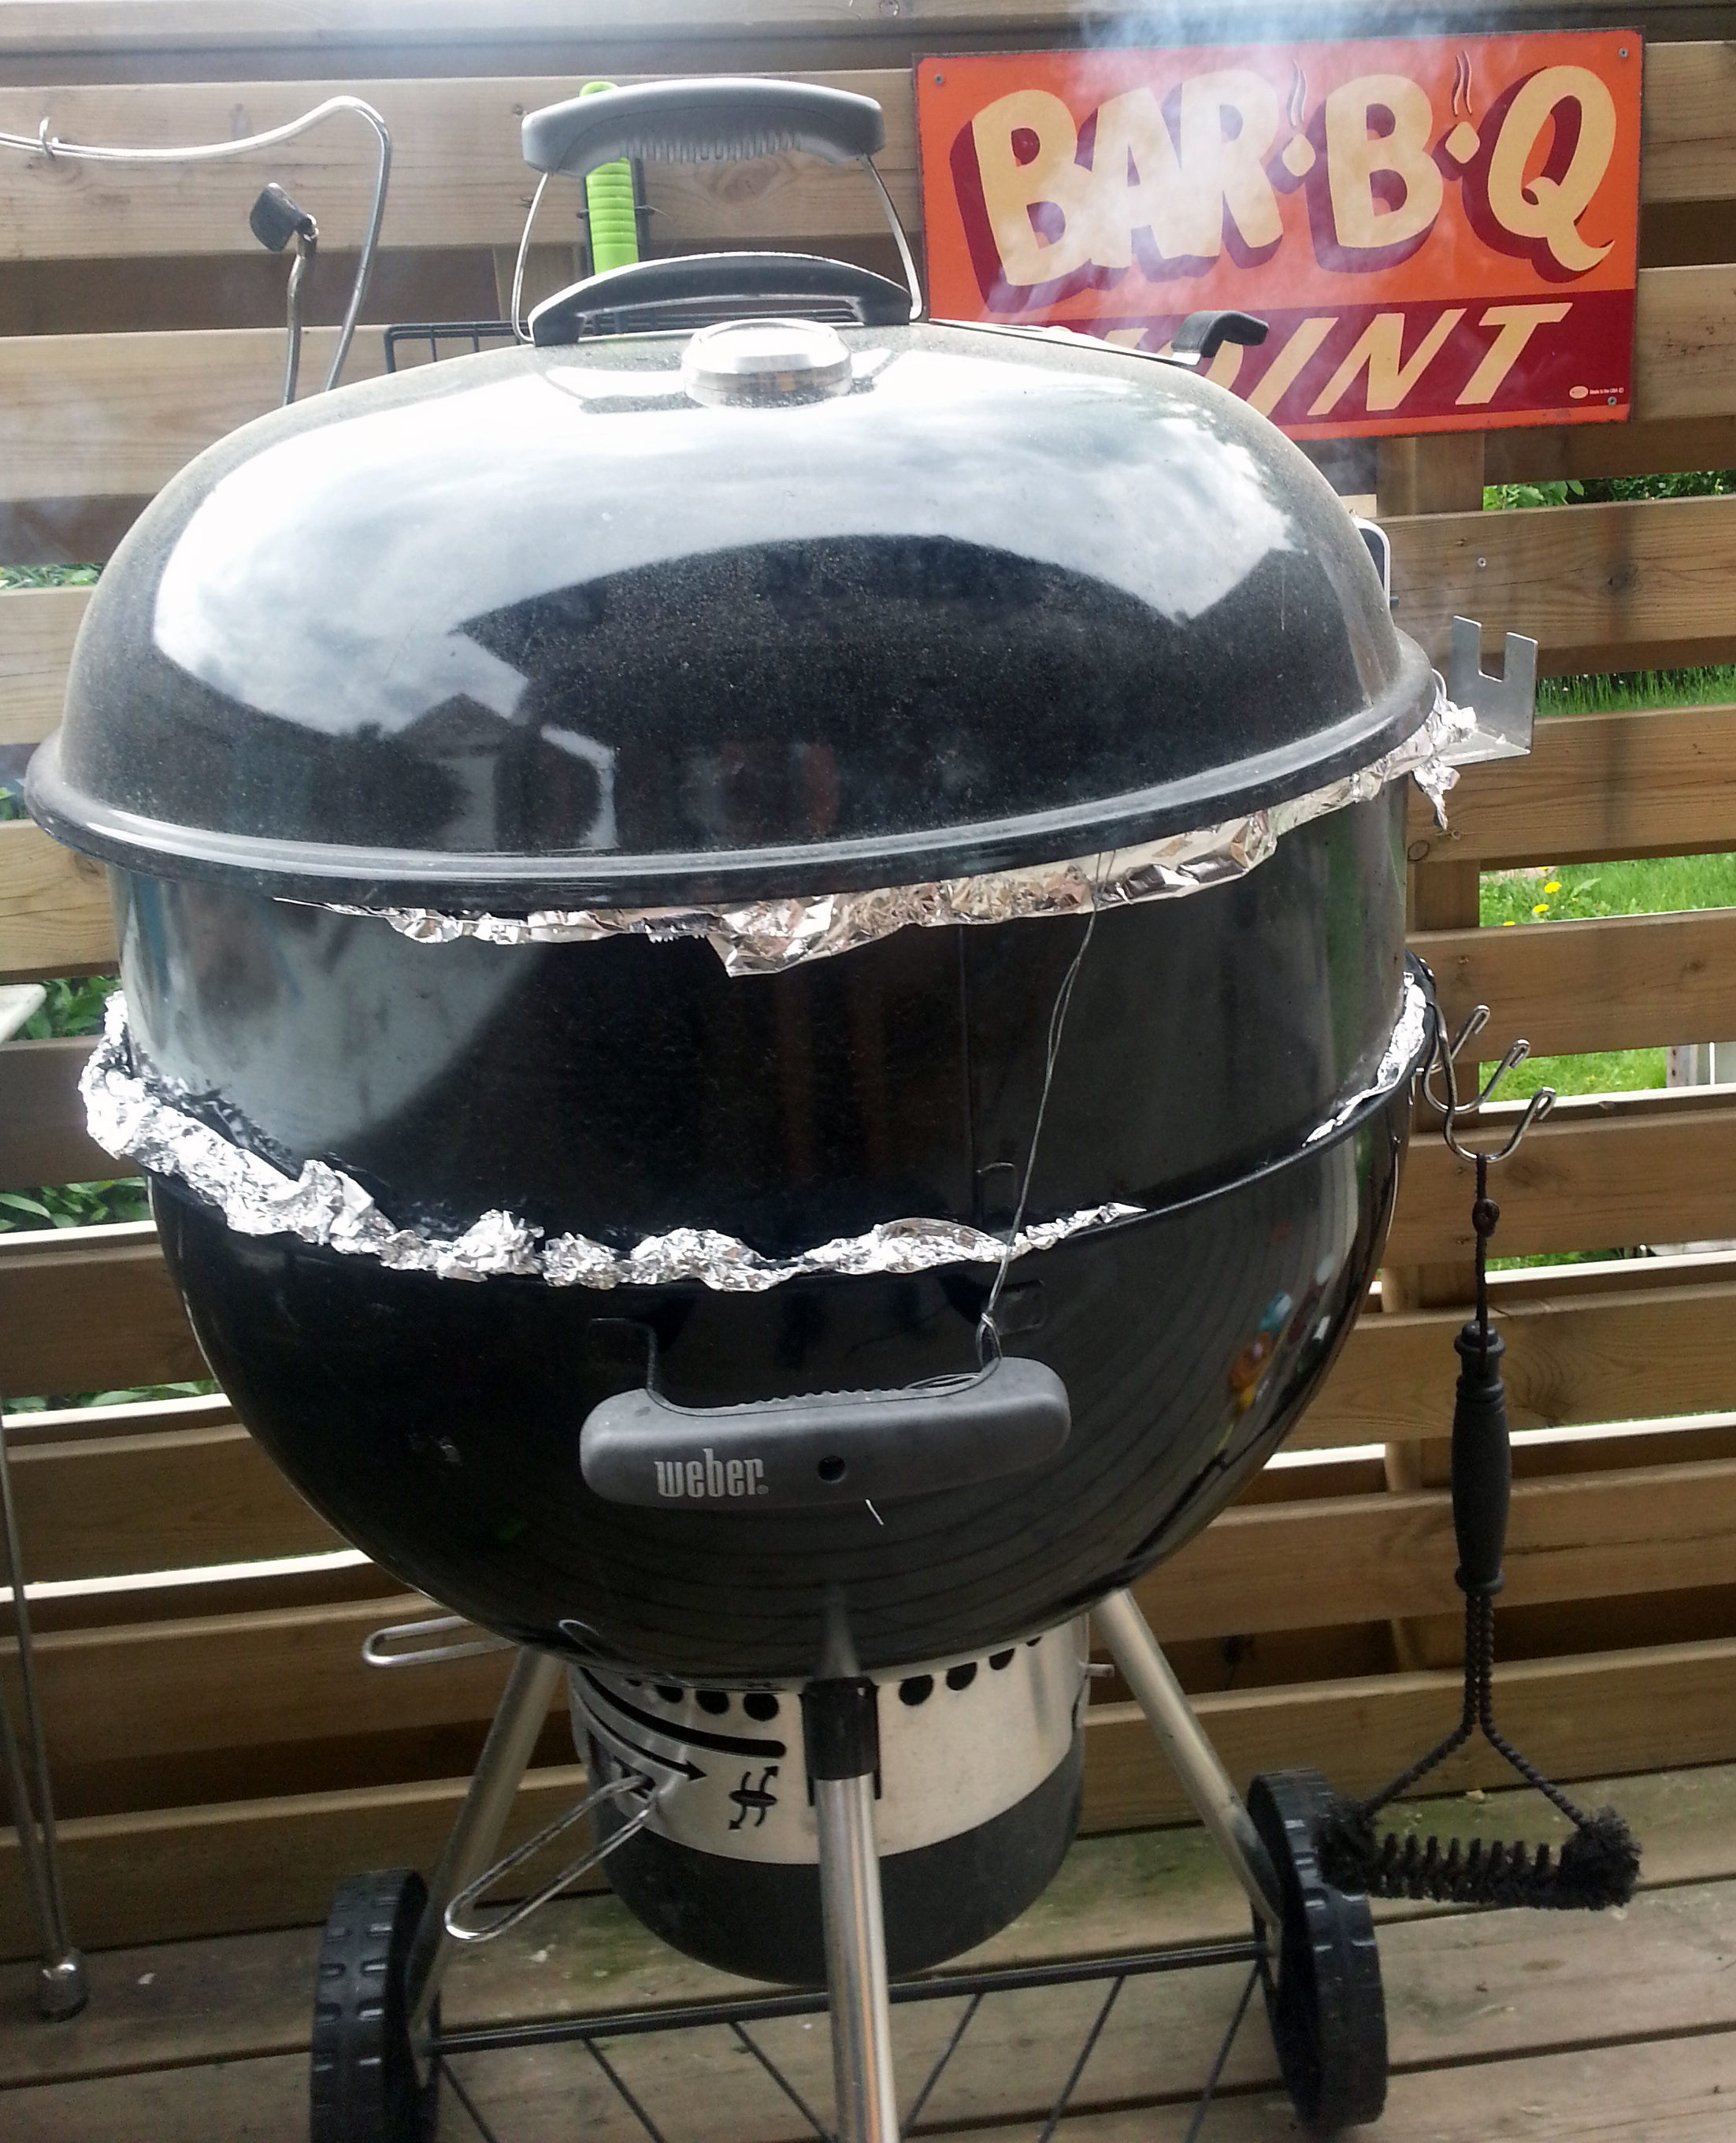
This worked great, the rig helg up for the 12+ hours I needed for the cook, so all is well. The moral of the story is: Keep some stuff floating around your yard/house/apartment. It could come in handy someday. Also; keep extra rolls of tinfoil. Everywhere.
2013-05-31 20.10.56

ABT’s with hot chorizo and vegetable filling

ABT’s are great as an appetizer or side dish if you’re cooking something low & slow and have some extra space on your grill. Why they’re called atomic bomb turds, I do not know. It’s kind of a weird name for a food item, but there ya go. That’s what it means. You can use all kinds of stuff to put into the chillies, but in this recipe I went for a simple filling with some vegetables, cream cheese and hot chorizo sausage. I also used some good pancetta instead of the traditional bacon to wrap them, but you can use either, and it will be fantastically good. The union of hot chillies, bacon and tons of apple smoke is a tasty one indeed. Just make sure you make enough of them, I’d say 3-4 per person as a minimum for a starter.

Prep time: 10-15 minutes
Time on the grill: 90-120 minutes
Grilling method: Indirect, with smoke
Grilling temperature: 130 Centigrade lid temp (266F)

What you need:
5 Largish peppers of your choosing. I found some large chillies at my local market
10 strips of good bacon or pancetta
Some cream cheese, I used Philadelphia with much success
A little bit of hot chorizo sausage
A little yellow onion
One green pepper
Two mushrooms
Some toothpicks (not the ones with mint flavor…)

How you do it:

  • Slice your chillies lengthwise, and deseed them
  • Mix cream cheese with some finely chopped mushroom, green pepper and onion. You can use almost anything in here, I’m sure shrimp or crab meat would be good, different cheeses, have fun with it and experiment
  • Spread a thick layer of the cheese mix in each chilli half
  • Wrap each chilli half in bacon or pancetta, use toothpicks to secure the bacon if it doesn’t work out without them
  • Put them on the indirect side of your grill and smoke them using apple or cherry wood for 90-120 minutes
  • Enjoy, and watch out for any heart attack symptoms

BBQ 101 – Pulled Pork

Homemade coleslaw and pulled pork sandwich. Ah yeh…

Pork butt is a fantastic piece of meat. It’s quite a tough cut, with a lot of collagen (and fat), which makes it perfect for low and slow BBQ. If you can’t get pork butt where you live, you can try a boned-out ham. However, the best cut for this is the pork butt which is essentially the upper part of the pork shoulder ham cut, here in Norway not a regular cut, but when I tell my butcher I want the upper part of the ham, basically the shoulder-blade, with all the meat and fat on it, I get the right thing. Keeping the bone in there helps the meat become more juicy because the bones contains gelatine, so I always get bone-in when I can. Gives you that lip-smacking goodness feel you get from good ribs. Guess that’s why gelatine is used a lot for making candy, huh… That goes for any meat – bone-in = better. Talk to your butcher and show him some charts and google images, and I’m sure you’ll get it right. Now, to get a historical fact out of the way, they’re not called butts because they’re from the butt (because they’re from the shoulder end of the pig really..), but because this cut was stored in special barrels known as butts, in the olden days. Read more on Wikipedia.

Pork butts ready for pullin’

This is not a good place to start for the novice griller, but if you think you’ve got indirect grilling and temperature control on your kettle or smoker down, you should try it. Pork butt is some of the best eats to ever come out of a BBQ, and it’s a cheap cut, which enables you to feed tons of people for little money. Time for a party, in other words. Let’s get to it.

Serving suggestion:
I serve this dish in a very traditional manner, on homemade hamburger buns, with a creamy coleslaw, a basic Eastern North Carolina style vinegar sauce, and some pickled gherkins. Don’t make it complicated, the meat should be the star.

Total time: 10-14 hours (prep starts the day before)
Skill level: Intermediate/Expert
Grilling method: Indirect, one-zone (some coals on one side, large drip pan filled with water under the meat)
Grill temperature: About 120-140 degrees centigrade (250-285F)

You’re going to need:

  • Time, I usually start around 6-7 AM when I do this and we eat around 7-8 PM. A great excuse to drink beer and “mind the bbq” all day, in other words. Kinda like fishing or golf in that regard (dads will know what I mean…)
  • 2 pork butts (I always make two, because that’s what I have room for on my kettle. Pulled pork freezes well, so if I have leftovers, that just means my wife is going to be happy for the next few weeks eating pulled pork sandwiches..)
  • 1 cup of your favourite all-round spice rub
  • Some yellow American mustard (to be used as a glue)
  • 1-2 bags of charcoal briquettes (make sure you get good ones with no chemicals and food starch as a binder)
  • 4-5 cups of wood smoking chips (I like to mix hickory and some mesquite for pulled pork, read more about smoke wood here. Apple wood is also great)
  • A notebook and a pen, for taking notes during the process
  • An instant-read thermometer like a Thermapen, or a leave-in probe style thermometer

Pork butt, rubbed and ready to go

How you do it, the night before:

  • Prep should ideally start the day before. Cut the skin off the butts unless your butcher did it, but leave a good thick layer of fat on the meat
  • Lay out some lengths of plastic wrap on your workspace, and put a pork butt on there. Put a thin layer of yellow mustard on it, and apply generous amounts of spice rub all around it. I use about 0.5 cup for each butt
  • Wrap in several layers of plastic wrap, and repeat.
  • I store my butts overnight in the fridge. It’s (almost) always a good idea to room temper your meat before it goes on the grill, as long as you’re able to do it in a safe, hygienic manner. However, if you want to maximize your smoke penetration and smoke ring size, you should go straight from the fridge on this one. Experienced BBQ’ers tell me the smoke ring only happens when the meat is below 60 degrees centigrade (140F)

How you do it, cooking day:

  • Taking notes is paramount if you want to learn

    Fire up your chimney starter with 20 briquettes (this is based on my 22.5″ Weber kettle, and your mileage and/or method may vary on other grills and smokers)

  • In the meantime, put a briquette basket on one side of the grill only, and a big water pan covering the whole middle part of the grill. Why water you say? The mass of water (I use a stainless steel pan from Ikea that holds about 4-5 liters or one US gallon) helps me maintain a steady temperature inside the kettle, because water stores (in this case) heat pretty well. It also helps the meat retain its moisture during the long cook by increasing the general moisture in the cooking environment.
  • When your briquettes are white hot, put them in the briquette basket you put on the one side of the grill.
  • Put two smokebombs (a handful of soaked wood chips wrapped in aluminium foil) on the briquettes. Putting them out towards the edge of the fire makes them last longer. Wait 5-10 minutes until they start smoking. Replace these as often as you please once they are smoked out. This is especially important the first 4 hours, after that the meat won’t really soak up the smoky flavours anymore.
  • Put the grate on, pork butts on the grate away from the fire, and put the lid on
  • Next is 10-12 hours of temperature watch. You should try to adjust your temperature using only the bottom vent(s) on your grill. The top one should stay at least 50% open. If you close the top one too much, you can get a soot buildup, which will not taste nice.
  • Eventually, usually after 4-6 hours you may run into something BBQ’ers call “the stall” – The temp of the pork butt will stabilize or plateau at about 68-70 degrees C (154-158F) – sometimes it will even drop a little. This can go on for hours and really f up your dinner schedule. Read up on the stall in this great article, it’s got useful, common sense information you need to be aware of if you do low and slow.
  • A lot can be said on how to do this on a kettle style grill, but it should be possible. However, there are a lot of factors that come into play when doing a long cook on a kettle or smoke. Wind. Rain. Sun. Shade. Air temperature. Humidity. Which is what makes this fun, and exciting, and a skill that is learned from experience.
  • If it gets too hot, I take my tongs and dump a briquette or two right in the water pan. You can take them out too of course, just don’t put them on your wooden deck…
  • If it gets too cold, you might need more briquettes. I put in 6-8 unlit briquettes every hour when I do this. If you get a strange dip in temp and really need to knock it up quickly, you can use unsoaked wood chips or chunks, or you can put on some lump charcoal which burns a lot hotter than briquettes. Just be patient and don’t overdo it.
  • I will not go on in lengths on all the different ways to get there, you shold keep a log of times, kettle lid temp and meat temp, so you’ll have something to learn from for your next cook. The important part is to have fun, and reach a target temp of about 87-90 degrees centigrade (that’s 190-195F). The other important part, is to get there slowly.
  • If you get to the target temp too early, don’t worry. Wrap the meat in aluminium foil, and a couple of kitchen towels, and put it all in a cooler, and it will stay warm enough for hours.
  • When you’re ready to serve, it’s time to pull the pork. If you did everything right, it

    Two butts, a ham and a cow chest

    should be easily pullable by hand. Here’s a neat tip, get some thin carpenter’s gloves from your local hardware store, and buy some vinyl gloves one size up at the supermarket. Put the builder’s gloves on first and then the vinyl gloves (duh!), and you will be able to pull two pork butts without burning off your fingers (I’ve tried, not fun). If it’s not easy to pull by hand, you took it off the grill prematurely. Don’t worry, use a knife to assist you, it should still taste great. If it does not taste great, you have failed, and consequently brought shame upon your house and family.

  • Once all the pork is pulled, drench it in the North Carolina style vinegar sauce, and serve. Enjoy the taste of a fantastic dish, knowing it tastes even better for you, because you’ve been outside working the BBQ all day. NICE!

Techniques : Grill setups for direct, indirect and rotisserie grilling

So, I get some questions on how I do different things on the grill, among other things how to keep a steady low temperature for low and slow BBQ on the standard Weber kettle. I have made the attached drawings to help me explain this better. Feel free to print and use this diagram as a reference, but don’t steal it and use it on your own webpage without asking me first, it took me some work to make it. Take a look at the diagram first, and below I will explain the different setups and what I use them for.

Grill setups for direct, indirect and rotisserie grilling

Okay, let’s start top left:

    • Indirect, two-sides: I use this when making roasts and other large pieces of meat. It’s good for a medium-low temperature, but can also go up to medium-high, just make the fire mounds on both sides bigger. I use this type of setup for instance for Whole, Smokegrilled Trout
    • Indirect/direct 50/50: This is perhaps my most used setup. It can go from medium to high heat, and it’s very versatile. You can grill indirect sides on the right side and have heat for searing meat and other thing on the left side. You have large safety/resting zone too, if you have larger piece of meat you want to sear first and then finish indirectly. I use this type of setup for instance in my Smokegrilled Mackerel recipe
    • Indirect/direct pile: This can be a good setup if you need a quick sear on something and then need to rest it a while after. I can see that it would be useful for thick t-bone steaks, for instance. You can also start with this for searing a roast or similar large piece, and then rake it out to both sides after for a long indirect cook.
    • Ring of fire: Haven’t experimented much with this one either. I can tell you I put it in there mostly for the name. I guess it could be good for indirectly grilling a very large piece of meat, it would give you a more even heat than some of the other options
    • Indirect, one-sided (low and slow!): I use this method for two things. Firstly,I use it when doing beef short ribs and pulled pork, in 12-16 hour sessions. I will then use a very minimal amount of briquettes, all on one side, 12-20 briquettes at a time, depending on the weather outside, and I use a large steel drip pan filled with about 4 litres (a gallon) of water in the middle of the grill. The purpose of the water is primarily to store heat and help me keep the temperature stable, but it also makes for a moist environment inside the grill. Adjust temperature using the bottom vent only, always leave top vent open. The second thing I use this for is rotisserie grilling chickens, ducks and other things. I will then use charcoal normally, and much more of it. No problem getting to 200-250 degrees centigrade (390-480F) with one big pile up against the side wall
    • Direct, all: I’ve only used this setup for one thing, but for that it’s very useful. We were having a big party, and I used the kettle for making a ton of chicken wings (only the small, outer wing part). For that, it was ingenious. A thin layer of coals over meant I could do 30-40 wings at a time on the grill as they needed no indirect grilling, only a good sear. Very efficient for making lots of sliders too I would imagine
    • Direct/indirect, two-zone fire: This is really a lot like the 50/50 setup, just with a smaller safety zone. Use when you need more sear space and less resting area.
    • Direct/indirect, three-zone fire: This is the most complicated setup. On the left 1/3rd of the grill there is a thick layer of coals for very high heat, the middle third has a thinner layer, and then there’s a safety zone to the right for resting. It’s just another option that might suit you depending what combination of food you’re grilling.

Yeah, that was a lot wasn’t it? I primarily use only 2-3 of these regularly, but it’s always good to know your options. Some common things to remember; always put a drip tray under your meat/fish when grilling indirect, you don’t want all the fat to drip and stick to the bottom part of your kettle. Another important point, when you set up, try to keep your coals away from the handles when you can. It will just be easier if you need to move the grill around during cooking if the handle sides don’t get too hot.