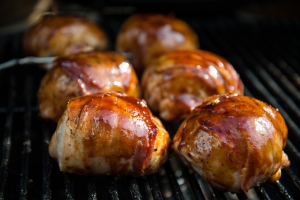
BBQ101 – Perfect, juicy smoked chicken breast filets (with bacon!)

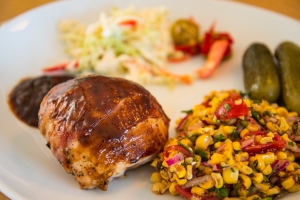
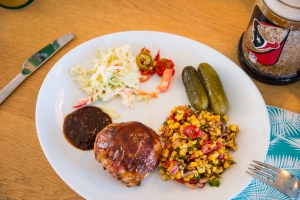
Tastes great with some grilled corn salsa, coleslaw and homemade bourbon-pickled jalapenos!

Tastes great with some grilled corn salsa, coleslaw and homemade bourbon-pickled jalapenos!

The last year I have had a personal focus on eating healthier and working out. Does that have to mean less BBQ? No, of course not. It means more BBQ. And one of the most protein-rich, low-fat foods you can put on your smoker is the chicken breast. However, due to the low fat content and the temperature levels you have to cook them to, they can easily end up being dry and bland. Some months ago I saw a (stupid) comment from someone about how you “had to” employ sous vide techniques to make a good chicken breast. Of course you don’t, as we all know EVERYTHING tastes better smoked or grilled (don’t get me started on the whole sous vide first and then smoke it debacle, it doesn’t even come close to real BBQ, and you know it). So I have experimented for a while, and believe now that I have found a very good (perfect?) way to make chicken breast! We will combine low and slow BBQ with the method known as the reverse sear, and some glazing in the end to achieve perfection while cooking outdoors. Let’s go!


What you will need for 6 filets:

  • 6 large chicken breast filets
  • 6 strips of quality dry smoked bacon
  • Some BBQ sauce for glazing (I like to use this one, but you can buy a good one too of course)

Serving suggestions:

  • I like to serve with some good coleslaw, maybe some grilled corn salsa (recipe to come later…) and some good homemade bourbon-pickled jalapenos. Some bratwurst is never a bad idea either!

Preparations (15 min):

  • Set up your grill or smoker for indirect cooking and try to stabilize grate temp at Chicken filets on the Primo Oval XL. Yum!around 100C/212F
  • I like to rinse the filets under cold water and then pat them dry with kitchen towel. You can brine them too if you like that, but I don’t find it necessary using the method we will use
  • Season the filets. I use salt and pepper only for this, but you can use your favorite rub for more spiciness too if you like.
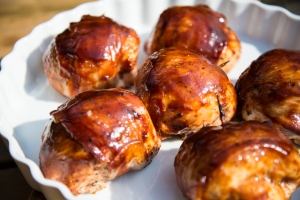
  • Once rinsed and dry, roll/fold the filets lengthwise into a ball that is uniform as possible. This together with low temperature smoking will aid in even cooking throughout, plus it looks cool. Wrap a strip of bacon (or two, cross-wise if you’re feeling like partying) around the filet, and use a small wood skewer to hold it all in place.
  • Chicken is now ready to go!

How to cook it (120-150 min):

  • Place your chicken balls safely on the cold side of your grill smoker. Throw some (cherry/apple) wood chips on if you like, I don’t find it necessary on my lovely Primo Oval XL, I get enough smokiness just from the lump charcoal I use. Either way go easy on the smoke, poultry is easily oversmoked.
  • Stick a thermometer probe in the largest one and keep an eye on the temperature throughout cooking. On around 100C/212F grate temp it usually takes a bout 90 minutes to get to the desires temp, which should be about 65C/149F (not safe for eating, but we are not done yet!)
  • Once the chicken has reached 65C/149F, take them off the grill, and get the temp up a bit. Heat up a grate over the coal side of the grill, because we will do some searing next
  • When the grate is nice and hot, get the chicken balls nicely seared on all sides. ThisChicken safe temp reached and resting commencing should bring them up to around 70C/158F.
  • Once searing is done move them over to the cold side of the grill again, and brush them with the BBQ sauce selected earlier. I normally have a grate temp of around 150C/300F at this point, try and keep it at that or lower, or the sugar in your BBQ sauce will burn and create bad flavors
  • Let the filets glaze for 5-10 minutes. At this point I check each one with my ThermaPen, to see if I have reached the safe temp for chicken (USDA says 165F/74C, and I agree)
  • Winner winner. Chicken dinner.Once they reach the correct temp, take them off the grill and let them rest 5-10 minutes. Serve it up and enjoy the juiciest, most delicious smoky chicken filets you have ever eaten. Perfection!

BBQ Grunnkurs – Perfekte, saftige kyllingfileter med nydelig røyksmak (og bacon!)

Tastes great with some grilled corn salsa, coleslaw and homemade bourbon-pickled jalapenos!

Smaker fortreffelig med grillet maissalsa, coleslaw, hjemmelagde bourbon-pickled jalapenos og en iskald IPA

Det siste året har jeg hatt en personlig fokus på å spise sunnere og trene masse. Betyr det mindre BBQ? Nei, selvsagt ikke, det betyr mer BBQ. En av de mest proteinrike, magre tingene du kan slenge på grillen er kyllingfilet. Men, pga det lave fettinnholdet og den forholdsvis høye kjernetemperaturen vi må tilberede filetene til for å unngå sykdommer, ender kyllingfileter ofte opp som tørre, smakløse greier. For noen måneder siden så jeg en (idiotisk) kommentar om at man “måtte” bruke sous vide teknikker for å få til ett godt kyllingbryst. Det må man selvsagt ikke, og som vi alle vet smaker ALT bedre når det er røykt og grillet (og ikke nevn disse sous vide først og så røyking teknikkene, det er ikke engang i nærheten av ekte BBQ, og det vet dere!). Så, nå har jeg eksperimentert noen måneder og mener å ha funnet en metode for å lage veldig god (kanskje til og med perfekt) kyllingfilet på grillen. I denne oppskriften kombinerer vi “low and slow” BBQ (varmrøyking) med teknikken kjent som “reverse sear” (dvs at vi brunner kjøttet til slutt istedetfor først), før vi avslutter med å glasere filetene.

Hva trenger du for 6 fileter:

  • 6 store kylling brystfileter
  • 6 remser med tynn, røykt kvalitetsbacon
  • BBQ saus for glasering. Jeg liker å lage og bruke denne, men du kan kjøpe en også selvsagt.

Serveringsforslag:

  • Jeg liker å servere disse med litt god coleslaw, litt grillet maissalsa (oppskrift kommer senere), og noen gode hjemmelagde bourbon-pickled jalapenos. Litt bratwurst er aldri en dårlig idé heller!

Forberedelser (15 min):

  • Sett opp grillen eller røykeren din for indirekte grilling og prøv å stabilisere en temperatur (målt på risten) på ca. 100 grader celsius.
  • Jeg liker å skylle filetene i kaldt vann og så tørke dem med kjøkkenpapir. Du kan legge dem i saltlake noen timer også, men jeg synes ikke det er nødvendig med den metoden vi skal bruke for tilberedning her.
  • Krydre filetene. Jeg bruker kun salt og pepper på disse, men du kan bruke din favoritt-rub også for litt mer krydret smak.
  • Når filetene er klare, rull eller brett dem på langs og form dem til en ball som er så uniform/rund som mulig. Dette sammen med den lave temperaturen i røykefasen vil hjelpe oss til å dem jevnest mulig ferdig, og dermed få ett ekstremt saftig sluttresultat. Legg en stripe bacon rundt “kyllingballen” (eller to striper på kryss om du er i festhumør), og bruk en cocktailpinne til å holde alt sammen.
  • Kyllingen er nå klar til å tilberedes, og bør legges i kjølen om ikke alt er klart til røyking enda.

Hvordan du griller dette (120-150 min):

  • Sett kyllingballene pent på en ren rist på den kalde siden av grillen/røykeren din. Hiv inn litt eple- eller kirsebær-flis om du ønsker det, på min nye Primo Oval XL har jeg ikke behov for dette, fordi jeg får nok røyksmak fra selve grillkullet. På en vanlig kulrgrill er litt flis å anbefale. Vær uansett forsiktig med mengden røykflis, det er lett å overrøyke fjærkre, og det smaker ikke noe særlig godt..
  • Putt en termometer-sensor i den største kyllingballen, og hold ett øye med temperaturen mens du røyker filetene. Med en temperatur på 100C på grillristen, pleier det å ta cirka 90 minutter å komme til ønsket temperatur, som er rundt 65C (ikke trygg temperatur for konsumering, men husk, vi er ikke ferdige enda!)
  • Når filetene har nådd 65C, ta dem av grillen, og få temperaturen opp litt i grillkammeret. Varm en rist på kullsiden av grillen, for nå skal vi brune filetene litt.
  • Når risten er passe varm, bruner du kyllingballene pent på alle sider. Dette bringer vanligvis temperaturen i filetene opp til rundt 70C.
  • Chicken safe temp reached and resting commencingNår bruningen er ferdig, flytter du filetene til den kalde siden av grillen igjen, som nå bør holde rundt 150C. Pensle dem med ett strøk BBQ saus eller to. Pass på at du ikke går over 160C her, for da kan du svi sukkeret i BBQ sausen, noe som lager dårlig smak.
  • La filetene glaseres for 5-10 minutter. På dette tidspunktet pleier jeg å sjekke hver av filetene med ett termometer (jeg bruker ThermaPen), for å se om de har nådd sikker temperatur for å spises, som bør være minimum 70 grader. Jeg pleier å gå ett par grader over, for sikkerhets skyld.
  • Winner winner. Chicken dinner.Når filetene har nådd korrekt temperatur, ta dem av grillen og la dem hvile 5-10 minutter. Server og nyt den søte, røykfylte smaken av den saftigste, deiligste kyllingfileten du noengang har spist!

ABT’s with hot chorizo and vegetable filling

ABT’s are great as an appetizer or side dish if you’re cooking something low & slow and have some extra space on your grill. Why they’re called atomic bomb turds, I do not know. It’s kind of a weird name for a food item, but there ya go. That’s what it means. You can use all kinds of stuff to put into the chillies, but in this recipe I went for a simple filling with some vegetables, cream cheese and hot chorizo sausage. I also used some good pancetta instead of the traditional bacon to wrap them, but you can use either, and it will be fantastically good. The union of hot chillies, bacon and tons of apple smoke is a tasty one indeed. Just make sure you make enough of them, I’d say 3-4 per person as a minimum for a starter.

Prep time: 10-15 minutes
Time on the grill: 90-120 minutes
Grilling method: Indirect, with smoke
Grilling temperature: 130 Centigrade lid temp (266F)

What you need:
5 Largish peppers of your choosing. I found some large chillies at my local market
10 strips of good bacon or pancetta
Some cream cheese, I used Philadelphia with much success
A little bit of hot chorizo sausage
A little yellow onion
One green pepper
Two mushrooms
Some toothpicks (not the ones with mint flavor…)

How you do it:

  • Slice your chillies lengthwise, and deseed them
  • Mix cream cheese with some finely chopped mushroom, green pepper and onion. You can use almost anything in here, I’m sure shrimp or crab meat would be good, different cheeses, have fun with it and experiment
  • Spread a thick layer of the cheese mix in each chilli half
  • Wrap each chilli half in bacon or pancetta, use toothpicks to secure the bacon if it doesn’t work out without them
  • Put them on the indirect side of your grill and smoke them using apple or cherry wood for 90-120 minutes
  • Enjoy, and watch out for any heart attack symptoms

BBQ 101 – Pulled Pork

Homemade coleslaw and pulled pork sandwich. Ah yeh…

Pork butt is a fantastic piece of meat. It’s quite a tough cut, with a lot of collagen (and fat), which makes it perfect for low and slow BBQ. If you can’t get pork butt where you live, you can try a boned-out ham. However, the best cut for this is the pork butt which is essentially the upper part of the pork shoulder ham cut, here in Norway not a regular cut, but when I tell my butcher I want the upper part of the ham, basically the shoulder-blade, with all the meat and fat on it, I get the right thing. Keeping the bone in there helps the meat become more juicy because the bones contains gelatine, so I always get bone-in when I can. Gives you that lip-smacking goodness feel you get from good ribs. Guess that’s why gelatine is used a lot for making candy, huh… That goes for any meat – bone-in = better. Talk to your butcher and show him some charts and google images, and I’m sure you’ll get it right. Now, to get a historical fact out of the way, they’re not called butts because they’re from the butt (because they’re from the shoulder end of the pig really..), but because this cut was stored in special barrels known as butts, in the olden days. Read more on Wikipedia.

Pork butts ready for pullin’

This is not a good place to start for the novice griller, but if you think you’ve got indirect grilling and temperature control on your kettle or smoker down, you should try it. Pork butt is some of the best eats to ever come out of a BBQ, and it’s a cheap cut, which enables you to feed tons of people for little money. Time for a party, in other words. Let’s get to it.

Serving suggestion:
I serve this dish in a very traditional manner, on homemade hamburger buns, with a creamy coleslaw, a basic Eastern North Carolina style vinegar sauce, and some pickled gherkins. Don’t make it complicated, the meat should be the star.

Total time: 10-14 hours (prep starts the day before)
Skill level: Intermediate/Expert
Grilling method: Indirect, one-zone (some coals on one side, large drip pan filled with water under the meat)
Grill temperature: About 120-140 degrees centigrade (250-285F)

You’re going to need:

  • Time, I usually start around 6-7 AM when I do this and we eat around 7-8 PM. A great excuse to drink beer and “mind the bbq” all day, in other words. Kinda like fishing or golf in that regard (dads will know what I mean…)
  • 2 pork butts (I always make two, because that’s what I have room for on my kettle. Pulled pork freezes well, so if I have leftovers, that just means my wife is going to be happy for the next few weeks eating pulled pork sandwiches..)
  • 1 cup of your favourite all-round spice rub
  • Some yellow American mustard (to be used as a glue)
  • 1-2 bags of charcoal briquettes (make sure you get good ones with no chemicals and food starch as a binder)
  • 4-5 cups of wood smoking chips (I like to mix hickory and some mesquite for pulled pork, read more about smoke wood here. Apple wood is also great)
  • A notebook and a pen, for taking notes during the process
  • An instant-read thermometer like a Thermapen, or a leave-in probe style thermometer

Pork butt, rubbed and ready to go

How you do it, the night before:

  • Prep should ideally start the day before. Cut the skin off the butts unless your butcher did it, but leave a good thick layer of fat on the meat
  • Lay out some lengths of plastic wrap on your workspace, and put a pork butt on there. Put a thin layer of yellow mustard on it, and apply generous amounts of spice rub all around it. I use about 0.5 cup for each butt
  • Wrap in several layers of plastic wrap, and repeat.
  • I store my butts overnight in the fridge. It’s (almost) always a good idea to room temper your meat before it goes on the grill, as long as you’re able to do it in a safe, hygienic manner. However, if you want to maximize your smoke penetration and smoke ring size, you should go straight from the fridge on this one. Experienced BBQ’ers tell me the smoke ring only happens when the meat is below 60 degrees centigrade (140F)

How you do it, cooking day:

  • Taking notes is paramount if you want to learn

    Fire up your chimney starter with 20 briquettes (this is based on my 22.5″ Weber kettle, and your mileage and/or method may vary on other grills and smokers)

  • In the meantime, put a briquette basket on one side of the grill only, and a big water pan covering the whole middle part of the grill. Why water you say? The mass of water (I use a stainless steel pan from Ikea that holds about 4-5 liters or one US gallon) helps me maintain a steady temperature inside the kettle, because water stores (in this case) heat pretty well. It also helps the meat retain its moisture during the long cook by increasing the general moisture in the cooking environment.
  • When your briquettes are white hot, put them in the briquette basket you put on the one side of the grill.
  • Put two smokebombs (a handful of soaked wood chips wrapped in aluminium foil) on the briquettes. Putting them out towards the edge of the fire makes them last longer. Wait 5-10 minutes until they start smoking. Replace these as often as you please once they are smoked out. This is especially important the first 4 hours, after that the meat won’t really soak up the smoky flavours anymore.
  • Put the grate on, pork butts on the grate away from the fire, and put the lid on
  • Next is 10-12 hours of temperature watch. You should try to adjust your temperature using only the bottom vent(s) on your grill. The top one should stay at least 50% open. If you close the top one too much, you can get a soot buildup, which will not taste nice.
  • Eventually, usually after 4-6 hours you may run into something BBQ’ers call “the stall” – The temp of the pork butt will stabilize or plateau at about 68-70 degrees C (154-158F) – sometimes it will even drop a little. This can go on for hours and really f up your dinner schedule. Read up on the stall in this great article, it’s got useful, common sense information you need to be aware of if you do low and slow.
  • A lot can be said on how to do this on a kettle style grill, but it should be possible. However, there are a lot of factors that come into play when doing a long cook on a kettle or smoke. Wind. Rain. Sun. Shade. Air temperature. Humidity. Which is what makes this fun, and exciting, and a skill that is learned from experience.
  • If it gets too hot, I take my tongs and dump a briquette or two right in the water pan. You can take them out too of course, just don’t put them on your wooden deck…
  • If it gets too cold, you might need more briquettes. I put in 6-8 unlit briquettes every hour when I do this. If you get a strange dip in temp and really need to knock it up quickly, you can use unsoaked wood chips or chunks, or you can put on some lump charcoal which burns a lot hotter than briquettes. Just be patient and don’t overdo it.
  • I will not go on in lengths on all the different ways to get there, you shold keep a log of times, kettle lid temp and meat temp, so you’ll have something to learn from for your next cook. The important part is to have fun, and reach a target temp of about 87-90 degrees centigrade (that’s 190-195F). The other important part, is to get there slowly.
  • If you get to the target temp too early, don’t worry. Wrap the meat in aluminium foil, and a couple of kitchen towels, and put it all in a cooler, and it will stay warm enough for hours.
  • When you’re ready to serve, it’s time to pull the pork. If you did everything right, it

    Two butts, a ham and a cow chest

    should be easily pullable by hand. Here’s a neat tip, get some thin carpenter’s gloves from your local hardware store, and buy some vinyl gloves one size up at the supermarket. Put the builder’s gloves on first and then the vinyl gloves (duh!), and you will be able to pull two pork butts without burning off your fingers (I’ve tried, not fun). If it’s not easy to pull by hand, you took it off the grill prematurely. Don’t worry, use a knife to assist you, it should still taste great. If it does not taste great, you have failed, and consequently brought shame upon your house and family.

  • Once all the pork is pulled, drench it in the North Carolina style vinegar sauce, and serve. Enjoy the taste of a fantastic dish, knowing it tastes even better for you, because you’ve been outside working the BBQ all day. NICE!
BBQ Gallery – II

Last week’s escapades in grilling and BBQ here at BBQ Viking’s house

Techniques : Grill setups for direct, indirect and rotisserie grilling

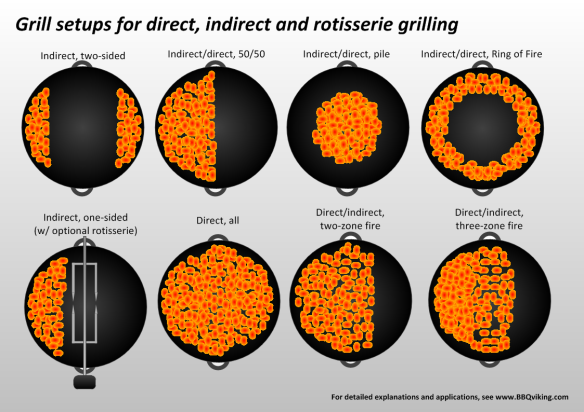
So, I get some questions on how I do different things on the grill, among other things how to keep a steady low temperature for low and slow BBQ on the standard Weber kettle. I have made the attached drawings to help me explain this better. Feel free to print and use this diagram as a reference, but don’t steal it and use it on your own webpage without asking me first, it took me some work to make it. Take a look at the diagram first, and below I will explain the different setups and what I use them for.

Grill setups for direct, indirect and rotisserie grilling

Okay, let’s start top left:

    • Indirect, two-sides: I use this when making roasts and other large pieces of meat. It’s good for a medium-low temperature, but can also go up to medium-high, just make the fire mounds on both sides bigger. I use this type of setup for instance for Whole, Smokegrilled Trout
    • Indirect/direct 50/50: This is perhaps my most used setup. It can go from medium to high heat, and it’s very versatile. You can grill indirect sides on the right side and have heat for searing meat and other thing on the left side. You have large safety/resting zone too, if you have larger piece of meat you want to sear first and then finish indirectly. I use this type of setup for instance in my Smokegrilled Mackerel recipe
    • Indirect/direct pile: This can be a good setup if you need a quick sear on something and then need to rest it a while after. I can see that it would be useful for thick t-bone steaks, for instance. You can also start with this for searing a roast or similar large piece, and then rake it out to both sides after for a long indirect cook.
    • Ring of fire: Haven’t experimented much with this one either. I can tell you I put it in there mostly for the name. I guess it could be good for indirectly grilling a very large piece of meat, it would give you a more even heat than some of the other options
    • Indirect, one-sided (low and slow!): I use this method for two things. Firstly,I use it when doing beef short ribs and pulled pork, in 12-16 hour sessions. I will then use a very minimal amount of briquettes, all on one side, 12-20 briquettes at a time, depending on the weather outside, and I use a large steel drip pan filled with about 4 litres (a gallon) of water in the middle of the grill. The purpose of the water is primarily to store heat and help me keep the temperature stable, but it also makes for a moist environment inside the grill. Adjust temperature using the bottom vent only, always leave top vent open. The second thing I use this for is rotisserie grilling chickens, ducks and other things. I will then use charcoal normally, and much more of it. No problem getting to 200-250 degrees centigrade (390-480F) with one big pile up against the side wall
    • Direct, all: I’ve only used this setup for one thing, but for that it’s very useful. We were having a big party, and I used the kettle for making a ton of chicken wings (only the small, outer wing part). For that, it was ingenious. A thin layer of coals over meant I could do 30-40 wings at a time on the grill as they needed no indirect grilling, only a good sear. Very efficient for making lots of sliders too I would imagine
    • Direct/indirect, two-zone fire: This is really a lot like the 50/50 setup, just with a smaller safety zone. Use when you need more sear space and less resting area.
    • Direct/indirect, three-zone fire: This is the most complicated setup. On the left 1/3rd of the grill there is a thick layer of coals for very high heat, the middle third has a thinner layer, and then there’s a safety zone to the right for resting. It’s just another option that might suit you depending what combination of food you’re grilling.

Yeah, that was a lot wasn’t it? I primarily use only 2-3 of these regularly, but it’s always good to know your options. Some common things to remember; always put a drip tray under your meat/fish when grilling indirect, you don’t want all the fat to drip and stick to the bottom part of your kettle. Another important point, when you set up, try to keep your coals away from the handles when you can. It will just be easier if you need to move the grill around during cooking if the handle sides don’t get too hot.

BBQ Gallery – I

Just some pictures from today’s BBQ-related cooking here at BBQviking’s house…

Whole, smokegrilled trout

There’s nothing that spells summer to me like grilling a whole salmon or trout. Grilling it whole also makes it juicier and more forgiving in terms of temperature. One small note on this, I see a lot of people “grilling” whole fish completely wrapped in aluminium foil. Now I don’t mean to be a BBQ snob, but I am, so here goes. When you do that, you’re basically steaming the fish, not grilling it. There’s also no way for smoke and other flavours of the grill to get into the fish. So, you might as well go inside and steam it in your kitchen, much easier. There.

Now that’s out of the way, let’s look at a good way of getting that delicious smokegrilled flavour on a big piece of whole fish. Trout or salmon can be used here, that’s up to you.

Total time: 2-3 hours
Skill level: Easy/intermediate
Grilling method: Indirect, two-zoned (some coals on each side, none in the middle)
Grill temperature: About 175 degrees centigrade (350F)

You’re going to need:
A medium-large whole trout (or salmon)
2 lemons
Some butter
Fresh dill
A clove of garlic
Salt and pepper
Oak wood chips (alternatively alder or fruit wood)
(Optional) A long fish basket for large fish
If no fish basket, some cardboard and heavy-duty aluminium foil

Serving suggestions:
Mustard-dill sauce
New potatoes (boiled or baked on the grill)
Butter-steamed spring cabbage
Grilled spring onions

How you do it:

  • Get the grill started as instructed above
  • Clean the fish if it hasn’t been done for you. Remove the head, tail, use kitchen shears to cut off any fins. Rinse it off in ice-cold water and dry with paper towels
  • Cut some diagonal slashes on both side of the fish, quite deep. We do this to allow the smoke and flavours to penetrate the meat properly when grilling.
  • Put thinly sliced lemon and some dill sprigs in each slash
  • Season the inside of the fish with salt and pepper, put some more lemon slices and dill sprigs in there too
  • Make a herb butter by melting a cup of butter, then chucking in a minced garlic clove and a handful or two of chopped dill. I also put some pepper in there, but that’s optional
  • If you  have a fish basket, good. If not,cut out two pieces of cardboard slightly larger than your fish. Wrap them in two layers of heavy-duty aluminium foil
  • Brush one of your new cardboard “planks” with butter
  • Brush the fish on both sides with herb butter and put it in your fish basket or on your cardboard plank
  • Put some water-soaked smoke wood chips on the coals. I like to get a good smoke level started before I put on meat or fish, because raw meat seems to take up smoke flavour more readily. This goes for all meats. Always get the smoke going good first, then put the food in.
  • Once the smoke gets going, put the fish in the middle of the grill, on its plank/basket
  • Baste the fish with herb butter every ten minutes
  • When the fish has been on the grill for 30-40 minutes, depending on size and temperature, it’s time to flip it. If you have a fish basket, that’s easy. If you have cardboard planks, butter up the second plank, and use your grilling gloves to flip the fish over on plank #2. It can be a bit tricky, so be careful
  • Grill the fish another 30-40 minutes until ready. If you have a Thermapen or other instant-read thermometer, look for the fish to be 55 degrees centigrade (about 130F). If you don’t have an instant read thermometer, make a small incision on the widest section of the fish near the backbone. The meat should be pale pink and opaque, not translucent and pink/orange.
  • Serve!

Butterflied Chicken

Whole chickens are one of my favorite things to grill. They’re tasty, juicy, and here in Norway, cheap. A lot of people grill chicken breasts only, which I think is REAL boring. They don’t taste much unless you do a lot to them, and they dry out easily unless you brine them and do other secret tricks. A whole chicken is much more forgiving in terms of temperature, and much tastier too. Also, I am a leg man (I prefer the thighs with their juicy, darker meat). This recipe makes use of the butterflying technique which essentially lets you flatten the whole bird, making it easier to cook it evenly and shortening cooking time for those weeknight BBQs. I get my chicken thighs and legs, and there’s two nice chicken breasts for my wife and the kids. Everybody wins with whole chicken!

Time: 60-90 minutes total

Skill level: Easy
Grilling method: Direct/indirect
Grill temperature: About 200-250 degrees centigrade  (390-480F)
Equipment: Fish basket (optional), mesquite wood chips or chunks for smoke

You’ll need to get hold of:
A whole, raw chicken
Your favorite home-made BBQ rub (or a store-bought one)
Some hot chili sauce

How you do it:

  • Have a hot grill waiting (don’t you always?)
  • Prep the chicken; trim off unneccesary fat, cut out the backbone and remove wishbone (Great TVWB instruction video here). Finally rinse under cold water and dry with paper towels. I tend to use disposable vinyl gloves for this whole process. Always take extra care with hygiene and cleanliness when working with raw poultry!
  • Make yourself a simple wet rub/sauce mixture. I mix up my home-made rub-a-dub with some rapeseed oil and some hot asian chili sauce I buy from the local Turkish convenience store. Use what you have access to, but the goal is to end up with a nice sticky sauce that can be brushed on the chicken, and has the heat level you prefer
  • Once the sauce is ready, brush the chicken with it, make sure to get good coverage everywhere
  • (Optional) If you have time, cover the chicken in clingfilm and let it marinate in the fridge for some hours or even overnight
  • (Optional) When the grill is nice and hot and ready, you can put the chicken in a fish basket like on the above pic. It’s not necessary by any means, but it’s kind of a neat look, and i makes it a lot easier to flip the chicken during grilling. It also makes it stay nice and flat throughout the process, easing even cooking.
  • Grill it! I like to have a lot of mesquite smoke flavor on my chicken, so before I put it on the grill, I like to throw in some soaked mesquite chips on the coals. Once the smoke gets started, I grill the chicken over direct heat, 3-4 minutes on each side, to get a nice brown, crispy texture on it. If you get flame-ups (you will), then keep the lid on and it should be fine
  • Once the chicken is nicely browned, move it over to the indirect side of the grill and leave it there until it’s done, flipping and basting it with your wet rub every ten minutes.
  • How do you know when it’s done? There are tons of methods for this. Wiggling the thigh joint is one, you’ll find many others. I use a Thermapen (www.thermapen.com) and I recommend you also use that or some other thermometer. The good thing about a Thermapen style thermometer is that it’s fast and has a thinner probe. This means I can check the temperature in several places. It’s the only real way for an amateur chef to know when the temperature is just right.
  • I usually cook my chicken to 75 degrees centigrade (167F). Salmonella is not a big problem here in Norway, but I know it is in many countries, so follow your local recommendations here for safety
  • Always let the chicken rest, at least 10-15 minutes before cutting into it. It will be worth the wait.