There’s nothing that spells summer to me like grilling a whole salmon or trout. Grilling it whole also makes it juicier and more forgiving in terms of temperature. One small note on this, I see a lot of people “grilling” whole fish completely wrapped in aluminium foil. Now I don’t mean to be a BBQ snob, but I am, so here goes. When you do that, you’re basically steaming the fish, not grilling it. There’s also no way for smoke and other flavours of the grill to get into the fish. So, you might as well go inside and steam it in your kitchen, much easier. There.
Now that’s out of the way, let’s look at a good way of getting that delicious smokegrilled flavour on a big piece of whole fish. Trout or salmon can be used here, that’s up to you.
-
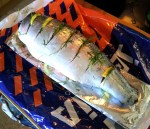
- Prepping the trout. Lemon and dill.
-

- Whole smokegrilled trout on the grill. Note homemade cardboard plank to ease moving.
-
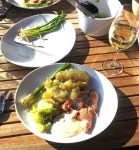
- Whole smokegrilled trout, butter-steamed spring cabbage, scallions, new potatoes and mustard-dill sauce
Total time: 2-3 hours
Skill level: Easy/intermediate
Grilling method: Indirect, two-zoned (some coals on each side, none in the middle)
Grill temperature: About 175 degrees centigrade (350F)
You’re going to need:
A medium-large whole trout (or salmon)
2 lemons
Some butter
Fresh dill
A clove of garlic
Salt and pepper
Oak wood chips (alternatively alder or fruit wood)
(Optional) A long fish basket for large fish
If no fish basket, some cardboard and heavy-duty aluminium foil
Serving suggestions:
Mustard-dill sauce
New potatoes (boiled or baked on the grill)
Butter-steamed spring cabbage
Grilled spring onions
How you do it:
- Get the grill started as instructed above
- Clean the fish if it hasn’t been done for you. Remove the head, tail, use kitchen shears to cut off any fins. Rinse it off in ice-cold water and dry with paper towels
- Cut some diagonal slashes on both side of the fish, quite deep. We do this to allow the smoke and flavours to penetrate the meat properly when grilling.
- Put thinly sliced lemon and some dill sprigs in each slash
- Season the inside of the fish with salt and pepper, put some more lemon slices and dill sprigs in there too
- Make a herb butter by melting a cup of butter, then chucking in a minced garlic clove and a handful or two of chopped dill. I also put some pepper in there, but that’s optional
- If you have a fish basket, good. If not,cut out two pieces of cardboard slightly larger than your fish. Wrap them in two layers of heavy-duty aluminium foil
- Brush one of your new cardboard “planks” with butter
- Brush the fish on both sides with herb butter and put it in your fish basket or on your cardboard plank
- Put some water-soaked smoke wood chips on the coals. I like to get a good smoke level started before I put on meat or fish, because raw meat seems to take up smoke flavour more readily. This goes for all meats. Always get the smoke going good first, then put the food in.
- Once the smoke gets going, put the fish in the middle of the grill, on its plank/basket
- Baste the fish with herb butter every ten minutes
- When the fish has been on the grill for 30-40 minutes, depending on size and temperature, it’s time to flip it. If you have a fish basket, that’s easy. If you have cardboard planks, butter up the second plank, and use your grilling gloves to flip the fish over on plank #2. It can be a bit tricky, so be careful
- Grill the fish another 30-40 minutes until ready. If you have a Thermapen or other instant-read thermometer, look for the fish to be 55 degrees centigrade (about 130F). If you don’t have an instant read thermometer, make a small incision on the widest section of the fish near the backbone. The meat should be pale pink and opaque, not translucent and pink/orange.
- Serve!

