Quick tip: Build a two storey Weber kettle

20130531_140135
Quick technique tip this time. I had a challenge couple weeks ago, was doing a bunch of low & slow stuff for my wife’s birthday. For about 40+ guests. Now, I only have one standard sized Weber kettle (and a Go-Anywhere, which isn’t really great for low & slow), so I figured I’d try and improvise. This is what I came up with, using the heightener ring from the rotisserie kit, an extra grate I always keep handy, some steel string, and an upside down beer can chicken holder.

20130531_140039This worked great, the rig helg up for the 12+ hours I needed for the cook, so all is well. The moral of the story is: Keep some stuff floating around your yard/house/apartment. It could come in handy someday. Also; keep extra rolls of tinfoil. Everywhere.
2013-05-31 20.10.56

Quick tip: Gloves for grilling and BBQ

With grilling and BBQ as with any other hobby, there’s tons of cheap and expensive, necessary and unnecessary stuff you can buy. Should you buy all of it? Probably not. I’m not exactly a cheapskate myself, but I hate wasting money on unnecessary stuff. I’ve tried a bunch of gloves for both the cooking part of grilling and BBQ, and for the finishing part (handling warm/hot meat like when pulling pork, chicken, or carving a roasts. So I figured in the interest of sharing, it’d be nice to do a post on gloves. Because you’re going to need gloves, that’s for sure.

Part 1 – Gloves for handling coals and utensils over a hot hot grill

Builder's gloves are perfect for handling hot grates and coals when you're grilling!

Builder’s gloves are perfect for handling hot grates and coals when you’re grilling!

I like to handle the coals manually when possible. I don’t pick up white hot coals and juggle them around, but it’s nice to be able to use gloves when adding just a few lumps to the grill, when moving freshly added coals around on the grill grate, and when moving grates and stuff around. I’ve tried some different setups for this. I tried the Weber long mitts. They great, but they are expensive, and they’re mitts. Gloves are much better for dexterity (that’s why we have five fingers, not a lobster claw. Just ask evolution). So I tried silicone gloves. They’re also expensive, hard to clean, so no go. I’ve come to a conclusion after testing different stuff. Leather builder’s gloves are awesome for this. Even here in one of the most expensive countries in the world, they’re about $5 at the local hardware store, ByggMax. They last about a year with my 2-3 times a week grilling, and the leather protects you quite well from heat. Good enough as long as you don’t plan on lifting white hot grates (use tongs for that) or juggling white hot coals around. When they get dirty, just keep them on and “wash your hands” in dishwashing liquid. Or buy another pair. Cheap, simple, and bulletproof!

Part 2 – Gloves for handling hot food items, like when pulling pork or carving a roast

Gloves for pulling pork and handling other hot foods!

Gloves for pulling pork and handling other hot foods!

The first few times I pulled pork, I used just the normal, thin, vinyl kitchen gloves I use when handling chiles (don’t ask), fish or raw meat. The gloves held up nicely, but after pulling two pork shoulders my fingertips we’re quite red and sore from the burns. Not a lot of fun. So I came up with a fix. Went to the gardening store, bought some gardening gloves, fabric, with a rubberized layer inside the hands, and put those under the vinyl gloves for insulation. It works like a charm. Pulling pork is much faster now, and my hands don’t get burned either. Gardening gloves can be reused again and again since they never touch any food directly, and are cheap to replace when you have to.

Quick tip: Beginners – how do I fire up my grill?

It's awesome, and it lets you talk about convection, which is always good.

a chimney starter is awesome, and it lets you talk about convection, which is always a good thing.

Every spring/early summer, my neighborhood, and all others around Norway and many other countries, fill up with the digusting smell of grill lighter fluid. Lighter fluid is horrible stuff. Here in Norway it’s actually very very similar to kerosene. It’s seriously something you don’t want coming near your food in any shape or form. So do everyone, most of all yourself and your family, a favor and go invest in a chimney starter. I’ve used the Weber one for years, it’s still holding up fine. It’s an ingenious device, that lets you fire up a bunch of lump charcoal or even briquettes in no time, using only some crumpled up newspaper with vegetable oil for a starter. It also saves tons of time, especially briquettes take a LONG time to get ready if you’re doing it down on the grill grate.

So in conclusion, a chimney starter is cheaper to run, more envorinmentally friendly, better for your health, quicker, much more awesome to look at, and it makes women lust for you. Only time I don’t use one is when I go camping, because it’s kind of big to carry into forests.

So, I’ll wait here, while you run off and buy yourself a chimney starter. There you go.

Just keep a ziplok style bag with newspaper and a few spoons of food oil in your BBQ stash.

Just keep a ziplok style bag with newspaper and a few spoons of food oil in your BBQ stash.

Now, this is easy. I usually soak a few crumpled up balls of newspaper or kitchen towel in some cheap vegetable oil or cooking oil (see, no poison!), as you can see on the picture to the left. Put them newspaper on the top grate of your grill or some other fireproof surface (never stone, concrete or cement surface, these can “explode” and crack because of the heat, see the picture below…), set your firestarter on top and fill it up with briquettes or lump charcoal.

After a couple more minutes, you're ready to grill!

After a couple more minutes, you’re ready to grill!

Sneak a match in there and fire up the newspaper. Because of the chimney shape things will happen quickly, so always keep an eye on the starter. Once the flames lick over the top of the chimney, you are ready to go. Put on your favorite BBQ gloves and pour them carefully onto the grill grate of your grill. Now get to cooking!

Here’s a shot of what happened when a guy put his starter on a concrete sidewalk. The concrete actually exploded, bits of white hot concrete flying everywhere. Fortunately nobody got hurt. So don’t do that.

Don't put your starter on cement, concrete or stone surfaces. They could explode, like this unfortunate chap found out!

Don’t put your starter on cement, concrete or stone surfaces. They could explode, like this unfortunate chap found out!

Quick tip: Roll’em Up!

Another quick tip for you. It’s hard to fit more than 4 baby back rib racks on a standard sized Weber kettle if they’re laying flat. Sure – a rib rack helps, but not a lot. This idea is cheaper, and it works well. Roll up the racks, use a wooden skewer to hold them in place, make sure there’s room for air (smoke..) between the meat, so don’t roll them too tight. The only downside I can see to this is that it makes glazing harder, but I managed to roll mine back out again for the glazing part. rolling ribs

Techniques : Grill setups for direct, indirect and rotisserie grilling

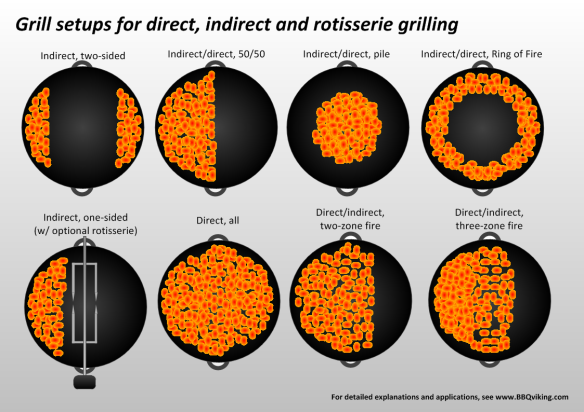
So, I get some questions on how I do different things on the grill, among other things how to keep a steady low temperature for low and slow BBQ on the standard Weber kettle. I have made the attached drawings to help me explain this better. Feel free to print and use this diagram as a reference, but don’t steal it and use it on your own webpage without asking me first, it took me some work to make it. Take a look at the diagram first, and below I will explain the different setups and what I use them for.

Grill setups for direct, indirect and rotisserie grilling

Okay, let’s start top left:

    • Indirect, two-sides: I use this when making roasts and other large pieces of meat. It’s good for a medium-low temperature, but can also go up to medium-high, just make the fire mounds on both sides bigger. I use this type of setup for instance for Whole, Smokegrilled Trout
    • Indirect/direct 50/50: This is perhaps my most used setup. It can go from medium to high heat, and it’s very versatile. You can grill indirect sides on the right side and have heat for searing meat and other thing on the left side. You have large safety/resting zone too, if you have larger piece of meat you want to sear first and then finish indirectly. I use this type of setup for instance in my Smokegrilled Mackerel recipe
    • Indirect/direct pile: This can be a good setup if you need a quick sear on something and then need to rest it a while after. I can see that it would be useful for thick t-bone steaks, for instance. You can also start with this for searing a roast or similar large piece, and then rake it out to both sides after for a long indirect cook.
    • Ring of fire: Haven’t experimented much with this one either. I can tell you I put it in there mostly for the name. I guess it could be good for indirectly grilling a very large piece of meat, it would give you a more even heat than some of the other options
    • Indirect, one-sided (low and slow!): I use this method for two things. Firstly,I use it when doing beef short ribs and pulled pork, in 12-16 hour sessions. I will then use a very minimal amount of briquettes, all on one side, 12-20 briquettes at a time, depending on the weather outside, and I use a large steel drip pan filled with about 4 litres (a gallon) of water in the middle of the grill. The purpose of the water is primarily to store heat and help me keep the temperature stable, but it also makes for a moist environment inside the grill. Adjust temperature using the bottom vent only, always leave top vent open. The second thing I use this for is rotisserie grilling chickens, ducks and other things. I will then use charcoal normally, and much more of it. No problem getting to 200-250 degrees centigrade (390-480F) with one big pile up against the side wall
    • Direct, all: I’ve only used this setup for one thing, but for that it’s very useful. We were having a big party, and I used the kettle for making a ton of chicken wings (only the small, outer wing part). For that, it was ingenious. A thin layer of coals over meant I could do 30-40 wings at a time on the grill as they needed no indirect grilling, only a good sear. Very efficient for making lots of sliders too I would imagine
    • Direct/indirect, two-zone fire: This is really a lot like the 50/50 setup, just with a smaller safety zone. Use when you need more sear space and less resting area.
    • Direct/indirect, three-zone fire: This is the most complicated setup. On the left 1/3rd of the grill there is a thick layer of coals for very high heat, the middle third has a thinner layer, and then there’s a safety zone to the right for resting. It’s just another option that might suit you depending what combination of food you’re grilling.

Yeah, that was a lot wasn’t it? I primarily use only 2-3 of these regularly, but it’s always good to know your options. Some common things to remember; always put a drip tray under your meat/fish when grilling indirect, you don’t want all the fat to drip and stick to the bottom part of your kettle. Another important point, when you set up, try to keep your coals away from the handles when you can. It will just be easier if you need to move the grill around during cooking if the handle sides don’t get too hot.

Quick tip: String’em up!

Here’s a great tip for smoking or roasting small pieces of vegetables or any other small things. Get some steel string from your local hardware store, and just string them up, like so. This worked great when smoking a bunch of chillies for my homemade ketchup.

Chillies stringed up on steel string

Which smoke wood to use when?

I get a lot of questions on which smoke wood to use for which foods. Here are some suggestions. Like anything else to do with BBQ, this is no exact science. And remember, what kind of rub or sauce you use and the spice level should also be part of the consideration.

Pork – Pork works well with lots of different smoke woods. I like to use almost anything for pork. I use mesquite a lot for pork, and I use apple (real good for ribs), cherry and pecan wood. Sometimes when I really want smoke taste on pork butts, I use hickory as well. Want something light? Try Alder.

Beef – Beef=hickory in my mind. Sometimes I’ll mix 50/50 hickory and mesquite. Oak is also good, the Jack Daniel’s oak wood chips are great for steaks for instance.

Poultry – For poultry I would normally pick something lighter, like cherry or apple. Sometimes I use mesquite, it can be real tasty with duck, which has a stronger, more gamey taste than chickens

Fish – Oak or alder is very popular for smoking fish. Here in Norway the juniper bush is sometimes used, but I find the taste too owerpowering.

Vegetables – Since they’re not the stars of the show, my vegetables usually get smoked with whatever I’m using for the meat. Hickory and mesquite is great for baked potatoes and ears of corn (prick the potatoes with a fork first).

Lastly, experiment. A lot. It’s the only way to learn what’s best for your tastes. There’s also other ways to make smoke, rosemary smoke from fresh rosemary for lamb for instance. Vines of various kinds can also be used. But don’t use fresh wood, it needs to be dried. Nothing green should go on the grill as smoke wood.

Quick tip: Spring onions on the grill

Spring onions or scallions are one of my favorite sides. They go well with almost anything. However, I had a lot of problems with them rolling of the grate and into the coals, or rolling off the grill completely sometimes when grilling in parks or at the beach. I picked up this nifty little trick from author and chef Steven Raichlen ( www.barbecuebible.com ). It made me feel like an idiot not to have though of this myself, but sometimes the simplest solution is the hardest to find.

Use bamboo skewers or any other skewer and do them like you see in the below pic. Also makes turning them much quicker and easier. This also works great with asparagus and other long, skinny things you put on the grill. For spring onions, while we’re at it, I do this, brush them with olive oil, and  sprinkle with Maldon salt and freshly ground pepper. Enjoy!