Quick and easy summer food- Mussels on the grill!

Delicious fruits of the sea taste even better straight from the grill.

Delicious fruits of the sea taste even better straight from the grill.

Don’t have a lot of time, so thinking about skipping the appetizer? Don’t do that, just get yourself a net of fresh mussels and grill’em up. Here’s how:

This is so easy, and it’s perfect for those times when you’ve set up for direct cooking the main course. How about some mussel and tenderloin surf and turf? Or, you could serve the mussels as a starter with some homemade buns and chipotle mayo. Me and my wife made them for dinner, with a side salad with some fresh spinach and chickpeas. Delicious.

Total time: 10 minutes

Skill level: Beginner
Grilling method: Direct
Grill temperature: High!

You’re going to need:

  • Fresh, live mussels
  • Whatever you want on the side

How you do it:

  • Set up your grill for direct cooking, and wait until it’s all nice and evenly hot
  • Throw the mussels on the direct heat! No prep, no seasonings, no smoke chips. They make their own smoky, salty flavor, and to me it’s just perfect.
  • As the mussels open up, take them off the grill and put them in a bowl. The ones that don’t open up a lot, or at all, need to be discarded, or you could get sick
  • Enjoy!
Advertisement

Lamb Chops grilled with Hickory and Rosemary smoke

Grilling and smoking lamb chops with rosemary and hickory smoke

Grilling and smoking lamb chops with rosemary and hickory smoke

There’s not much that can top some fresh young lamb for the grill. In this recipe we’ll pair it with some hickory and rosemary smoke, raw spring onions finely chopped and a delicious mint oil to go with your preferred side. Let’s roll!

What you need (to serve 4):

  • 2 racks of young lamb (3 if they’re small, and small is good here)
  • A fistful of fresh rosemary
  • A fistful of hickory wood chips
  • 6-8 spring onions
  • A cup of good olive oil of the extra virgin variety
  • A fistful of fresh mint
  • A Thermapen or similar instant-read thermometer is very useful for this one

How to make the mint oil (can be made a few days ahead, and should at least be made the night before for max flavor):

  • Finely chop the fresh mint
  • Combine with a pinch of good sea salt and about a cup of quality olive oil in a mortar, and crush away
  • Pour into a jar and leave it in the fridge overnight or for a couple days to let the oil take the flavor

How to grill the lamb:

  • Get your firestarter going, fill it up to the top with coals. For this you want the 50/50 setup so you can sear the chops on one side of the grill, and then move them over to the other side for finishing
  • Once your grill is nice and hot, might be a good time to dump some yams on there for a side dish, my recipe for ember-roasted yams is great with the mint oil.
  • Slice a nice little diamond pattern in the fatty parts of the rack, making sure not to Lil' lamb chops - all ready to go go goslice into the meat. This is to help the fat render, and to help with the crispiness of the skin. Important!
  • Cut your lamb racks into “chops” in the order of two bones on each. Doing one boned chops is possible, but you’re going to need your grill to get REALLY hot to pull that off – so let’s go with two. It’s a handy compromise
  • Season the chops with salt & pepper
  • Once your yams (if youre doing those) are done and out of the way, get the grill real hot (you want the grate to be so hot it whitens for this one), and chuck in the rosemary and hickory chips right on the coals.
  • The smoke will start fairly instantly, so get your chops on there (I usually do fatty side down first), and put the lid on for about a minute. Repeat for all sides so you get a good sear all round.
  • When you’re done searing, move the chops to the “cold side” of the grill, and take their temp. Continue to do so until they’re all done (I usually go with 56C/132F, nice and pink in the middle, tastes great!)
  • Give the chops a five minute rest while you finely chop some spring onion
  • Serve on warm plates, with abovementioned yams sprinkled with mint oil and spring onion
  • Enjoy!

BBQ Gallery – II

Last week’s escapades in grilling and BBQ here at BBQ Viking’s house

BBQ Viking Sliders with caramelized onions

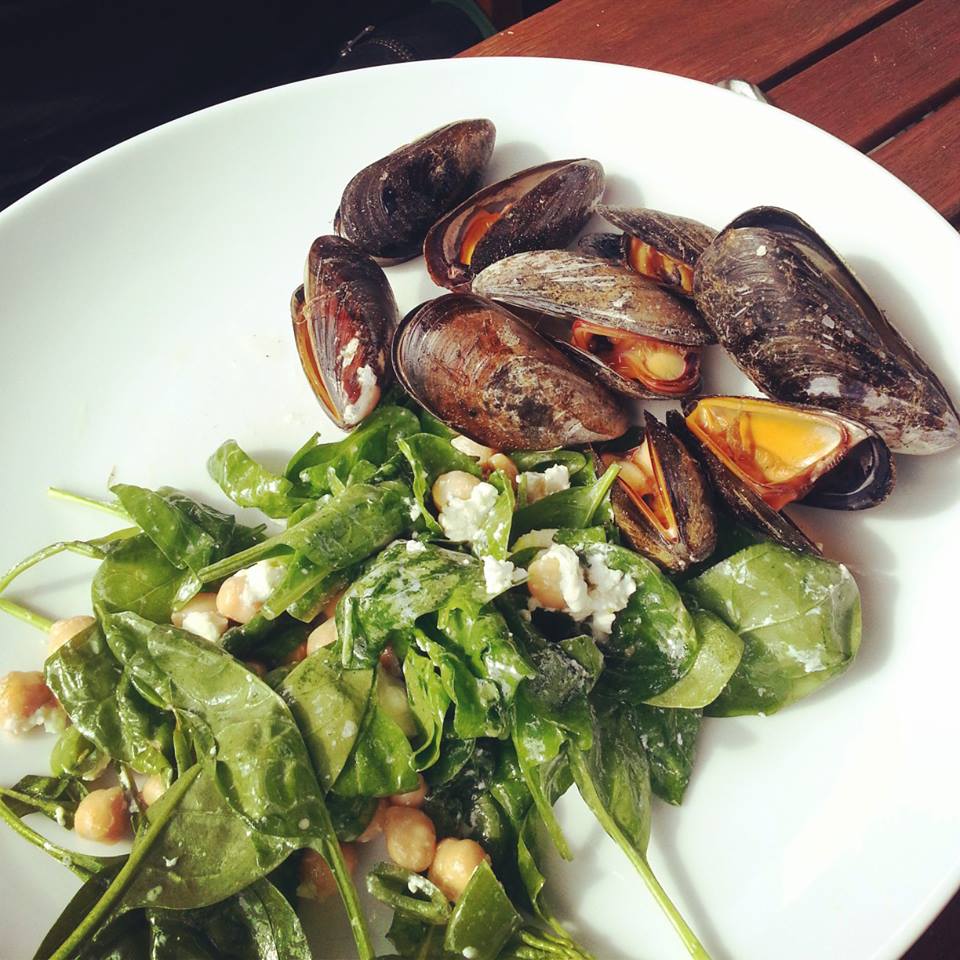
Sliders, homemade chipotle mayo, shakey taters and caramelized onions

These sliders are tasty, juicy (even when you have to cook them through), and are real popular with the kids. They’re easy to make too, and require only a quick sear on the grill. You could always buy some slider buns, but I really suggets making your own, see my recipe for buns here. I realize some of you are going to find it extremely controversial that I put bread in my sliders. Don’t knock it till you’ve tried it. I mean it. If you grind your own beef, and have a hot enough grill to get a sear on these while they’re still pink in the middle, you can skip the bread. But I often have to use storebought ground beef, and that means it has to be cooked all the way through. That’s where the bread comes in, by soaking up the juices and fat, it makes these sliders a real, juicy treat.

Time: 60 minutes total
Skill level: Easy
Grilling method: Direct
Grill temperature: About 250 degrees centigrade  (480F)
Equipment: Hickory wood chips for smoke

Serve with:
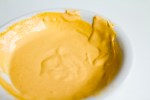
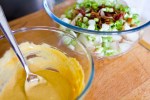
Homemade chipotle mayo
Homemade slider buns
Shakey potatoes (recipe to come)

Sliders and Texas style BBQ sauce

You’ll need to get hold of:
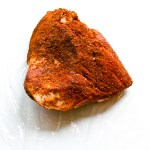
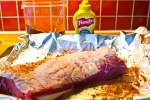
Ground beef, about 500 grams makes about 15 sliders
2 slices of bread
4 tbsp of your favorite, preferrable homemade, BBQ sauce. I used Rocket Fuelled Bull BBQ Sauce
Some meltable cheese (I prefer orange cheddar)
2 large yellow onions
2 tbsp butter

How you do it:

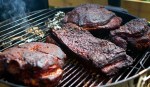
  • Have a hot grill waiting, for this I just cover the whole grill grate in white hot coals
  • Slice your onions the way you want them, and caramelize them in a frying pan with the butter, some salt and pepper, and about a tbsp of sugar, on low heat for 30-45 minutes. You can do this the night before, store in the fridge and just reheat.
  • Cut away the crust from your two slices of bread, and let it soak in cold water for ten minutes. After soaking, squeeze all the water out of it
  • Mix the ground beef carefully with the BBQ sauce, the bread and liberal amounts of salt and pepper
  • Form the slider patties. Remember to make them flatter and larger-diameter than you want to be finished product to be, because they will change size when they’re being grilled. Each patty should be about 33 grams
  • Get a good hickory smoke going on the grill before starting grilling, I use water-soaked chips for this to maximize smoke, since they’re only on there a couple of minutes.
  • Put them on the grill. About 2-3 minutes should be enough, flip them, put the cheese on the finished side, and give them another 2-3 minutes. Serve!

Techniques : Grill setups for direct, indirect and rotisserie grilling

So, I get some questions on how I do different things on the grill, among other things how to keep a steady low temperature for low and slow BBQ on the standard Weber kettle. I have made the attached drawings to help me explain this better. Feel free to print and use this diagram as a reference, but don’t steal it and use it on your own webpage without asking me first, it took me some work to make it. Take a look at the diagram first, and below I will explain the different setups and what I use them for.

Grill setups for direct, indirect and rotisserie grilling

Okay, let’s start top left:

    • Indirect, two-sides: I use this when making roasts and other large pieces of meat. It’s good for a medium-low temperature, but can also go up to medium-high, just make the fire mounds on both sides bigger. I use this type of setup for instance for Whole, Smokegrilled Trout
    • Indirect/direct 50/50: This is perhaps my most used setup. It can go from medium to high heat, and it’s very versatile. You can grill indirect sides on the right side and have heat for searing meat and other thing on the left side. You have large safety/resting zone too, if you have larger piece of meat you want to sear first and then finish indirectly. I use this type of setup for instance in my Smokegrilled Mackerel recipe
    • Indirect/direct pile: This can be a good setup if you need a quick sear on something and then need to rest it a while after. I can see that it would be useful for thick t-bone steaks, for instance. You can also start with this for searing a roast or similar large piece, and then rake it out to both sides after for a long indirect cook.
    • Ring of fire: Haven’t experimented much with this one either. I can tell you I put it in there mostly for the name. I guess it could be good for indirectly grilling a very large piece of meat, it would give you a more even heat than some of the other options
    • Indirect, one-sided (low and slow!): I use this method for two things. Firstly,I use it when doing beef short ribs and pulled pork, in 12-16 hour sessions. I will then use a very minimal amount of briquettes, all on one side, 12-20 briquettes at a time, depending on the weather outside, and I use a large steel drip pan filled with about 4 litres (a gallon) of water in the middle of the grill. The purpose of the water is primarily to store heat and help me keep the temperature stable, but it also makes for a moist environment inside the grill. Adjust temperature using the bottom vent only, always leave top vent open. The second thing I use this for is rotisserie grilling chickens, ducks and other things. I will then use charcoal normally, and much more of it. No problem getting to 200-250 degrees centigrade (390-480F) with one big pile up against the side wall
    • Direct, all: I’ve only used this setup for one thing, but for that it’s very useful. We were having a big party, and I used the kettle for making a ton of chicken wings (only the small, outer wing part). For that, it was ingenious. A thin layer of coals over meant I could do 30-40 wings at a time on the grill as they needed no indirect grilling, only a good sear. Very efficient for making lots of sliders too I would imagine
    • Direct/indirect, two-zone fire: This is really a lot like the 50/50 setup, just with a smaller safety zone. Use when you need more sear space and less resting area.
    • Direct/indirect, three-zone fire: This is the most complicated setup. On the left 1/3rd of the grill there is a thick layer of coals for very high heat, the middle third has a thinner layer, and then there’s a safety zone to the right for resting. It’s just another option that might suit you depending what combination of food you’re grilling.

Yeah, that was a lot wasn’t it? I primarily use only 2-3 of these regularly, but it’s always good to know your options. Some common things to remember; always put a drip tray under your meat/fish when grilling indirect, you don’t want all the fat to drip and stick to the bottom part of your kettle. Another important point, when you set up, try to keep your coals away from the handles when you can. It will just be easier if you need to move the grill around during cooking if the handle sides don’t get too hot.

Ember-roasted yams

Yams that have been roasted directly on the embers. Tasty!

This is maybe my all-time favorite side dish. It goes well with all meats, it’s healthier than potatoes, and it tastes fantastic. It really couldn’t be easier than putting something right on the coals and leaving it there. The burning of the outside gives the inside a lovely smokey flavor. Best trick ever!
Time: 45-60 minutes total
Skill level: Easy
Grilling method: On the embers
Grill temperature: Doesn’t really matter as long as the coals are white-hot

You’ll need to get hold of:
Yams
(Optional) Butter, garlic, herbs for a herb butter

Yams that have been roasted directly on the embers. Yes I have moved them to the grate for the photo. Don’t do that before they’re finished.

How you do it:

  • No washing or prep needed, because you’re burning the outside to a crisp anyway
  • Just chuck your yams directly on the white-hot coals, turn them every 10-15 minutes until they have a nice, ashy, burnt finish on all sides
  • Prick them with a knife to check they’re nice and soft all the way through
  • Slice in two with a sharp knife, make a garlic or herb butter, mash it up a bit with a fork, and eat!

BBQ Gallery – I

Just some pictures from today’s BBQ-related cooking here at BBQviking’s house…

Simple mustard-dill sauce

Here in Scandinavia, trout and salmon is very often served with dill and mustard. So why not make a sauce of it? This goes well with any salmon or trout dish.

Time: 10 minutes
Skill level: Easy

You’re going to need:
1.5 cups of mayo (homemade is best of course!)
0.75 cup sour cream
0.5 cup of dijon mustard, honey mustard or sweet Swedish mustard, depending on what your preference is
Handful of chopped fresh dill
Some lemon juice
Salt and pepper

How you do it:

  • Put everything except lemon juice and salt and pepper in a bowl and whisk it all together
  • Season with lemon juice, salt and pepper
  • Serve!

Did I mention this sauce goes well with for instance smokegrilled trout

Butter-steamed spring cabbage

Spring cabbage is one of the tastiest vegetables out there. It goes well with grilled fish, especially salmon or trout. In Norway we call it summer cabbage, because that’s when you can get it here. This is the easiest and best way to prepare it if you ask me, and it’s super fast.

Time: 10 minutes
Skill level: Easy
Grilling method: Steaming over direct heat
Grill temperature: Doesn’t really matter

You’re going to need:
A head of spring cabbage
4 tablespoons of butter
Salt and pepper
Aluminium foil

How you do it:

  • Slice the cabbage in longish strips about a half-inch wide
  • Make a big sheet of aluminium foil, put 4 tablespoons of butter on it
  • Put the cabbage on top of the butter
  • Season with salt and pepper
  • Make it into a bowl shape, that you half close on top
  • Put it over direct heat on the grill, and let the butter steam the cabbage for about 5-10 minutes depending on heat level
  • Serve!

This goes well with for instance a whole grilled trout or smokegrilled mackerel

Smokegrilled mackerel

Mackerel is one of my favorite fish to eat. It brings back memories of summers spent fishing in my little dingy outside Bergen on the west coast of Norway. A feisty fish that was fun to fish for as a kid growing up. It’s nice and juicy thanks to very high-fat content, and that also makes it very healthy, full of omega-3 and other good stuff. I think mackerel tastes fantastic, and I like to keep it really simple. Salt and pepper for seasoning, new potatoes on the side, with a sour cream sauce and some good butter. One thing that makes mackerel perfect for the grill, is the fact that it can smell quite strong. Fun when you’re making it and eating it, not so fun three days later in your kitchen. So, let’s take the mackerel outside!

In this recipe I combine smoking with high temperature grilling. Mackerel being a fatty fish, it takes up smoke flavour quite readily, so you don’t need a lot of time to get the right amount of smoke flavour into the meat.

Time: 45 minutes total
Skill level: Easy
Grilling method: Direct
Grill temperature: About 200-250 degrees centigrade  (390-480F)
Equipment: Fish basket, cherry wood chips for smoke

You’ll need to get hold of:
Fresh, raw mackerel (1 large per person)
New potatoes
Butter
Sour cream
Lemon
Fresh Dill

How you do it:

  • Have a hot grill waiting, with the 50/50 setup (coals on one side)
  • If you’re baking the new potatoes, prick them with a fork all around so smoke can get in, throw some wood chips on the coals and leave these on the indirect side of the grill. They will need 45-60 minutes depending on size
  • Prep and clean the mackerel unless you had the fish shop do it for you, remove all guts and blood, rinse and dry off with paper towels. I like to leave the tails and heads on, but you can remove these if you’re wimpy about it or if your kids have watched Finding Nemo too many times…
  • Liberally season the fish inside and outside with Maldon salt and freshly ground black pepper (I use Tellicherry)
  • Put the mackerel in your fish basket (oil it if it’s not a non-stick one). A fish basket is really necessary here, because mackerel will stick to your grill grate like crazy and it will be extremely difficult to flip the fish without it falling apart
  • Make a very simple sour cream sauce. I mix sour cream with some lemon juice, salt and pepper, and some freshly chopped dill
  • Grill the mackerel over direct heat, until the skin is nicely crispy and the meat falls of the bone easily (use a fork to test). If you’re using a thermometer, mackerel is a cold water fish and as such it should be ready when the meat is about 55 degrees centigrade (131F), but it’s so fatty it will stay nice and juicy way above that temperature too.
  • Serve with the baked new potatoes, sour cream sauce and some butter for those who want it. Easy living!