BBQ Grunnkurs – Perfekte, saftige kyllingfileter med nydelig røyksmak (og bacon!)

Tastes great with some grilled corn salsa, coleslaw and homemade bourbon-pickled jalapenos!

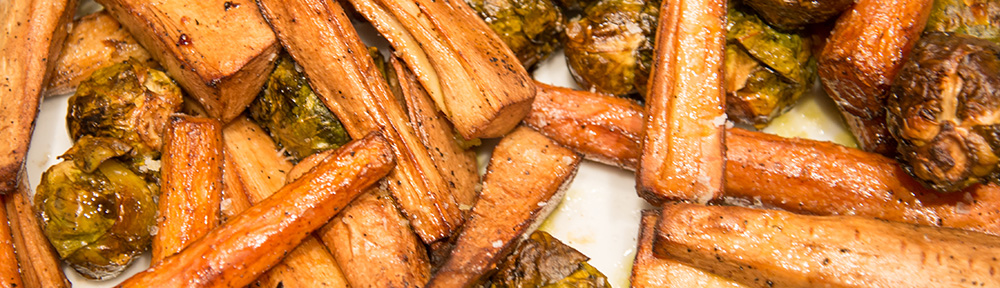
Smaker fortreffelig med grillet maissalsa, coleslaw, hjemmelagde bourbon-pickled jalapenos og en iskald IPA

Det siste året har jeg hatt en personlig fokus på å spise sunnere og trene masse. Betyr det mindre BBQ? Nei, selvsagt ikke, det betyr mer BBQ. En av de mest proteinrike, magre tingene du kan slenge på grillen er kyllingfilet. Men, pga det lave fettinnholdet og den forholdsvis høye kjernetemperaturen vi må tilberede filetene til for å unngå sykdommer, ender kyllingfileter ofte opp som tørre, smakløse greier. For noen måneder siden så jeg en (idiotisk) kommentar om at man “måtte” bruke sous vide teknikker for å få til ett godt kyllingbryst. Det må man selvsagt ikke, og som vi alle vet smaker ALT bedre når det er røykt og grillet (og ikke nevn disse sous vide først og så røyking teknikkene, det er ikke engang i nærheten av ekte BBQ, og det vet dere!). Så, nå har jeg eksperimentert noen måneder og mener å ha funnet en metode for å lage veldig god (kanskje til og med perfekt) kyllingfilet på grillen. I denne oppskriften kombinerer vi “low and slow” BBQ (varmrøyking) med teknikken kjent som “reverse sear” (dvs at vi brunner kjøttet til slutt istedetfor først), før vi avslutter med å glasere filetene.

Hva trenger du for 6 fileter:

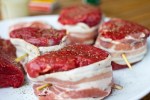
  • 6 store kylling brystfileter
  • 6 remser med tynn, røykt kvalitetsbacon
  • BBQ saus for glasering. Jeg liker å lage og bruke denne, men du kan kjøpe en også selvsagt.

Serveringsforslag:

  • Jeg liker å servere disse med litt god coleslaw, litt grillet maissalsa (oppskrift kommer senere), og noen gode hjemmelagde bourbon-pickled jalapenos. Litt bratwurst er aldri en dårlig idé heller!

Forberedelser (15 min):

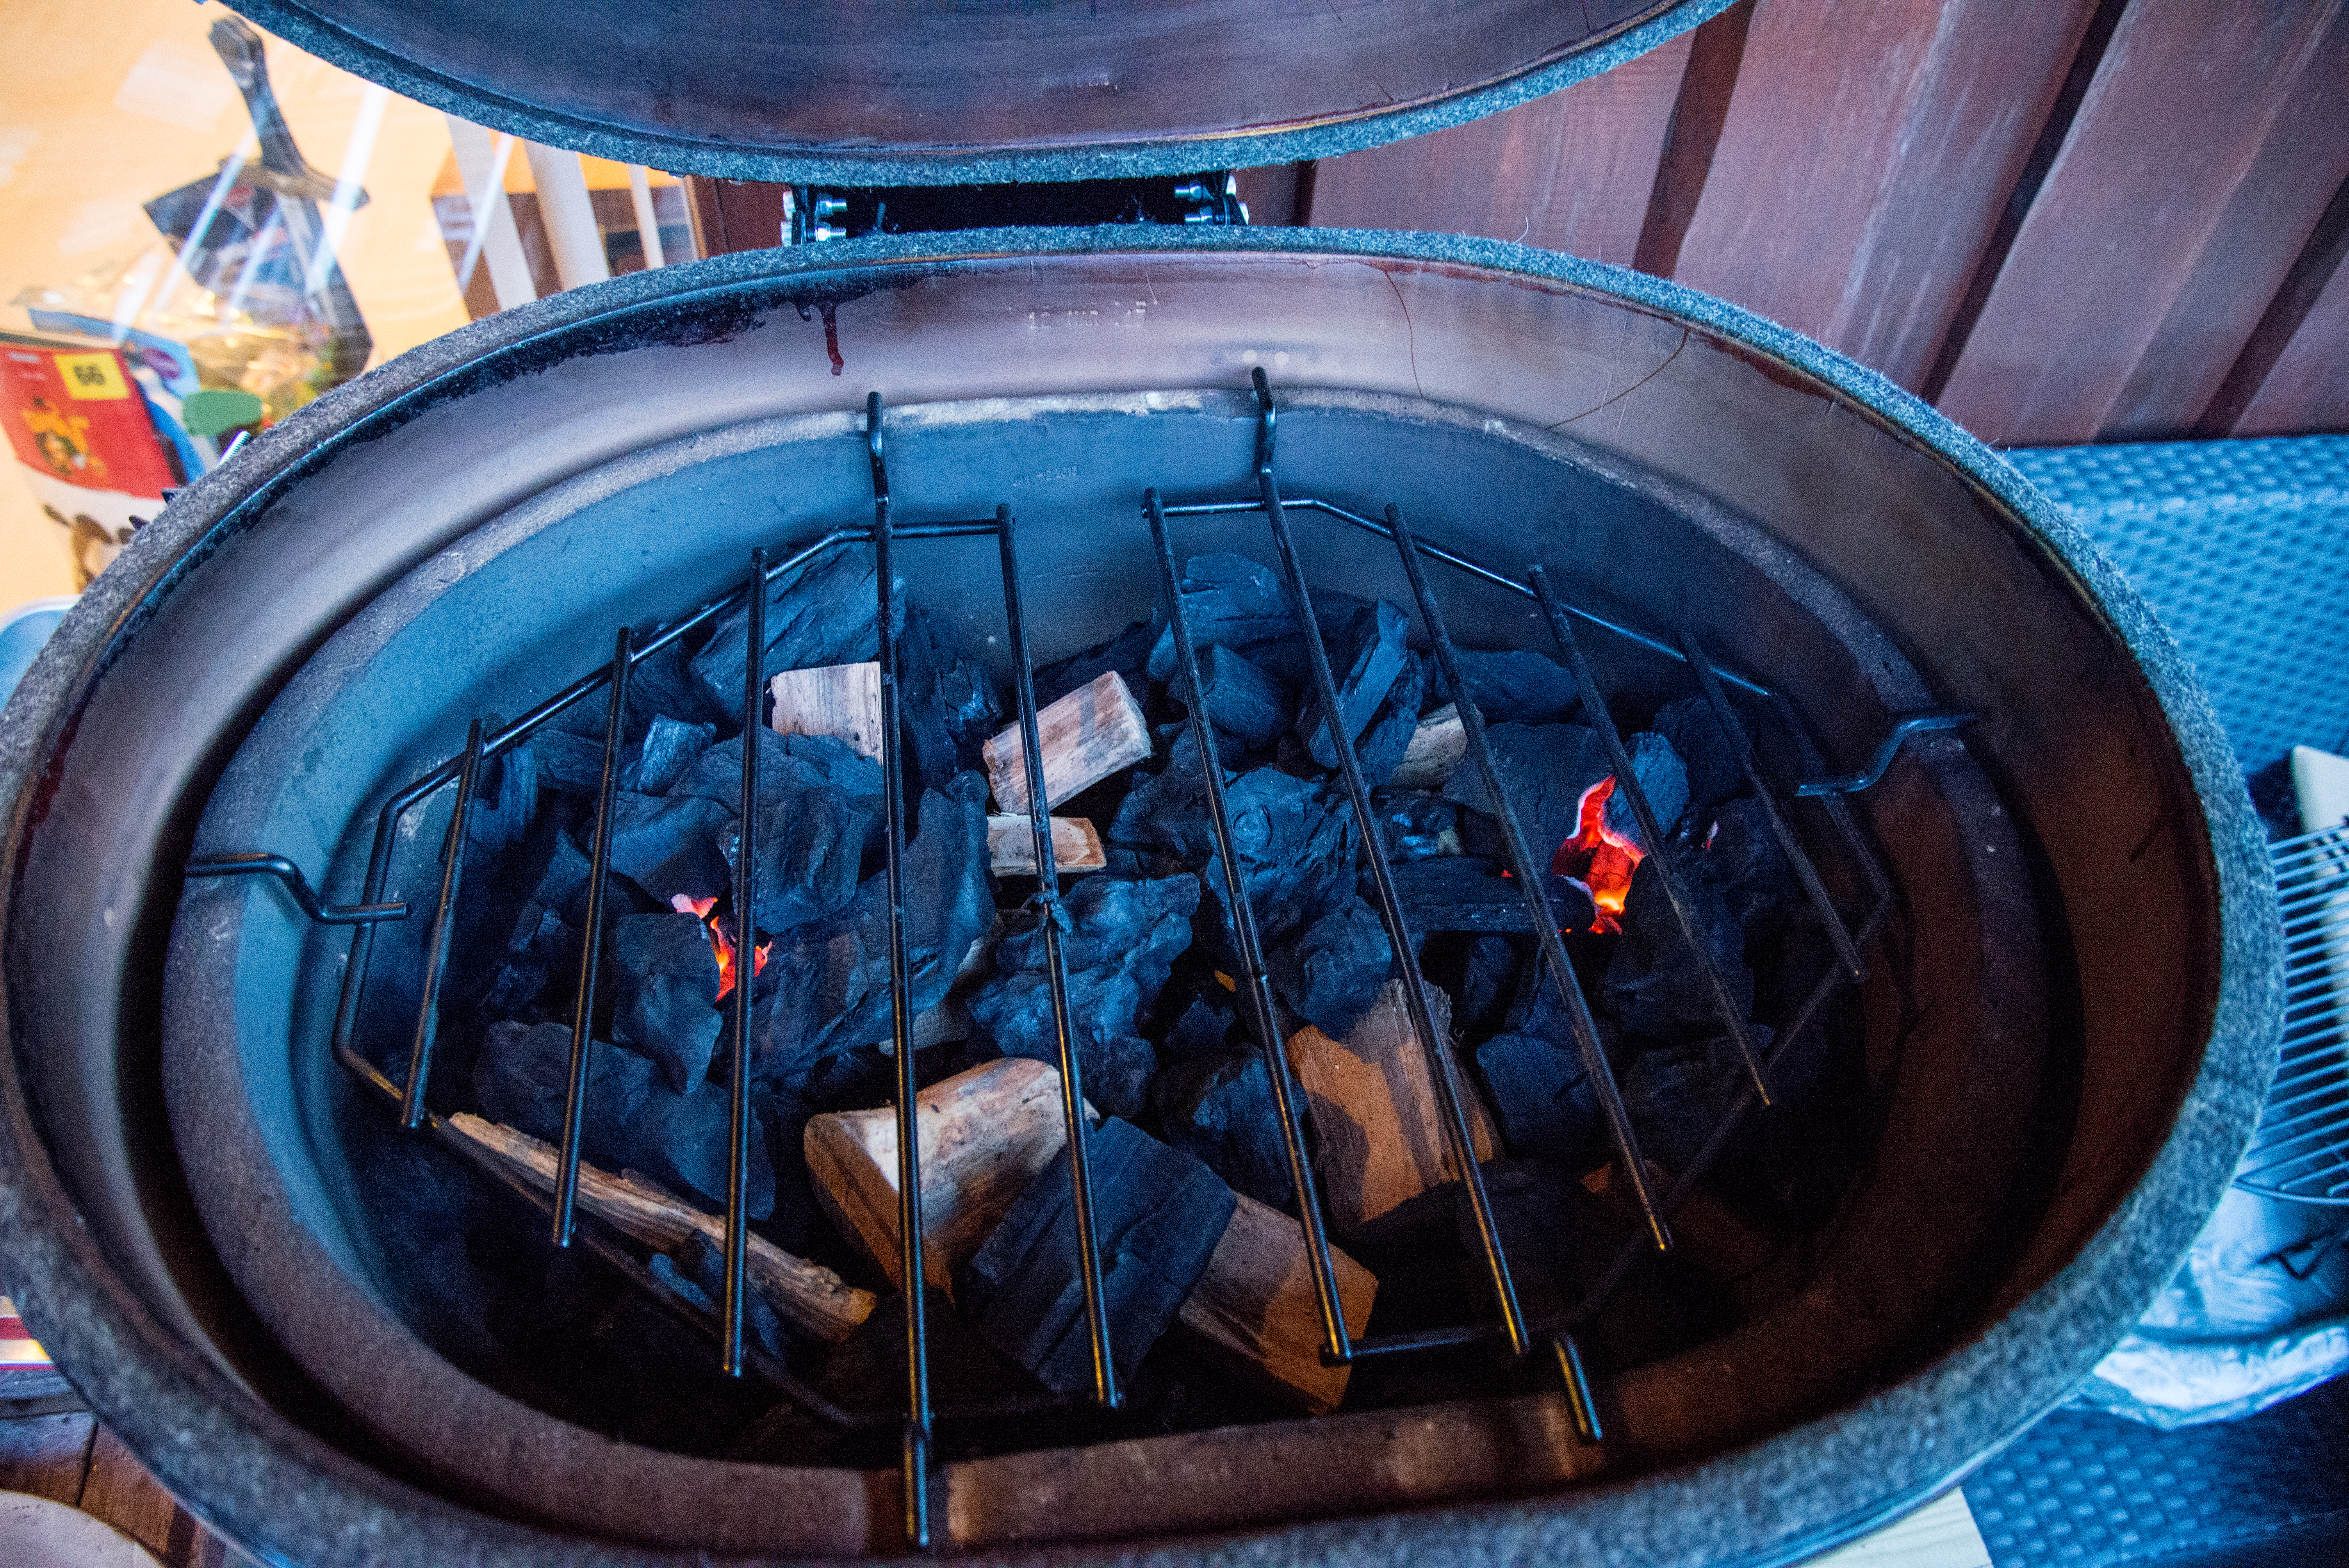
  • Sett opp grillen eller røykeren din for indirekte grilling og prøv å stabilisere en temperatur (målt på risten) på ca. 100 grader celsius.
  • Jeg liker å skylle filetene i kaldt vann og så tørke dem med kjøkkenpapir. Du kan legge dem i saltlake noen timer også, men jeg synes ikke det er nødvendig med den metoden vi skal bruke for tilberedning her.
  • Krydre filetene. Jeg bruker kun salt og pepper på disse, men du kan bruke din favoritt-rub også for litt mer krydret smak.
  • Når filetene er klare, rull eller brett dem på langs og form dem til en ball som er så uniform/rund som mulig. Dette sammen med den lave temperaturen i røykefasen vil hjelpe oss til å dem jevnest mulig ferdig, og dermed få ett ekstremt saftig sluttresultat. Legg en stripe bacon rundt “kyllingballen” (eller to striper på kryss om du er i festhumør), og bruk en cocktailpinne til å holde alt sammen.
  • Kyllingen er nå klar til å tilberedes, og bør legges i kjølen om ikke alt er klart til røyking enda.

Hvordan du griller dette (120-150 min):

  • Sett kyllingballene pent på en ren rist på den kalde siden av grillen/røykeren din. Hiv inn litt eple- eller kirsebær-flis om du ønsker det, på min nye Primo Oval XL har jeg ikke behov for dette, fordi jeg får nok røyksmak fra selve grillkullet. På en vanlig kulrgrill er litt flis å anbefale. Vær uansett forsiktig med mengden røykflis, det er lett å overrøyke fjærkre, og det smaker ikke noe særlig godt..
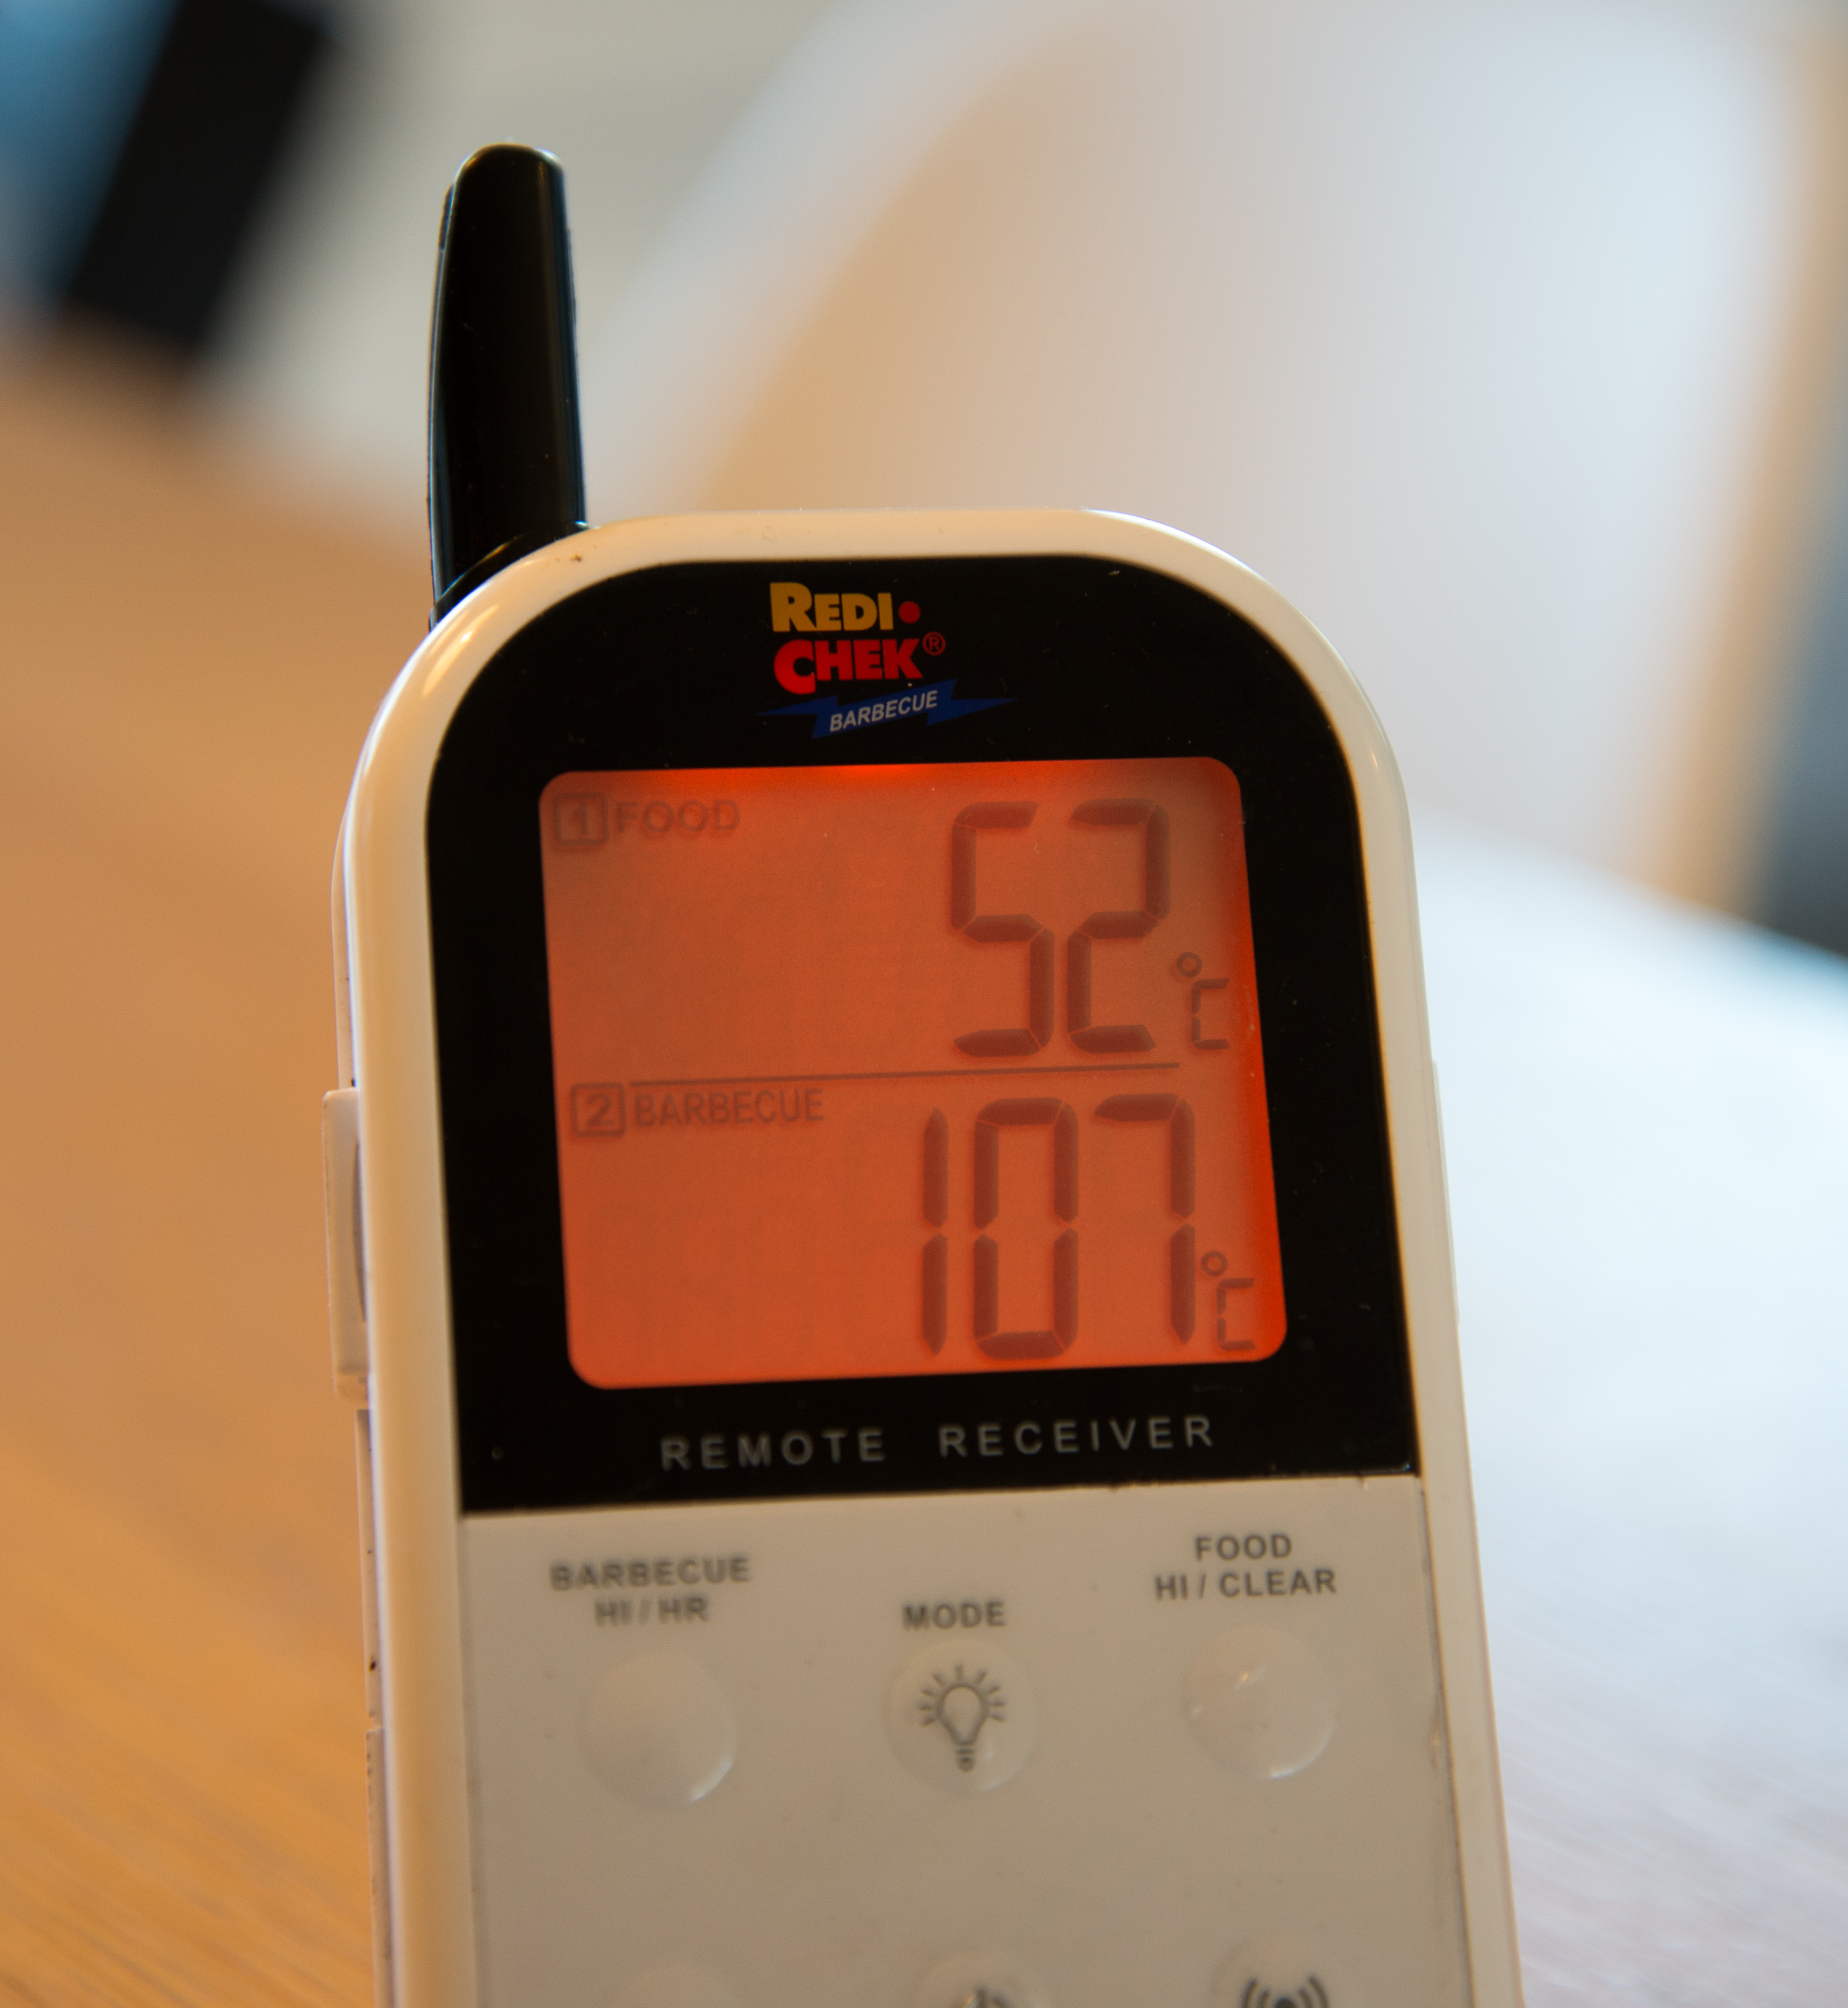
  • Putt en termometer-sensor i den største kyllingballen, og hold ett øye med temperaturen mens du røyker filetene. Med en temperatur på 100C på grillristen, pleier det å ta cirka 90 minutter å komme til ønsket temperatur, som er rundt 65C (ikke trygg temperatur for konsumering, men husk, vi er ikke ferdige enda!)
  • Når filetene har nådd 65C, ta dem av grillen, og få temperaturen opp litt i grillkammeret. Varm en rist på kullsiden av grillen, for nå skal vi brune filetene litt.
  • Når risten er passe varm, bruner du kyllingballene pent på alle sider. Dette bringer vanligvis temperaturen i filetene opp til rundt 70C.
  • Chicken safe temp reached and resting commencingNår bruningen er ferdig, flytter du filetene til den kalde siden av grillen igjen, som nå bør holde rundt 150C. Pensle dem med ett strøk BBQ saus eller to. Pass på at du ikke går over 160C her, for da kan du svi sukkeret i BBQ sausen, noe som lager dårlig smak.
  • La filetene glaseres for 5-10 minutter. På dette tidspunktet pleier jeg å sjekke hver av filetene med ett termometer (jeg bruker ThermaPen), for å se om de har nådd sikker temperatur for å spises, som bør være minimum 70 grader. Jeg pleier å gå ett par grader over, for sikkerhets skyld.
  • Winner winner. Chicken dinner.Når filetene har nådd korrekt temperatur, ta dem av grillen og la dem hvile 5-10 minutter. Server og nyt den søte, røykfylte smaken av den saftigste, deiligste kyllingfileten du noengang har spist!
Advertisement

Equipment – First impressions of my new Primo Oval XL

DSC_1642About a week ago, the Norwegian company Gastronaut gave me a good offer on a Primo Oval XL grill (this happened sort of by chance via my BBQviking Instagram account, btw!). I had been researching kamado style grills and other types of smokers for a long time already, thinking about upgrading from my two standard Weber kettles. I long considered Weber’s WSM, some insulated smokers like the Chubby from Backwoods Smoker, and other alternatives.

The more I researched and thought about it, the more a kamado style grill/smoker looked like the best alternative for me. It would allow me to get a better grill for hot and fast type cooking (especially for Norwegian winter conditions) and a smoker at the same time. Best of both worlds. The Oval shape of the Primo appealed to me, and seemed to give me the most cooking space for my buck -. Which is important, because I often cook for 8+

That one time the inside of a kamado was clean and bright. This can't last

That one time the inside of a kamado was clean and bright. This can’t last

people.  I had been eyeing the Big Green Egg too of course, but they seemed way overpriced, especially here in Norway

Last Monday, the magic happened – I could pick up my new Primo Oval XL from the dealer. It barely fit in my boxy, boring people mover, and it was heavy! Had to call a friend to help me come over and put it on a makeshift table/stand I had built for it! I opted for the model with no stand, because I have some plans for a simple outdoor kitchen/bench this spring on my deck anyway. More on that later!

I have had 4 cooks on the thing this week. A couple normal grilling sessions with direct and indirect cooking, and one long, low and slow cook last Saturday, with two big pork butts and some Norwegian beef ribs – aka “bibringe”. Two pork butts and four pieces of Norwegian bibringe on the smoker

So, what are the biggest differences between the Primo and my two Weber Performer grills? Let me give you a list of things I noticed using the Primo this first week:

  • First off – you don’t use a chimney starter on the primo. It only takes lump charcoal, no briquettes, and I have been using alcohol based tablets to fire it up. The old paper towel drenched in vegetable oil trick works well too. Never use starting fluid in a ceramic grill, says all the manufacturers.
  • The charcoal capacity of the thing is huge, and it seems to work best when it’s filled up – even if I’m doing a short cook. Once I’m done I just close the vents, and out the flame goes, leaving a ton of charcoal for next cook. Quite simple really.
  • The Primo Oval XL takes A LOT of charcoal in the fire boxIt was very easy getting used to the vents and managing temperature – but then I have practiced A LOT on the Weber kettles doing this. Having a remote two-probe type thermometer seems almost a necessity on this type of grill. I use the Maverick ET-732.
  • For me so far, it takes a bit longer to get the Primo up to temp then it takes on my standard kettles. This kind of makes sense, due to the sheer mass of the Primo. 90 kg or about 200 pounds of ceramic needs to get heated up. When adding the deflector plates, that adds more weight too. Also I think the different lighting technique makes it take a while longer
  • Once it’s up to temp however, it stays there very nicely. Patience is important, the amount of mass introduces a delay in temperature changes, so oversteering it could become an issue if you’re not patient enough. Monitoring temperature from my easy chair all thanks to the lovely Maverick ET-732
  • Smoke management is also quite different. Especially doing low and slow with the two deflector plates installed, I have no easy way of adding smoke during the cook. This means chunks spread out in the coal pile are a lot better than the chips I’m using on my standard kettles. If you’re grilling without deflector plates, direct/indirect for instance, adding chips is of course very easy
  • With a grill like this that is very airtight, it seems to keep the moisture content in the meat on slow cooks a lot higher. Holding my hand above the chimney (not recommended on hot cooks btw!) I can feel the moisture coming out of the thing. I have never noticed this on my standard kettles.
  • The ceramic makes it a lot less susceptible than the standard kettles to changes in weather. On those things I would notice if the sun came out, or if the wind direction changed, and had to adjust accordingly. Because of the huge mass, the Primo seems unaffected. Can’t wait to try it out in real winter conditions next winter!
  • The low and slow cook I did this weekend was quicker than my experiences with the Weber kettles, even though I had the same grate/dome temperature range as I normally have. I think this could be attributed to several things, but the higher mouisture content inside seems a likely contributor, as well as being able to keep the lid on for a lot longer than I do on the kettles. Running at a range mostly between 130-150 degrees C (265-320F) this weekend, one of the 12 pound pork butts I had was done after only 8 hours.
  • This stuff burns very steady and long in the Primo!

    This stuff burns very steady and long in the Primo!

    Another big thing with Primo – it burns really clean. I filled up the chamber with coal for the above cook, and cooked for about 12 hours total, closed the vents – and more than 1/3 of the charcoal (Wicked Good Weekend Warrior type) I put in was still there the next day. That’s pretty impressive. Scraping the ashes out of it there was not a whole lot of those either.

  • I learned something else too on one of these first cooks. Make sure the two deflector plates make contact in the middle, even a small gap here will burn your food where the gap is!
  • Lastly, the beef ribs I made on the Primo this weekend came out WAY better than my 7-8 previous attempts at those on standard kettles. More testing will be needed but it seems attributable to the grill that I would nail it on the first try when I have had so many tries before. Don’t get me wrong, they’ve been good before too, but nothing like what came out of this thing in terms of tenderness+juicyness.

All in all, I am very pleased with my newest grill so far. The only downside I see is that it takes a little while to get it up to temp, but I will be working on testing different methods and ways, some of that could be my lack of experience with kamado style grills too.

Full disclosure: I got a good price on this grill+accessories to have it appear on my blog at times in photos etc (which it would’ve without the discount too, to be honest). But then I figured it would be fun to write some about my experiences with it too as I know a lot of people are looking at kamado style cookers these days.

Quick and easy summer food- Mussels on the grill!

Delicious fruits of the sea taste even better straight from the grill.

Delicious fruits of the sea taste even better straight from the grill.

Don’t have a lot of time, so thinking about skipping the appetizer? Don’t do that, just get yourself a net of fresh mussels and grill’em up. Here’s how:

This is so easy, and it’s perfect for those times when you’ve set up for direct cooking the main course. How about some mussel and tenderloin surf and turf? Or, you could serve the mussels as a starter with some homemade buns and chipotle mayo. Me and my wife made them for dinner, with a side salad with some fresh spinach and chickpeas. Delicious.

Total time: 10 minutes

Skill level: Beginner
Grilling method: Direct
Grill temperature: High!

You’re going to need:

  • Fresh, live mussels
  • Whatever you want on the side

How you do it:

  • Set up your grill for direct cooking, and wait until it’s all nice and evenly hot
  • Throw the mussels on the direct heat! No prep, no seasonings, no smoke chips. They make their own smoky, salty flavor, and to me it’s just perfect.
  • As the mussels open up, take them off the grill and put them in a bowl. The ones that don’t open up a lot, or at all, need to be discarded, or you could get sick
  • Enjoy!

BBQ Gallery – III

Gallery

This gallery contains 18 photos.

Here it is! The third installment in my popular BBQ Gallery series. Enjoy!

Bacon-wrapped tenderloin and grilled vegetables

Grilled, Bacon Wrapped Tenderloin with Zucchini and Tomatoes

There’s some real nice South American tenderloin to be had at my local store here in Oslo this year, thanks to the Rema 1000 chain of food stores. This meat is of much better quality than what you normally can get here in Oslo for a decent price. So I plan to take advantage of that this summer. So, I went and bought myself a piece of tenderloin, cut it into some nice large steaks and gave it a quick sear on the grill. This is what chef/author Steven Raichlen likes to refer to as “millionaire grilling”. You’re really buying yourself success, because you have to be an idiot not to get tenderloin right on the grill, all it takes is quick sear, to serve this meat done anywhere over medium rare would be a crime to bovines everywhere.

Time: 60 minutes total
Skill level: Easy
Grilling method: Direct
Grill temperature: About 250 degrees centigrade, or more  (480F)
Equipment: Hickory wood chips for smoke

Serve with:
Ember-roasted yams
Grilled zucchini and vine tomatoes

You’ll need to get hold of:
A piece of tenderloin, two pounds should easily serve 4
A squash
4-6 Vine tomatoes
Some strips of quality bacon
Some hickory wood chips for a quick smoke
Some yams, 1 for each person eating
Weber’s thin, double-pronged skewers, or some wooden skewers

How you do it:

  • Have a hot grill waiting, for this I use a two-zone setup
  • Chuck your yams on the coals as described here, and turn them every 10-15 minutes or so
  • While the yams are cooking, cut your tenderloin into nice tall steaks, wrap them in

    Griled tenderloin with Zucchini and Tomatoes


    good bacon, and put a skewer through the whole thing to keep the bacon in place during cooking
  • If you want your steaks rare, keep them in the fridge until grilling, if you want them medium-rare, you can take them out of the fridge 1-2 hours in advance
  • Slice tomatoes in half and zucchini in thick slices and skewer them. I use Weber’s double-pronged thing skewers for this, they’re great. If you don’t have those, use two wooden skewers soaked in water
  • Season the vegetables with salt, pepper and marjoram, and brush them lightly with canola or rapeseed oil. When they’re seared leave them in the indirect/resting area of the grill
  • Let your grate heat up until it gets that white-gray colour, so you can get a good sear
  • Season the steaks (I use salt and pepper only for this one), and sear the steaks about 2 minutes, then turn them 45 degrees to get nice grill marks, another 2 minutes, flip, and repeat
  • Take the steaks off the grill to a plate (not the one you kept raw meat on), and let them rest under foil for 10 minutes while the vegetables finish
  • Plate everything, and serve. I just slice my yams in two and serve them on a separate plate to not get yam coal on my food, with a herb butter

Techniques : Grill setups for direct, indirect and rotisserie grilling

So, I get some questions on how I do different things on the grill, among other things how to keep a steady low temperature for low and slow BBQ on the standard Weber kettle. I have made the attached drawings to help me explain this better. Feel free to print and use this diagram as a reference, but don’t steal it and use it on your own webpage without asking me first, it took me some work to make it. Take a look at the diagram first, and below I will explain the different setups and what I use them for.

Grill setups for direct, indirect and rotisserie grilling

Okay, let’s start top left:

    • Indirect, two-sides: I use this when making roasts and other large pieces of meat. It’s good for a medium-low temperature, but can also go up to medium-high, just make the fire mounds on both sides bigger. I use this type of setup for instance for Whole, Smokegrilled Trout
    • Indirect/direct 50/50: This is perhaps my most used setup. It can go from medium to high heat, and it’s very versatile. You can grill indirect sides on the right side and have heat for searing meat and other thing on the left side. You have large safety/resting zone too, if you have larger piece of meat you want to sear first and then finish indirectly. I use this type of setup for instance in my Smokegrilled Mackerel recipe
    • Indirect/direct pile: This can be a good setup if you need a quick sear on something and then need to rest it a while after. I can see that it would be useful for thick t-bone steaks, for instance. You can also start with this for searing a roast or similar large piece, and then rake it out to both sides after for a long indirect cook.
    • Ring of fire: Haven’t experimented much with this one either. I can tell you I put it in there mostly for the name. I guess it could be good for indirectly grilling a very large piece of meat, it would give you a more even heat than some of the other options
    • Indirect, one-sided (low and slow!): I use this method for two things. Firstly,I use it when doing beef short ribs and pulled pork, in 12-16 hour sessions. I will then use a very minimal amount of briquettes, all on one side, 12-20 briquettes at a time, depending on the weather outside, and I use a large steel drip pan filled with about 4 litres (a gallon) of water in the middle of the grill. The purpose of the water is primarily to store heat and help me keep the temperature stable, but it also makes for a moist environment inside the grill. Adjust temperature using the bottom vent only, always leave top vent open. The second thing I use this for is rotisserie grilling chickens, ducks and other things. I will then use charcoal normally, and much more of it. No problem getting to 200-250 degrees centigrade (390-480F) with one big pile up against the side wall
    • Direct, all: I’ve only used this setup for one thing, but for that it’s very useful. We were having a big party, and I used the kettle for making a ton of chicken wings (only the small, outer wing part). For that, it was ingenious. A thin layer of coals over meant I could do 30-40 wings at a time on the grill as they needed no indirect grilling, only a good sear. Very efficient for making lots of sliders too I would imagine
    • Direct/indirect, two-zone fire: This is really a lot like the 50/50 setup, just with a smaller safety zone. Use when you need more sear space and less resting area.
    • Direct/indirect, three-zone fire: This is the most complicated setup. On the left 1/3rd of the grill there is a thick layer of coals for very high heat, the middle third has a thinner layer, and then there’s a safety zone to the right for resting. It’s just another option that might suit you depending what combination of food you’re grilling.

Yeah, that was a lot wasn’t it? I primarily use only 2-3 of these regularly, but it’s always good to know your options. Some common things to remember; always put a drip tray under your meat/fish when grilling indirect, you don’t want all the fat to drip and stick to the bottom part of your kettle. Another important point, when you set up, try to keep your coals away from the handles when you can. It will just be easier if you need to move the grill around during cooking if the handle sides don’t get too hot.

Ember-roasted yams

Yams that have been roasted directly on the embers. Tasty!

This is maybe my all-time favorite side dish. It goes well with all meats, it’s healthier than potatoes, and it tastes fantastic. It really couldn’t be easier than putting something right on the coals and leaving it there. The burning of the outside gives the inside a lovely smokey flavor. Best trick ever!
Time: 45-60 minutes total
Skill level: Easy
Grilling method: On the embers
Grill temperature: Doesn’t really matter as long as the coals are white-hot

You’ll need to get hold of:
Yams
(Optional) Butter, garlic, herbs for a herb butter

Yams that have been roasted directly on the embers. Yes I have moved them to the grate for the photo. Don’t do that before they’re finished.

How you do it:

  • No washing or prep needed, because you’re burning the outside to a crisp anyway
  • Just chuck your yams directly on the white-hot coals, turn them every 10-15 minutes until they have a nice, ashy, burnt finish on all sides
  • Prick them with a knife to check they’re nice and soft all the way through
  • Slice in two with a sharp knife, make a garlic or herb butter, mash it up a bit with a fork, and eat!