Ember-roasted yams

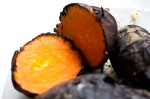
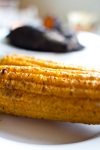
Yams that have been roasted directly on the embers. Tasty!

This is maybe my all-time favorite side dish. It goes well with all meats, it’s healthier than potatoes, and it tastes fantastic. It really couldn’t be easier than putting something right on the coals and leaving it there. The burning of the outside gives the inside a lovely smokey flavor. Best trick ever!
Time: 45-60 minutes total
Skill level: Easy
Grilling method: On the embers
Grill temperature: Doesn’t really matter as long as the coals are white-hot

You’ll need to get hold of:
Yams
(Optional) Butter, garlic, herbs for a herb butter

Yams that have been roasted directly on the embers. Yes I have moved them to the grate for the photo. Don’t do that before they’re finished.

How you do it:

  • No washing or prep needed, because you’re burning the outside to a crisp anyway
  • Just chuck your yams directly on the white-hot coals, turn them every 10-15 minutes until they have a nice, ashy, burnt finish on all sides
  • Prick them with a knife to check they’re nice and soft all the way through
  • Slice in two with a sharp knife, make a garlic or herb butter, mash it up a bit with a fork, and eat!

Spicy Fennel Ketchup aka Ketchup for grownups

Homemade spicy fennel ketchup

I like experimenting with making ketchups. The regular Heinz ketchup is of course aclassic that will live forever, but sometimes it’s good to have a ketchup with more taste to it, especially for spicy sausages and on burgers. In this one, a spicy fennel taste is what I’m going for. This recipe makes about 2 jars of delicious homemade ketchup.

Time: 60 minutes
Skill Level: Easy

You’re going to need:
8 smoked, roasted chillies
2 cans of chopped tomatoes (If you live in a part of the world with GREAT tomatoes, you can use fresh ones instead. Lucky you!)
0,5 cup tomato paste
2 tbsp rapeseed oil
6 tbsp apple cider vinegar
1 cup of brown sugar (I use the sticky kind)
1 tbsp worcestershire sauce
2 tbsp freshly ground fennel seed
1 tsp marjoram
1/2 tsp ground cloves
1 tbsp ground pepper
1 tbsp ground cumin
1 tbsp maldon salt
2 tbsp ground chili flakes

Fennel seeds

Put your smoked and roasted chillies with rapeseed oil in a blender, and blend to a fine paste. Combine with everything else in a saucepan, and bring slowly to a boil. Let it simmer for 45 minutes or until desired consistency is reached. Blend in batches until desired smoothness is achieved. Let it cool to room temperature before putting in containers and storing in the fridge. Sterilize your equipment and jars, seal them properly, and this kind of sauce will stay good for many months in your fridge.

Quick tip: String’em up!

Here’s a great tip for smoking or roasting small pieces of vegetables or any other small things. Get some steel string from your local hardware store, and just string them up, like so. This worked great when smoking a bunch of chillies for my homemade ketchup.

Chillies stringed up on steel string

Rocket Fuelled Bull BBQ Sauce

I make my own BBQ sauces. It’s fun, it’s a lot cheaper than buying them (at least here in Norway), and it means you can tailor the sauce to your particular tastes. I think it’s good to make as much as possible of my food from the ground up, because then I know what’s in it. Call me paranoid, but I don’t always trust the food industry to make the healthiest choices on my behalf… Also, it’s not a very difficult thing to cook. This is a sweet, tangy sauce with quite the kick to it. Which is just what I like for any BBQ beef dish.

Chillies stringed up on steel string and smoking on the BBQ

Time: 60 minutes
Skill Level: Easy

You’re going to need:
1/2 yellow onion
8 whole fresh chillies (I use some medium to mild ones)
1 tbsp rapeseed oil
1 cup apple cider vinegar
2 tbsp Dijon mustard
1/2 cup Worcestershire Sauce
2 tbsp freshly squeezed lemon juice
0,5 cups of good bourbon
1 tbsp ground cumin
2 tbsp paprika powder (preferably the Spanish, spicy variety)
2 tbsp freshly ground pepper
1,5 cups of brown sugar
2 tbsp of liquid smoke (not necessary if you smoke the onion and chillies)

Ideally, I like to smoke and roast the chillies and onion on the grill beforehand, I normally do this while BBQing something else. If you don’t have time for that, just deseed chillies, chop onion, saute in the rapeseed oil, and then put in a blender to make a smooth paste. Combine the paste and the rest of all the ingredients in a saucepan. Whisk once in a while and let it simmer for 30-45 minutes until desired consistency is achieved. Let it cool to room temperature before putting in containers and storing in the fridge. Sterilize your equipment and jars, seal them properly, and this kind of sauce will stay good for many months in your fridge.

The finished sauce. I still draw at a kindergarten level, I know. Thanks.

BBQ Gallery – I

Just some pictures from today’s BBQ-related cooking here at BBQviking’s house…

Whole, smokegrilled trout

There’s nothing that spells summer to me like grilling a whole salmon or trout. Grilling it whole also makes it juicier and more forgiving in terms of temperature. One small note on this, I see a lot of people “grilling” whole fish completely wrapped in aluminium foil. Now I don’t mean to be a BBQ snob, but I am, so here goes. When you do that, you’re basically steaming the fish, not grilling it. There’s also no way for smoke and other flavours of the grill to get into the fish. So, you might as well go inside and steam it in your kitchen, much easier. There.

Now that’s out of the way, let’s look at a good way of getting that delicious smokegrilled flavour on a big piece of whole fish. Trout or salmon can be used here, that’s up to you.

Total time: 2-3 hours
Skill level: Easy/intermediate
Grilling method: Indirect, two-zoned (some coals on each side, none in the middle)
Grill temperature: About 175 degrees centigrade (350F)

You’re going to need:
A medium-large whole trout (or salmon)
2 lemons
Some butter
Fresh dill
A clove of garlic
Salt and pepper
Oak wood chips (alternatively alder or fruit wood)
(Optional) A long fish basket for large fish
If no fish basket, some cardboard and heavy-duty aluminium foil

Serving suggestions:
Mustard-dill sauce
New potatoes (boiled or baked on the grill)
Butter-steamed spring cabbage
Grilled spring onions

How you do it:

  • Get the grill started as instructed above
  • Clean the fish if it hasn’t been done for you. Remove the head, tail, use kitchen shears to cut off any fins. Rinse it off in ice-cold water and dry with paper towels
  • Cut some diagonal slashes on both side of the fish, quite deep. We do this to allow the smoke and flavours to penetrate the meat properly when grilling.
  • Put thinly sliced lemon and some dill sprigs in each slash
  • Season the inside of the fish with salt and pepper, put some more lemon slices and dill sprigs in there too
  • Make a herb butter by melting a cup of butter, then chucking in a minced garlic clove and a handful or two of chopped dill. I also put some pepper in there, but that’s optional
  • If you  have a fish basket, good. If not,cut out two pieces of cardboard slightly larger than your fish. Wrap them in two layers of heavy-duty aluminium foil
  • Brush one of your new cardboard “planks” with butter
  • Brush the fish on both sides with herb butter and put it in your fish basket or on your cardboard plank
  • Put some water-soaked smoke wood chips on the coals. I like to get a good smoke level started before I put on meat or fish, because raw meat seems to take up smoke flavour more readily. This goes for all meats. Always get the smoke going good first, then put the food in.
  • Once the smoke gets going, put the fish in the middle of the grill, on its plank/basket
  • Baste the fish with herb butter every ten minutes
  • When the fish has been on the grill for 30-40 minutes, depending on size and temperature, it’s time to flip it. If you have a fish basket, that’s easy. If you have cardboard planks, butter up the second plank, and use your grilling gloves to flip the fish over on plank #2. It can be a bit tricky, so be careful
  • Grill the fish another 30-40 minutes until ready. If you have a Thermapen or other instant-read thermometer, look for the fish to be 55 degrees centigrade (about 130F). If you don’t have an instant read thermometer, make a small incision on the widest section of the fish near the backbone. The meat should be pale pink and opaque, not translucent and pink/orange.
  • Serve!

Simple mustard-dill sauce

Here in Scandinavia, trout and salmon is very often served with dill and mustard. So why not make a sauce of it? This goes well with any salmon or trout dish.

Time: 10 minutes
Skill level: Easy

You’re going to need:
1.5 cups of mayo (homemade is best of course!)
0.75 cup sour cream
0.5 cup of dijon mustard, honey mustard or sweet Swedish mustard, depending on what your preference is
Handful of chopped fresh dill
Some lemon juice
Salt and pepper

How you do it:

  • Put everything except lemon juice and salt and pepper in a bowl and whisk it all together
  • Season with lemon juice, salt and pepper
  • Serve!

Did I mention this sauce goes well with for instance smokegrilled trout

Butter-steamed spring cabbage

Spring cabbage is one of the tastiest vegetables out there. It goes well with grilled fish, especially salmon or trout. In Norway we call it summer cabbage, because that’s when you can get it here. This is the easiest and best way to prepare it if you ask me, and it’s super fast.

Time: 10 minutes
Skill level: Easy
Grilling method: Steaming over direct heat
Grill temperature: Doesn’t really matter

You’re going to need:
A head of spring cabbage
4 tablespoons of butter
Salt and pepper
Aluminium foil

How you do it:

  • Slice the cabbage in longish strips about a half-inch wide
  • Make a big sheet of aluminium foil, put 4 tablespoons of butter on it
  • Put the cabbage on top of the butter
  • Season with salt and pepper
  • Make it into a bowl shape, that you half close on top
  • Put it over direct heat on the grill, and let the butter steam the cabbage for about 5-10 minutes depending on heat level
  • Serve!

This goes well with for instance a whole grilled trout or smokegrilled mackerel

Equipment – Basic setup

I live in Norway, where the selection of grills and accessories is pretty scarce, so I have some good ideas and experiences when it comes to how to make do with a pretty simple setup. Here’s my opinion on what you need to get started doing real low & slow BBQ.

In Norway, gas grills are increasingly popular. I have one myself, but it’s been standing unused on the patio since I got my Weber kettle last year. I don’t recommend anyone to get a gas grill if they plan to do some slow-cooking at low temperatures. If you must have a gas grill for this, get an expensive one that has a separate burner for a smoke chamber. On the regular gas grills, making smoke usually means keeping at least one burner on half or full, which means it will get too hot in the grill for doing things like pork butt.

There’s actually a lot of stuff you can do with this very basic type of grill. As long as you have a lid, some valves for temperature adjustment and some creativity and DIY skills, you can do all sorts of fun stuff with a basic Weber kettle or similar. And they’re fairly cheap, last long, and have spare parts readily available. All in all the best place to start. It can do direct grilling, indirect grilling. I even make 12-16 hour pork butts and beef ribs on my Weber kettle with nothing but briquettes and smoke wood, and a steel pan from Ikea full of water to help me keep a steady temperature. Using this setup I’ve managed to keep a steady temp of 100-110 degrees centigrade (210-230F) for many, many hours. It takes some effort, practice and skill, but that’s also what makes the food taste extra good when it’s done, isn’t it?

Based on my experience, here are my recommendations for a good, cheap and versatile setup that will bring you years of BBQ joy:

  • Standard Weber kettle, 22-inch (best size for availability of various accessories)
  • Chimney starter (never use chemical firestarters again, I use newspaper soaked in some food oil, and it will light charcoal and briquettes easily)
  • Water source or fire extinguisher (safety is always important)
  • Some good grilling gloves, I use leather builder’s gloves from the local hardware store, they’re cheap so I just replace them when they get too dirty
  • A good pair of long tongs and a nice flat spatula with some surface area
  • A cheap, basic digital, probe thermometer for larger cuts of meat like pork butt or roasts
  • A hinged fish basket, preferrably one with a detachable handle so you can leave it on the kettle and still get the lid on properly. If you don’t find one with a detachable handle, get out your dremel or some other metal-cutting power tool, and make one without a handle. You can use your tongs and/or gloves to flip it.

Which smoke wood to use when?

I get a lot of questions on which smoke wood to use for which foods. Here are some suggestions. Like anything else to do with BBQ, this is no exact science. And remember, what kind of rub or sauce you use and the spice level should also be part of the consideration.

Pork – Pork works well with lots of different smoke woods. I like to use almost anything for pork. I use mesquite a lot for pork, and I use apple (real good for ribs), cherry and pecan wood. Sometimes when I really want smoke taste on pork butts, I use hickory as well. Want something light? Try Alder.

Beef – Beef=hickory in my mind. Sometimes I’ll mix 50/50 hickory and mesquite. Oak is also good, the Jack Daniel’s oak wood chips are great for steaks for instance.

Poultry – For poultry I would normally pick something lighter, like cherry or apple. Sometimes I use mesquite, it can be real tasty with duck, which has a stronger, more gamey taste than chickens

Fish – Oak or alder is very popular for smoking fish. Here in Norway the juniper bush is sometimes used, but I find the taste too owerpowering.

Vegetables – Since they’re not the stars of the show, my vegetables usually get smoked with whatever I’m using for the meat. Hickory and mesquite is great for baked potatoes and ears of corn (prick the potatoes with a fork first).

Lastly, experiment. A lot. It’s the only way to learn what’s best for your tastes. There’s also other ways to make smoke, rosemary smoke from fresh rosemary for lamb for instance. Vines of various kinds can also be used. But don’t use fresh wood, it needs to be dried. Nothing green should go on the grill as smoke wood.