This gallery contains 18 photos.
Here it is! The third installment in my popular BBQ Gallery series. Enjoy!
This gallery contains 18 photos.
Here it is! The third installment in my popular BBQ Gallery series. Enjoy!
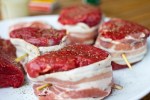
 ABT’s are great as an appetizer or side dish if you’re cooking something low & slow and have some extra space on your grill. Why they’re called atomic bomb turds, I do not know. It’s kind of a weird name for a food item, but there ya go. That’s what it means. You can use all kinds of stuff to put into the chillies, but in this recipe I went for a simple filling with some vegetables, cream cheese and hot chorizo sausage. I also used some good pancetta instead of the traditional bacon to wrap them, but you can use either, and it will be fantastically good. The union of hot chillies, bacon and tons of apple smoke is a tasty one indeed. Just make sure you make enough of them, I’d say 3-4 per person as a minimum for a starter.
Prep time: 10-15 minutes
Time on the grill: 90-120 minutes
Grilling method: Indirect, with smoke
Grilling temperature: 130 Centigrade lid temp (266F)
What you need:
5 Largish peppers of your choosing. I found some large chillies at my local market
10 strips of good bacon or pancetta
Some cream cheese, I used Philadelphia with much success
A little bit of hot chorizo sausage
A little yellow onion
One green pepper
Two mushrooms
Some toothpicks (not the ones with mint flavor…)
How you do it:


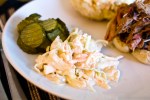
Homemade coleslaw and pulled pork sandwich. Ah yeh…
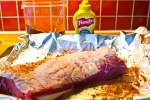
Pork butt is a fantastic piece of meat. It’s quite a tough cut, with a lot of collagen (and fat), which makes it perfect for low and slow BBQ. If you can’t get pork butt where you live, you can try a boned-out ham. However, the best cut for this is the pork butt which is essentially the upper part of the pork shoulder ham cut, here in Norway not a regular cut, but when I tell my butcher I want the upper part of the ham, basically the shoulder-blade, with all the meat and fat on it, I get the right thing. Keeping the bone in there helps the meat become more juicy because the bones contains gelatine, so I always get bone-in when I can. Gives you that lip-smacking goodness feel you get from good ribs. Guess that’s why gelatine is used a lot for making candy, huh… That goes for any meat – bone-in = better. Talk to your butcher and show him some charts and google images, and I’m sure you’ll get it right. Now, to get a historical fact out of the way, they’re not called butts because they’re from the butt (because they’re from the shoulder end of the pig really..), but because this cut was stored in special barrels known as butts, in the olden days. Read more on Wikipedia.

Pork butts ready for pullin’
This is not a good place to start for the novice griller, but if you think you’ve got indirect grilling and temperature control on your kettle or smoker down, you should try it. Pork butt is some of the best eats to ever come out of a BBQ, and it’s a cheap cut, which enables you to feed tons of people for little money. Time for a party, in other words. Let’s get to it.
Serving suggestion:
I serve this dish in a very traditional manner, on homemade hamburger buns, with a creamy coleslaw, a basic Eastern North Carolina style vinegar sauce, and some pickled gherkins. Don’t make it complicated, the meat should be the star.
Total time: 10-14 hours (prep starts the day before)
Skill level: Intermediate/Expert
Grilling method: Indirect, one-zone (some coals on one side, large drip pan filled with water under the meat)
Grill temperature: About 120-140 degrees centigrade (250-285F)
You’re going to need:

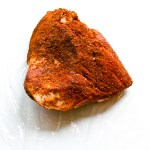
Pork butt, rubbed and ready to go
How you do it, the night before:
How you do it, cooking day:

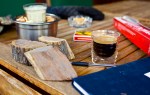
Taking notes is paramount if you want to learn
Fire up your chimney starter with 20 briquettes (this is based on my 22.5″ Weber kettle, and your mileage and/or method may vary on other grills and smokers)

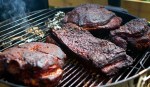
Two butts, a ham and a cow chest
should be easily pullable by hand. Here’s a neat tip, get some thin carpenter’s gloves from your local hardware store, and buy some vinyl gloves one size up at the supermarket. Put the builder’s gloves on first and then the vinyl gloves (duh!), and you will be able to pull two pork butts without burning off your fingers (I’ve tried, not fun). If it’s not easy to pull by hand, you took it off the grill prematurely. Don’t worry, use a knife to assist you, it should still taste great. If it does not taste great, you have failed, and consequently brought shame upon your house and family.

Turbocharged can beans!
Beans are real good eats. They’re also a side that work well with almost any BBQ meal. Great on burgers, hot dogs, with steak, pork, chicken… Yup, definitely an essential BBQ side dish. Now, you can make your beans from the ground up, using dried beans and making your own chilli or BBQ sauce from the ground up, that’s phenomenal. But sometimes there’s just not enough time for doing it that way. That’s when I turn to my turbocharged canned beans recipe. It’s basically about going to the store and buying some quality canned beans, and then doctoring them with some fresh chillies and some other stuff, to get to a great side dish with little time and effort. This should recipe is for 4-8 people, depending on what else is being served. Here’s how I do it.
Time: 45-60 minutes + some baking time (optional)
Skill level:Easy
You’re going to need:
3 cans of quality beans (I use S&W’s Texas Ranch Recipe Barbecue beans)
4-8 Fresh chillies of your choosing
4 Scallions, spring onions or even some leeks
A good chunk of quality bacon (about 250 grams or 0.5 pounds)
A couple tbsp of your favorite BBQ rub (optional)
1/2 cup of your favorite BBQ sauce (optional)
How you do it:

S&W Barbecue Beans cans
sure not to burn the chillies and scallions

Eastern North Carolina style vinegar sauce
This is one of the most basic, old-school barbecue sauces you can make. It comes from the Eastern parts of North Carolina, where they’re pretty adamant about how this sauce should be meady. Those Western North Carolinians put some ketchup in theirs, which I hear is a big no-no in the eastern parts. It is specifically designed with pulled pork in mind, and that’s really the only thing I use it for. Just whisk these ingredients together until the sugar is dissolved in the vinegar. You can always give it a quick boil if you want to, I normally don’t:
This should be enough for two pork butts. Just mix it in with the meat before serving. Enjoy!

Homemade coleslaw. Ah yeh…
Coleslaw is my go-to side for a lot of BBQ and grilling meals. It’s a must for me with any BBQ sandwich, like pulled pork, hamburgers, sliders, steak sandwiches, brisket… It also works great with hot dog, as a side for BBQ chicken, fish…. Coleslaw – what can’t it do! So here’s my standard recipe, and I will get back to you with some more exciting varieties once you’ve got this nailed. Not into the creamy coleslaw? Lactose intolerent? Check out my spicy slaw instead!
Time: 20-30 minutes
Skill level:Easy
You’re going to need:
1/2 head of a large cabbage (or 1 whole medium cabbage)
2 carrots
1 cup of mayo (I suggest the homemade one found here, without the Chipotle)
1/2 cup of sour cream
4-6 tbsp vinegar (I use clear, no-taste vinegar for this)
2-3 tbsp sugar
1 clove of minced garlic (optional)
1 tsp Cayenne Pepper
Salt/pepper
How you do it:
Last week’s escapades in grilling and BBQ here at BBQ Viking’s house


Sliders, homemade chipotle mayo, shakey taters and caramelized onions
These sliders are tasty, juicy (even when you have to cook them through), and are real popular with the kids. They’re easy to make too, and require only a quick sear on the grill. You could always buy some slider buns, but I really suggets making your own, see my recipe for buns here. I realize some of you are going to find it extremely controversial that I put bread in my sliders. Don’t knock it till you’ve tried it. I mean it. If you grind your own beef, and have a hot enough grill to get a sear on these while they’re still pink in the middle, you can skip the bread. But I often have to use storebought ground beef, and that means it has to be cooked all the way through. That’s where the bread comes in, by soaking up the juices and fat, it makes these sliders a real, juicy treat.
Time: 60 minutes total
Skill level: Easy
Grilling method: Direct
Grill temperature: About 250 degrees centigrade (480F)
Equipment: Hickory wood chips for smoke
Serve with:
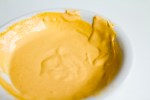
Homemade chipotle mayo
Homemade slider buns
Shakey potatoes (recipe to come)

You’ll need to get hold of:
Ground beef, about 500 grams makes about 15 sliders
2 slices of bread
4 tbsp of your favorite, preferrable homemade, BBQ sauce. I used Rocket Fuelled Bull BBQ Sauce
Some meltable cheese (I prefer orange cheddar)
2 large yellow onions
2 tbsp butter
How you do it:
So, I get some questions on how I do different things on the grill, among other things how to keep a steady low temperature for low and slow BBQ on the standard Weber kettle. I have made the attached drawings to help me explain this better. Feel free to print and use this diagram as a reference, but don’t steal it and use it on your own webpage without asking me first, it took me some work to make it. Take a look at the diagram first, and below I will explain the different setups and what I use them for.

Grill setups for direct, indirect and rotisserie grilling
Okay, let’s start top left:
Yeah, that was a lot wasn’t it? I primarily use only 2-3 of these regularly, but it’s always good to know your options. Some common things to remember; always put a drip tray under your meat/fish when grilling indirect, you don’t want all the fat to drip and stick to the bottom part of your kettle. Another important point, when you set up, try to keep your coals away from the handles when you can. It will just be easier if you need to move the grill around during cooking if the handle sides don’t get too hot.

Slider buns just out of the oven
Inspired by Norwegian-American BBQ chef Craig Whitson and his book “Far
lukter svidd” (Daddy smells burnt), I started making my own hot dog, burger and slider buns many years ago. This is basically his recipe, and it’s pretty straight-forward. I also use these for any BBQ-based sandwiches (pulled pork for instance).
Be warned though – once you try homemade buns like these, you’re NEVER going back to storebought… I usually make a large batch (2-3x this recipe), put them straight in the freezer, they only need 1-2 hours to defrost and taste great. This recipe makes about 60 slider buns, 25 large hot dog buns or 19 burger buns.
Time: 2-3 hours (mostly waiting though)
Skill Level: Easy
You’re going to need:
1 kilo (2.2 pounds) wheat flour (about 1,4 liters worth if you don’t have a scale)
2 packets of dry yeast
2 tsp salt
2 tbsp sugar
2,5 dl (8,5 oz) milk
2,5 dl (8,5 oz) water
2 eggs
4 tbsp rapeseed or similar oil
1 egg white and 2 tbsp milk for brushing
Sesame seeds (or other seeds if you prefer) for sprinkling
How you do it:
Put all the dry ingredients in your mixer bowl and whisk them a little. Put milk and water in a microwaveable (!) container, and heat to about body temp (for once I avoided the temp conversion from C to F!). Whisk the two eggs and rapeseed oil thoroughly into the milk/water mixture. Pour water mixture slowly into dry stuff while mixing continuously at low speed. Once the dough starts forming, crank it up, and knead it for 5-10 minutes by machine. You’re all set, leave the dough covered to rise for about 45-60 minutes until it has doubled in size.
Now, knead the dough a little by hand to get the large air bubbles out and the small ones evenly distributed. Once that’s done, you can start making your buns. I like to use a scale, so I can get them all the same size. I use 30 grams for slider buns, 75 for large hot dog buns, and 100 grams for large burger buns.
Turn your oven to 200 degrees centigrade (390F). Roll out the buns, and then squeeze them pretty flat, about 1,5cm (half inch) thick. They rise quite a lot. Cover the trays of buns with kitchen towels, and leave to rise to double size, again about 45 minutes. Brush them with egg wash (milk+egg white), then sprinkle seeds on top. Bake them in the middle of the oven for 10-14 minutes until golden brown. Transfer to wire rack immediately to let them cool, before eating them or bagging and freezing them. Enjoy!
